In Part One we looked at the first three tools of color correction or grading: Saturation, Levels and Curves.
In this part we’ll look at the next three tools: Masks, Mixers and Tracking.
Masks
In What is Color Correction I mentioned four types of problems, of which the second was isolating pixels when color information wasn’t enough. Using masks is one way to tackle this problem.
Masks (or Mattes or Power Windows) are just outlines over elements in an image that need to be isolated:
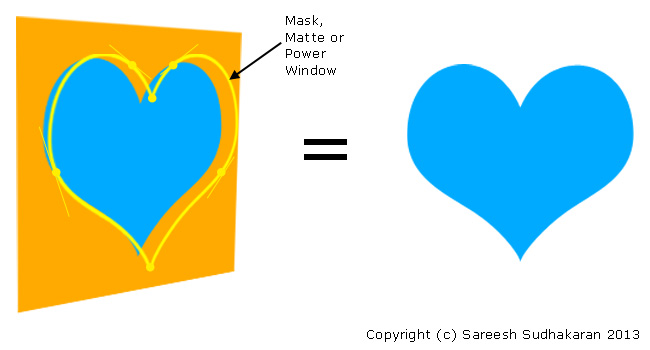
Masks can be hand-drawn, extrapolated by selecting only a few points, or selected using keying techniques (more about keying later). What you basically want is isolate that portion of the image you need to manipulate, while leaving all other pixels intact.
You basically either draw around the object or region you want to isolate. You can use control points to create splines that extrapolate curves perfectly, as shown in the heart-example above. When the region isn’t geometric, you can use keying methods to isolate it. When both splines and keying doesn’t work, you have to hand-draw the mask or matte. This technique is called rotoscoping.
The true power of masks is: You can use more than one to isolate each element individually. In effect, you can repaint an entire image this way. However, the more masks you apply, the more processing power you need.
It’s also tedious. Adding accurate masks isn’t easy, even for the best algorithms. Most of the time you’ll find yourself manually fine-tuning masks, and it is time-consuming (and boring). Always try to avoid using masks if you can. It’s far easier to get your colors right on set than having to deal with masks later in post.
Tracking
Tracking is having the software follow a selected pixel (or group of pixels) around as they move frame by frame. As you might have guessed, tracking is a video-centric tool:
![]()
When creating and using masks, you don’t always get still subjects. Usually you’re masking human beings or other objects in motion. You can’t (actually you can, but you don’t want to) draw masks frame by frame. Even if you want to, you might want to confine it to a few frames.
To save the hassle of resizing masks or mattes frame by frame, intelligent tracking algorithms exist that will move the mask as best as it can. Obviously, it never gets it right with complicated motion, changes of shape and light, and with motion blur or out-of-focus areas.
There are other forms of advanced tracking used in visual effects, but for the purposes of this article, we are confining ourselves to track masks and nothing else. There are two broad classes of tracking software: 2D-based and 3D-based. For color applications, 2D is more relevant, since you’re rarely dealing with 3D objects or 3D space here.
Mixers
Okay, a ‘mixer’ isn’t really a specific tool. Traditionally, color correction or grading is divided into two broad groups:
- Primary Color Correction – changing RGB values directly, like with saturation, curves and levels
- Secondary Color Correction – changing selected pixel values only, like with keying, masks, etc.
If curves is just levels with better intuitive control, then using color mixers or wheels is the art of dealing with color as color; and not as a ‘science’. This is what a color mixer or wheel looks like:
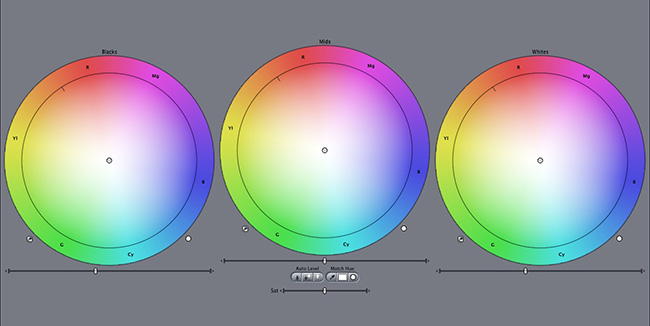
What is shown is a three-way color corrector, the most popular color mixer. You have a birds-eye view of color, so to speak, and if you know color theory, you can apply it directly and intuitively here.
You can move your cursor anywhere within the wheel. You get three traditional categories of wheels:
- Shadows – this only changes colors in the shadow or darker regions.
- Highlights – this only changes colors in the highlights or lighter regions.
- Mid-tones or Mids – this changes colors not in either extreme.
The challenge for a good color mixer tool is to keep these three areas separate. It’s not an easy job to study an image and decide which parts are highlights or shadows – if you’re a computer algorithm.
I only look to mixers or wheel tools when levels and curves aren’t enough. Even then, this tool doesn’t work for me. That is not to say it isn’t good, many professionals use it for spectacular results. It’s just another tool, and you don’t have to stick to any one. Pick the one that you instinctively like, but try all of them!
Additional Note: Keying
Keying is an important element in post-production (and some live) workflows. Some powerful color correction applications include great keying tools that isolate certain colors for specific changes.
I have not dealt with keying simply because keying by itself isn’t a color correction tool. It’s only an isolation tool, and one of the methods of isolation is by color (green screen, blue screen, etc.). There are other methods, which involves masks, luma, and so on. It’s a broader category that falls within the realm of visual effects rather than color correction or grading.
By now you have a solid grasp of the fundamentals of the basic color correction and color grading tools, why it is used, and how to use them. These tools are usually present in all major color correction applications, and up to a point they’re all solid.
The differences in applications stem from better and accurate masking, tracking, keying, format support and workflows. Most color correction applications need good graphics cards, and the link between the GPU and the monitor becomes a critical part of your workflow. There was a time when expensive computer components meant vendors provided ‘turn-key’ solutions – both hardware and software.
Today, computers are cheap, even powerful ones, and it is no longer necessary to purchase a turn-key solution unless you have extremely demanding and high-paying customers. The advantage is no longer in ‘quality’, but more in terms of support and speed.
One also needs a quality monitor. To know more about how to select a professional video monitor, click here.
Finally, if you’re a newcomer to color correction and grading, I highly recommend selecting an application (the best you can afford), and downloading its manual. If you follow the manual step by step, you will lay a solid foundation that will serve you well for years to come. After you’ve read and practiced the entire manual, you can look at third-party tutorials.