
This guide will show you:
- What a follow focus system is.
- Why you need a follow focus system.
- What they are made of, and how to get the best out of them.
- What to look out for in a good follow focus system.
- Suggestions for different budgets and camera systems.

The art of focusing
The 50mm lens is one of the most affordable and versatile options in any manufacturer’s lineup. It’s no surprise that nearly every lens-buying guide calls it the indispensable “nifty fifty.”
Here are the ones from Canon, the 50mm f/1.8, 50mm f/1.4 and the 50mm f/1.2L:

The f/1.4 and the f/1.2L have similar sized focusing rings, while the f/1.8 has a thin flimsy ring also known popularly as ‘a joke’. The position of the focus ring on all three lenses are different.
The major draw for all these lenses is their aperture. Assuming a Super 35mm sensor focusing at 10 feet;
- At f/1.8, the depth of field (DOF) is about 0.8 feet (10 inches).
- At f/1.4 the DOF range is 0.65 feet (8 inches)
- At f/1.2 the DOF range is 0.54 (6.5 inches).
If you’re shooting video at these f-stops, and your subject leans, turns or moves, you’ll have a hell of a time using the focus rings on these lenses to follow them around.
On a large display or cinema screen, any focusing error is impossible to hide. And, with the razor-sharp detail of 4K and 8K, even the slightest misstep becomes glaringly obvious.
So, what’s the point of a cool 50mm f/1.8 lens if you can’t practically shoot at f/1.8?
One way to get around this problem is by using autofocus. However, filmmaking is not always about documentation. You might want to rack focus (move focus from one point to another) at any time for various reasons.
In the professional cinema world, you need a system that is consistent enough to deliver at every turn. The bigger the production, the greater the cost of each take. How many takes can you screw up before you are kicked out?
Traditional high-end lenses made for film cameras and digital cinema cameras have good focusing rings. Older manual still camera lenses also have good focusing rings (there was a time when auto focus didn’t exist and people still got the shot). Newer lenses, especially the smaller semi-plastic variety, have the worst focusing rings seen in history. Then there’s focus-by-wire systems, which makes it impossible.
If you are okay using autofocus, fine. If you are zen master who can pull focus day in and day out on a 50mm f/1.8 plastic lens at f/1.8, respect.
For everyone else, there’s the follow focus system.
What is a follow focus system?
A follow focus system is a set of parts that work together to help you focus more precisely and conveniently for film or video work.
It’s primary function is to allow focus to follow the action.
The technique of following the action using a follow focus system is called racking focus or pulling focus. The person who is an expert at pulling focus is traditionally called the focus puller.
The question you need to ask yourself is: How much more of a benefit does this contraption provide over the focus ring?
The rest of this guide will attempt to help you find the answer to this question.
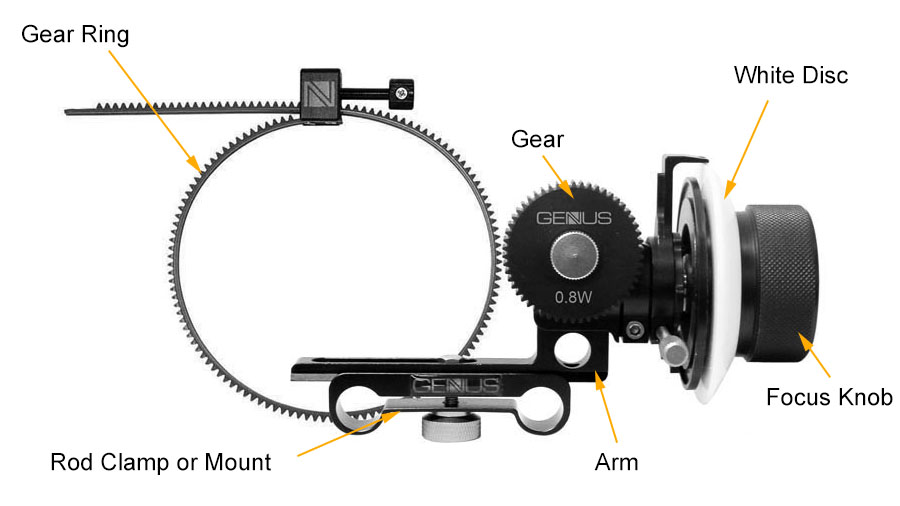
The parts of a follow focus system
The most visible part of the follow focus system is the white disc and knob that people turn. However, there’s a whole lot more going on.
Here are the generic and typical parts of any follow focus system:
- Rail clamp or mount or bracket
- Arm
- Gear
- Lens gear ring
- Focus knob
- White disc
Rail or rod clamp (or mount or bracket)
This is the part that attaches to the two rods that form the base of any camera rig. This means, you will need two rods and a base plate to set up this system correctly. Right here you have three options:
- 15 mm rods, spaced 60 mm apart, center to center.
- 15 mm rods, spaced 100 mm apart, center to center.
- 19 mm rods, spaced 104 mm apart, center to center.
Some systems come with multiple options, but the low cost ones come only in one standard – 15 mm/60 mm spacing. This is the most popular standard nowadays, since cameras have become lighter and smaller.
Knowing the rod system and lenses you are going to use is the first step in deciding which follow focus system is right for your work.
Arm
The arm can either be rigidly attached to the rod clamp or can be flexible. As a rule of thumb, you must aim for the most versatile arm possible, because this will allow you to work with different kinds of lenses and systems.
At the very least, you could look for an arm that moves laterally, so you can push the system outside or inside a bit to accommodate the size of the lens. If possible, you should also get an arm that pivots, for the same reason.
Adding these movements has one disadvantage though, and that is, the arm has more moving parts. This can lead to failure over long periods of abusive use. More on this later.
Gear
The gear attaches to the arm, and is rotated by teeth that connects directly to the focus knob. This is probably the most important part of the entire follow focus system. You can have 1-to-1 gears, which will give you the same ‘throw’ (the degrees that the lens can be rotated) as the focus knob.
Sometimes, you might want a larger throw, which means, for a smaller turn of the focus knob you want a larger turn of the focus ring on the lens. This is useful when you want to turn the focus ring from one extreme to another, but is tough to pull off with just one wrist action.
On the other hand, you might also need a shorter throw, which means, for a smaller turn of the focus ring you’ll need a larger turn of the focus knob. This is useful when your focus marks are spaced finely apart, and you need greater precision and smoothness of focus.
Finally, some systems allow you to flip the gear from left to right, so you can adjust for lenses who have focus rings that turn in the ‘other’ direction. This also helps to adjust the entire system forwards or backwards on the rig in proportion to the lens and camera body.
Each focus puller is different. What one might find perfect another might hate. Add to this the different kinds of shots that demand different throws. Having the option to manipulate the throw of the gear is one of the most important features you need to look out for.
This allows the focus puller to ‘tune the system’ like a musical instrument. Cheaper systems only offer one throw and gear.
Lens gear ring
The gear connects to the gear ring. The gear ring wraps around your lens tightly, exactly on the focus ring. Sometimes, you might work with lenses with focus rings that already have teeth, in which case a gear ring isn’t necessary.
If you work with many kinds of still photography lenses, you’ll find that you need more than one type of gear ring, and this might mean purchasing it separately to suit your lenses.
Needless to say, the pitch of the teeth (distance between each groove) must match with the pitch on the gear, for the smoothest action.
Focus knob
The focus knob is what you turn to focus, just like the focus ring. You normally turn the focus ring on a lens by keeping your arm perpendicular to the camera, and this isn’t a very convenient action for video. The focus knob on the side allows two major benefits:
- You can keep your arm on the side in a more comfortable position.
- The focus puller can pull focus and be out of the camera operator’s way.


On more expensive follow focus systems, you’ll find the knob can be attached to either side, for left-hand or right-hand use. You might also find systems that allow you to change the rotation, both clockwise and anti-clockwise. Some systems also allow you to lock in hard stops, for limited movements.
The focus knob has a fixed orientation marking (usually at 12 o’clock), either a white dot or a physical protrusion, that allows you to mark focus on the white disc.
White disc
This is another critical part of the system. If the material used on the rim is of good quality, you can:
- Write on it,
- Read what you’ve written easily,
- Erase everything leaving no trace,
- Do this a million times and still have a shiny white disc.
What do you write on it? We’ll see in the next section.

Wireless focus motors
Wireless focus motors designed for wireless follow focus attach directly to rods on a camera rig. They connect to the lens via the gear mechanism. A cine lens will already have this in place.
These motors require a stable wireless link, reliable power, and proper integration with the rig’s control systems. The advantages include minimizing camera shake, ensuring consistent focus even during complex shots, and providing greater creative flexibility on set.
Wireless focus controllers
Wireless controllers are dedicated devices that allow remote, precise operation of the focus motors attached to the lens. These controllers typically feature dials, joysticks, or sliders designed for smooth focus pulls and adjustments without the need to physically handle the rig.
They require a robust, low-latency wireless connection and compatibility with the specific motor systems in use to ensure reliable performance. The advantages include enhanced creative control and the flexibility to execute complex focus moves even in challenging shooting environments.
Wireless focus systems are not mandatory, but are the standard nowadays on all film sets.
The above parts form a typical follow focus system. The following parts add a bit of extra functionality:
- Focus Whip – this is a wired remote focus system that attaches to the knob (if it has the connector) and allows the focus puller to be completely out of the operator’s way. It’s very handy if the operator has to move around.
- Speed Crank – sometimes, you want to quickly rack focus across 360supo/sup. This is very hard to do on either focus ring or focus knob. For this reason, you attach a crank to the focus knob for faster turning.
- Additional gears – you can speed up or slow down the throw with additional gear systems.
- Wireless follow focus systems which allow you to control focus remotely. When the camera has to be on a jib or gimbal or Steadicam a lot, it makes sense to have a wireless follow focus system. This is the de facto standard nowadays in film.
In addition to all of the above, you also need two support tools to make all of this work:
- Some kind of measurement device
- Markers
Let’s see how all this ties in together.
How do you use a follow focus system?
The first thing you do is look for the Greek letter Phi (?) on your camera, as shown:

Once you’ve located the ? (phi) mark, you need to measure the distance from this mark to the point of focus, using a measuring device. This could be one of three things:
- For small distances (1-25 feet) – a heavy duty Steel Measuring Tape
with locking mechanism. For tapes less than 15 feet in length, a 1/2″ width is okay. For anything greater, look for 1″ wide tapes.
- For larger distances (10-300 feet) – a Fiberglass Tape Measure
- For large distances or out of reach areas – a Laser or Ultrasonic Rangefinder
If you are following humans, you usually measure from the ? to the eye, as follows:

You turn the focus knob until this distance is indicated on your lens (as shown above – not all lenses have focus distance markings, and some of them are not accurate!). Then, mark this spot (use the orientation marking on the focus knob) on the white disc with an erasable marker.
A Staedtler Marker is great for focus marking. If you can’t find the exact model, search for ‘dry erase marker‘ and use a reputable brand. The eraser is as important as the marker.
If you have more than one focus point, then measure each position and then mark all of them one by one. The convention is to mark them in numbers (1, 2, 3, etc.) in the order of the character’s movement on set. This way, the focus puller can pull focus by looking at the markings, while also having an eye on the monitor (if available). If more than one character is involved, you can try different colored markers.
All said and done, a focus puller’s job is not entirely mechanical. You have to watch the actors and anticipate their movements. Racking focus also means following the actor from one focus mark to the next. The actor might move at two varying speeds in different takes, and you have no choice but to match their movements. This kind of skill only comes with experience.
Having a monitor is definitely a safety net. Ideally, you’d want a monitor that is greater than 10″ for 1080p and 24″ for 4K. Other functions like focus peaking are also welcome.
It goes without saying that the following links in this chain must be accurate:
- The measuring device.
- The camera assistant who measures. You can’t afford to be lazy or distracted.
- The distance markings on the lens.
- The gear mechanism on the follow focus system.
How do you decide if you need a follow focus system?
Ask yourself these questions:
- Are you shooting at large apertures with shallow DOF on a regular basis?
- Is your production devoid of an external monitor with good resolution?
- Is there a lot of movement, either by the talent or by the camera?
- Are you shooting for broadcast or the silver screen?
- Are you shooting 4K and above?
- Are you using cheap semi-plastic lenses with poorly constructed focusing rings?
If the answer is yes to any of the above questions, your production will greatly benefit from a follow focus system.
Does a follow focus system offer more stability than focusing by hand?
Simple two-finger focusing (your hands only) gives two points of contact on the lens.
A follow focus system has four:
- Where the gear contacts the gear ring or focus ring.
- Your two fingers on the focus knob.
- Where the teeth meet the gear.
This doubles the chances of instability. The only way this can be overcome is by using a precise mechanism that is also rugged enough to work smoothly, without error, for years.
By using a well designed, precisely machined follow focus system that does not compromise on its parts, you eliminate the effects of the last two points of contact, and in that case a follow focus system will have only one point of contact.
Take his one step further with a focus whip or wireless follow focus system, and you really only have one point of contact.
So, as long as you’re not using plastic toys, a follow focus system is more stable than focusing by hand.
What to look for in a good follow focus system
Look for these things:
- Geared focusing mechanism for finer focus throw.
- Rigid construction to limit vibration.
- Allows a second person (focus-puller) to pull focus by standing out of the camera operator’s way.
- Clear white disc for erasable markings. If possible, it should be bevelled for better viewing.
- Precise machining with no ‘bumps’ in the movement
Want a cheap follow focus system? You’re better off without one.
I know this is a little hard to swallow. When you don’t have the money you must compromise on cheaper alternatives. The good news is, there are low budget brands available today that have passed the test of time and abuse. Tip: Don’t go by sample videos of systems that work great when new. Make absolutely sure you can find at least three people who have been using the same system for over a year in a professional environment.
Also look at the availability of parts. If something fails, what are the odds of finding a replacement soon? Secondly, many new manufacturers copy the latest designs, and might not have parts for their older models. You need to have a level-headed attitude here. Ask yourself: Is the manufacturer out to make a buck or do they really invest in follow focus design? What are their design principles?
Rule of thumb: Never, ever, settle for a cheap follow focus system that does not guarantee perfection over years of daily use.
The more expensive options are not only built to last but also fit on all kinds of camera and lens systems. A good follow focus system is a worthy investment. Compromise on something else. Here’s a quick comparison video that will help you understand a few of the things we’ve discussed so far:
Follow focus system suggestions for different budgets
These are just general suggestions or guidelines. Don’t take them as recommendations.
Low cost for short films: Tilta Tiltaing Pocket Follow Focus (Amazon, B&H)
At the time of this writing the minimum you should expect to spend on a follow focus system is $100, and these are somewhat risky solutions. You get what you pay for.
For professional low budget work: Tilta FF-T03 (Amazon, B&H)
For professional solo or small crew work: Bright Tangerine Revolvr
With this you get a cine or video kit. It is versatile and can be changed for all sorts of scenarios.
For professional wireless follow focus work: Cmotion systems. We use the Cmotion Mini predominantly, but I can’t see it on their website. Arri has the Hi-5, a high-end alternative.
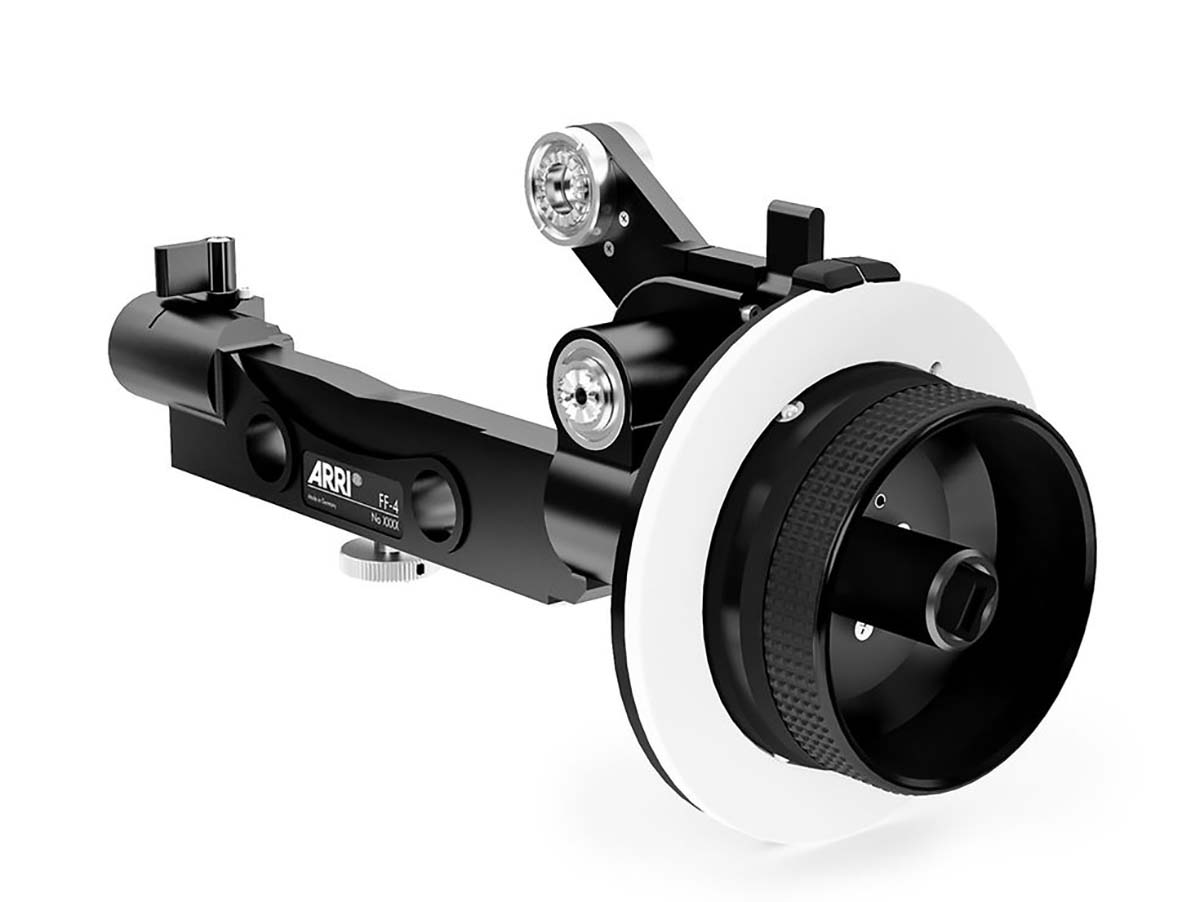
Professional cinema work: Arri FF-5 or Arri FF-4. Here’s a video breakdown:
Without real-world experience it is almost impossible for anyone to understand why the pros use expensive gear. Nobody wants to pay more for something that can be accomplished for less. It’s the little things that newcomers miss. Hunt for them!
If you are committed to years of cinematography, why not invest in a good follow focus system? These are meant to be long term investments, and the good ones will fit most lenses you throw at them. Cheapen out, and your project or career might just be thrown out of focus (bad pun intended!).
Agree with all thse guys who said these are too expensive! I have experienced once a KeyEasyFocus 2017, really good device for its price – $314 and works perfect.
The arm on my follow focus broke in half. What is my best course of action? It is a fotga dp500 2s.
Buy another one.
Image plane indicators (phi symbols) have been on professional camera bodies ever since we started using roll film. Lens distance markings should indicate the distance from the image plane to the object plane. Sheet film cameras have an obvious ground glass image surface that is replaced when the film holder is in place. It has always been critical to be aware of the actual image plane, especially in macro-imaging (close-up photography). Cameras that do not indicate the image plane position are for “snap shots,” not professional image creation. Just a humble comment by an “old school” photo/cinema/digital image maker.
How use DjI follow Focus for X5 with another cameras , is possible just buy the motor and cable?
Well said. This was a great article, but the minute I read the DSLR no phi symbol, I was like “whaaa???”. I may be wrong, but I believe every camera I’ve ever owned (film & DSLR) has had the film plane mark. Of course all of my DSLRs have been Pro or Semi Pro models, so maybe the bodies under like $500 don’t have it. Of course, I doubt many people using a $500 DSLR for video would be looking into a follow focus system that’s half (or as much) as the camera they bought, but maybe that’s just me.
It’s true that you have to spend more money to get a better quality follow focus. But let’s not pretend like these prices are reasonable. Just think about it; a follow focus system is a relatively simple mechanical device. Some more complicated than others but they are simple devices made of materials that really don’t cost that much. Namely metals and plastics. There’s simply no excuse whatsoever for any follow focus system to cost more than $500 and even THAT is pushing it.
The bottom line is that you have to spend the money sometimes but that doesn’t mean you should defend the price. Professional equipment is ridiculously overpriced and I wish people would realize this.
In theory that’s an easy argument. Why do people spend $2K even today for an expensive FF system? The people using it seem to know what they want. I’ve played with an own many cheap FF systems, and they have one thing in common – they suck.
Great Article! Thank you! I hear you on the professional prices. wow they are high and you at this little pile of pieces and go wow! Really!! The thing to remember is that creating a well designed product takes significant design time and testing by expensive engineers. This R & D cost must be covered by the number of units sold and still make a profit. In many cases the number of units sold may not be that high. So a large portion of the cost is the design.
Great article! I would just like to correct: we can find the “phi” symbol on DSLRs, i don’t know if on every DSLR, but i am pretty sure that on Canon ones there is a mark for flange distance.
You’re right, most DSLRs and cameras have the phi symbol nowadays.