
What is the best ISO for cinematography and video? Here’s your answer:

Filming in low light or at night can be tough. The challenge is to capture clear and detailed footage in these conditions.
Some filmmakers like a grainy look to add realism, but most want sharp and clean images. You can always add grain later in post.
Modern cameras make it easier to shoot in low light, and I expect things to get better. Let’s break down the key concepts you need to know about ISO settings and practical tips for low-light cinematography.
What is ISO?
ISO is a camera setting that controls how sensitive your camera’s sensor is to light.
In digital cinematography, ISO adjusts the sensor’s sensitivity so you can shoot in different lighting conditions. A higher ISO means more sensitivity to light, which is helpful in dark environments.
But be careful! Raising the ISO too much can introduce noise or grain into your image.
To know more about ISO, read and watch this:
Native ISO: The Sweet Spot for Your Camera
Every camera has a native ISO or base ISO. This is the ISO setting where your camera performs best, giving you the highest quality image with the least noise.
The native ISO is important because it strikes the perfect balance between light sensitivity and image quality. Camera engineers determine this setting after testing color accuracy, noise levels, and overall image quality.
Knowing your camera’s native ISO helps you get the best shot, especially in low light. It also provides the best dynamic range.
Dynamic range is the camera’s ability to capture details in both bright and dark areas of a scene. The higher the dynamic range, the better your camera can handle tricky lighting.
Understanding Dynamic Range
Dynamic range is crucial in filmmaking. It refers to the range of light levels from the darkest shadows to the brightest highlights that a camera can capture in a single shot.
A high dynamic range means your camera can capture more detail in both the bright and dark parts of an image. This is especially important in low-light conditions where lighting contrasts can be intense.
If your camera has a high dynamic range, it’s better equipped to handle complex lighting situations. Think of scenes like a candlelit dinner or a cityscape at night. You want to capture all the details without losing anything to shadows or overexposure.
A good dynamic range helps maintain the look and feel of your scene.
Adjusting ISO for Real-World Conditions
While the native ISO is a good starting point, you’ll often need to adjust it depending on your shooting conditions. In low light, you might need to raise the ISO to make the camera more sensitive to light. However, the higher you go, the more noise you introduce into the image.
But remember, there’s always a trade-off between noise and exposure. Knowing how to balance these elements is key to getting the best shot.
The Role of Camera Sensors
Your camera’s sensor is the heart of its performance in low light. Larger sensors generally perform better because they can capture more light, which means you don’t have to boost the ISO as much.
Some sensors also use back-illuminated technology (BSI) to increase light absorption, improving low-light performance even further.
Some high-end cameras now offer dual native ISO settings. This means the camera has two optimal ISO levels, one for bright scenes and another for dark ones. For example, you might use ISO 800 for daytime shots and ISO 5000 for nighttime. This feature gives you flexibility without sacrificing image quality.
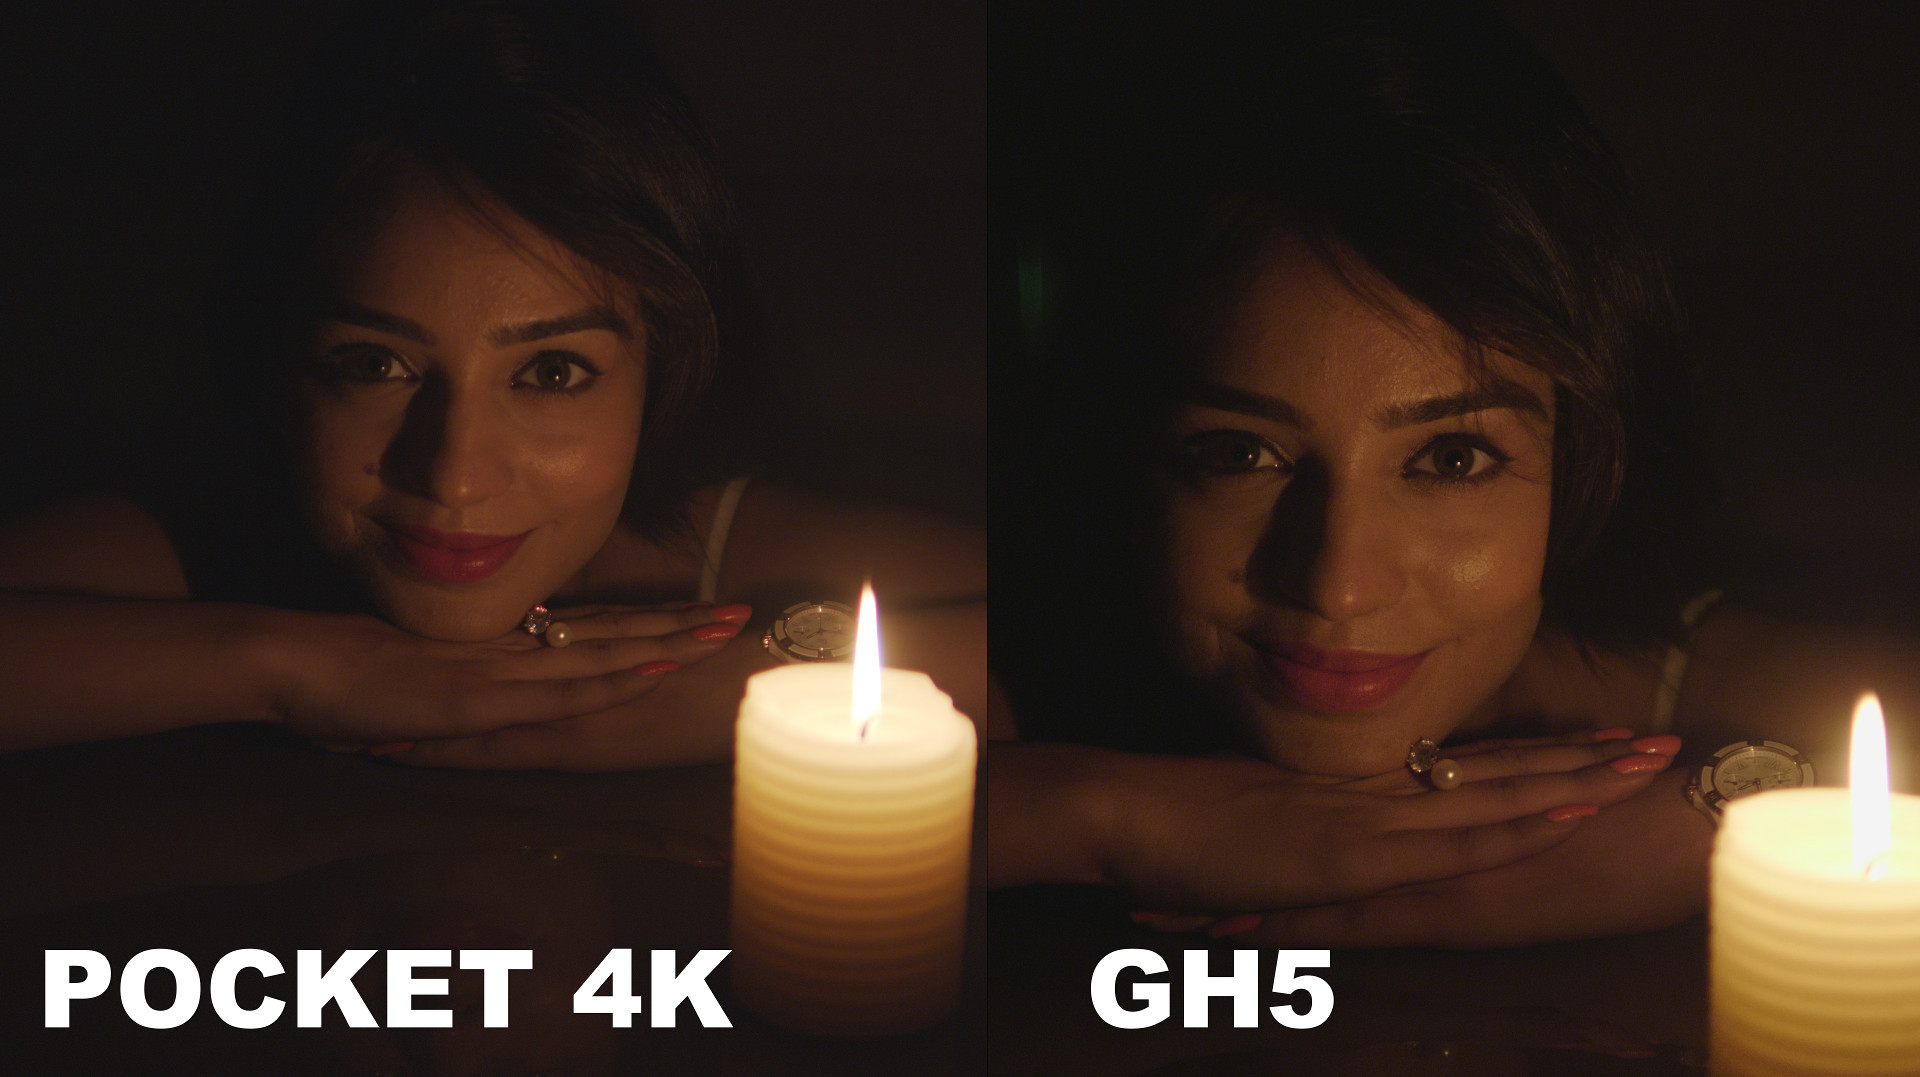
Here’s a comparison between two cameras at the same ISO:
Tips for Shooting in Low Light
1. Test Your ISO Settings
Before you start filming, it’s a good idea to test your camera’s ISO settings.
Shoot the same scene at different ISO levels to see how each one affects noise, color accuracy, and exposure. This testing helps you understand how your camera performs in various lighting conditions.
2. Balance ISO with Exposure
Understanding the “exposure triangle” is crucial. This triangle includes ISO, aperture, and shutter speed. Changing one element affects the others.
For instance, a wider aperture lets in more light, which might allow you to lower the ISO. A slower shutter speed can also help, but it might introduce motion blur. The goal is to find the right balance that works for your specific shot.
Color accuracy can suffer at high ISO settings. Colors might look washed out or unnatural. To avoid this, monitor color shifts during testing and post-production. Tools like waveform monitors and vector scopes can help ensure your colors stay true, even in tricky lighting.
3. Use Post-Production to Your Advantage
Post-production software is your friend when dealing with low-light footage. Use noise reduction tools to clean up any grainy areas. Color grading features can also help correct any shifts caused by high ISO settings.
These tools let you enhance your footage and bring out details that might have been lost during filming.
Bringing It All Together
Understanding ISO settings, knowing how your camera’s sensor works, and using smart filming and post-production techniques will help you master low-light cinematography.
As camera technology keeps getting better, even entry-level gear can produce amazing results. The more you practice and understand these concepts, the better your low-light footage will be.
Theoretically, the best ISO is the base ISO or native ISO. However, in practice, the best ISO is the ISO that will get the job done.
Don’t be afraid to experiment, test and do what’s best for your film!
I hope you found this useful. Let me know what you think in the comments below.