This article will help you:
- Decide whether your movie needs to be in 3D at all.
- Decide whether you and your project is worthy of stereoscopy.
- See the potential pitfalls right at the beginning so you are always in control.
- Know what to do when, how and at what cost.
- Decide the right 3D formats for your project.
All of these issues must be addressed, without a shadow of a doubt, before you commit to a 3D project. No exceptions.
This article is written for the absolute novice venturing into stereoscopy (3D, or S3D) for the first time. If you have never attempted 3D before, don’t do it alone, and don’t assume you can deliver a perfect 3D experience.

Does your movie need to be in 3D?
There are four major distribution categories for video:
- Cinema
- Television
- Computer
- Mobile handheld device
The sad truth is, you can’t make one 3D version for all of them. When the screen size or viewing distance changes, the 3D effect changes. It also changes with viewing technology, the display technology and angle of view.
If you are really serious about 3D, and your primary goal is a theatrical release, be prepared to make compromises for the other distribution methods. What does this tell you?
You have to know exactly how and where your movie is going to play before you can even begin. This is the surest test to know if your movie is worth the effort or not. If you don’t know your distribution strategy, exactly, as surely as you know the meaning of these words, then your movie is not ready for 3D.
You may wish it, you may will it, you may force it, but it will come back to bite you in the end. In 3D, you have to know the end, and work your way backwards. If your movie doesn’t stand a chance of a proper 3D release, then it is a waste of time and money to shoot in 3D – unless these things aren’t important to you.
If your project is for television and you don’t have a written contract for a 3D project, you’ll be taking a big gamble. There is no universal demand for 3D TV, and if your material is great, it will find buyers in its 2D avatar.
If your project is for the internet, you need to know exactly what screen types you’re going to cater to – there’s a world of a difference between an iPad, a 13″ laptop, a 15″ laptop and a 21″ computer display. Then you have the thankless task of picking one as your primary device.
If your project is experimental, and you don’t care much about the economics, logistics, workflow and quality of the end result, then please experiment. A few minutes of 3D is great fun. You will learn a great deal. A 3D project that needs to be delivered to a demanding audience is not an experiment.
How do you know good 3D from bad 3D?
Let’s say you know your movie is going to be in 3D, and know exactly which types of screens it’s going to play in. The next thing you need to do is get your eyes checked.
Don’t get me wrong, you’re going to do a lot of technical wizardry down the line to ‘ensure’ your 3D movie is within ‘acceptable norms’. But then, it’ll just be a technical exercise. Is that why you want your movie to be in 3D, or is it because you feel it will really enhance your story in some way?
Like every other aspect of filmmaking, you also need to use 3D as a story-telling device. To do that, you need to know the difference between good 3D and bad. If your eyes are well calibrated and normal you can confidently look at your work. Otherwise, you’ll never be sure what you’re looking at.
What’s the difference between good 3D and bad 3D? For starters, we use our eyes and the way we see 3D space in the real world. Here are some cues:
- We don’t see the seams between the left and right images, do we?
- We have a consistent 3D perspective of objects in space, don’t we?
- Even though the left eye is never the same as the right eye, our brain fuses the images well enough so we don’t perceive the difference, doesn’t it?
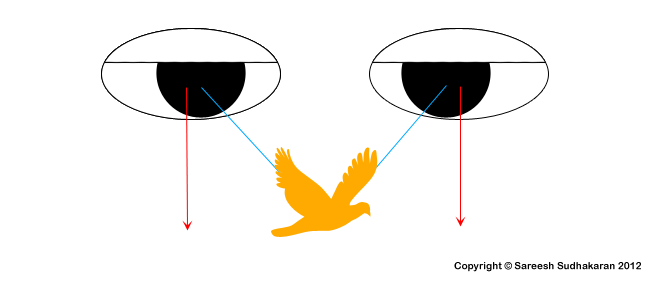
- When a fly sits on our nose, we find the limits of the eye’s ability to converge, don’t we?
- When we look into the horizon far away, we can no longer perceive depth, can we?
- Our eyes are at a fixed distance apart, isn’t it?
This is exactly the feeling we need to recreate with our movies. The depth should show, the effort shouldn’t.
How do we manage this? Simple, by avoiding everything that stands in its way! E.g., if you don’t want to see seams between the left and right images, then ensure they aren’t much different. Put your effort where it’s absolutely necessary.
Once you’re comfortable with 3D in general, you can start looking at 3D imagery. You need to test many formats and systems, conduct many experiments, fail, succeed and try again. You will start to see 3D better, even in the real world. You will be alive to depth.
It’s only when you have reached this stage that you can be sure you’re good enough to project your vision to a demanding audience. They can’t see 3D as well as you, so you need to be one responsible. Don’t blame their eyes or the ‘system’.
When the effort behind the 3D shows, it’s always bad 3D. Sometimes you can get away with bad 2D images, but not bad 3D images. It’s like bad audio – everyone hears bad audio. Bad 3D is painful to watch.
How are you going to judge 3D?
Once you know good 3D from bad, you need a partner who will always be dependable. Sure, you’ll have human partners, and we’ll get to that; but you’ll also need a monitoring device that you can rely on.
Remember, this is not just about technical correctness, but also about art. E.g., if your colors are a bit off, you can always hope to correct it in the grading suite. Bad 3D on set doesn’t give you this luxury. If you want an analogy, think of it as overexposing your image with blown, unrecoverable highlights – or recording poor audio on set. Bad 3D is almost impossible to fix.
What are the tools required to judge good 3D? A good 3D monitor. Is it that simple?
Nope. If you’ve read what I’ve written earlier you might have figured it out. If the size and shape of the screen determines the perception of depth, then how can you monitor on set? Surely you don’t expect a filmmaker to carry around a cinema screen and projection system, do you?
No, you don’t. Sad, but true. An on-set monitor will never show you how it’s going to look like on a cinema screen.
It seems like an insurmountable problem but there’s hope. It’s the difference between looking at a 3.5″ LCD and knowing how it’ll play on the big screen. It’s the difference between recording a voice on set and knowing how it’ll sound on the final soundtrack. It’s the difference between watching a snapshot of action and knowing how it’ll be edited together to form one coherent whole. You’re in the twilight zone, and this is where your skill of knowing good 3D, along with the technology that produces it, will see you through.
Your 3D monitoring system becomes your artistic tool – just like a calibrated 2D monitor, professional headphones, or camera blocking and editing. These are all gateways between the reality of your set to the reality of the finished performance. You must be able to stand at the gate, and see both ways.
How deep is your knowledge of depth?
How do you use depth to tell a story? How do you use it like you use lenses, filters, music, cuts, and so on?
First of all, you must write out what is called a Depth-Script. It’s your shooting script, plus how you’re planning to use depth in each shot.
This exercise will force you to use depth in artistic terms, only when necessary. After all, you don’t need to shove 3D into every scene, just like you won’t plaster a movie with wall to wall music. One hundred plus years of cinema has shown us that 2D is sufficient to cause suspended belief, provided your story is good. Your job is to figure out how you can use 3D to add a visceral experience to that belief, without announcing its existence (like throwing objects at the audience!).
What would you put in a depth-script? You plot exact values or boundaries of the following properties:
- Inter-axial distance
- Convergence, or toe-in
- Stereo window
- Parallax
- Duration of each property
Eventually, you’ll have something that resembles music notation. Without this exercise, you can’t proceed further.
A depth-script with numbers is not very convenient to read, so we have what is called a Depth-Chart:
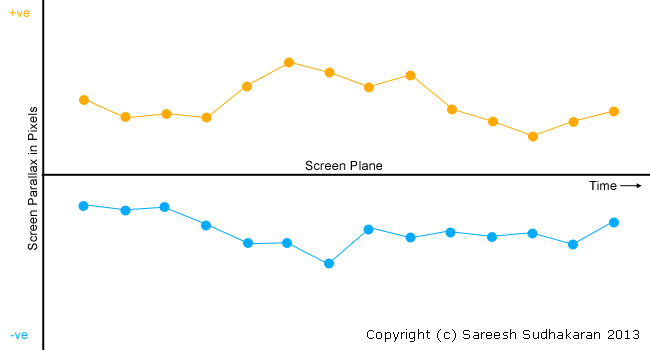
The screen plane is your screen. Anything behind it (positive parallax) is under the line (shown in blue). Anything in front of the screen (negative parallax) is above the line (shown in orange).
Each dot represents an object on screen. It could be an actor, a mountain, a helicopter, a water bubble, anything. You can have as many colored lines as you want, whatever is important to you, depth-wise.
So, to round up this section, here are the four things you need:
- Good eyes
- Good knowledge of stereoscopy – both theoretical and practical
- A good monitoring system
- A depth-script or chart
Now let’s see how your choice of depth affects everything else. We’ll start with the depth-budget.
How to prepare a depth-budget
We already know how to prepare a depth-chart and depth-script. I’m sure it looks intimidating to you. After all, what place does numbers and graphs have in art?
Well, the answer is: You asked for it. Deal with it.
Here’s the chart again for reference:
You can’t go haywire with your depth chart, no matter where your imagination takes you. You are constrained by many limits. Let’s look at them in detail.
Limits of Parallax
Since the 3D left and right images are only displaced horizontally, you only consider the horizontal width of your display.
No matter how far or close together you place your cameras, the end result will be seen by a pair of eyes with a fixed inter-ocular distance of 2.5″. The eye shouldn’t be forced to diverge beyond this point, and this sets the limit for how far the left and right versions of you object are in the final onscreen image. This difference is parallax.
Every screen has a fixed parallax limit.
Let’s say the width of your monitor is 50″ (inches). The screen limit of parallax is (2.5/50)*100 = 5%. Here’s the formula (courtesy of Tim Dashwood):
Maximum Parallax for a screen (%) = (Inter-axial distance / Screen width)*100
What this means is, the dots on the graph can’t move more than a certain limit in either direction (positive or negative). Remember, the dots on the graph represent real objects, maybe characters in your movie, etc.
What happens when you break this rule?
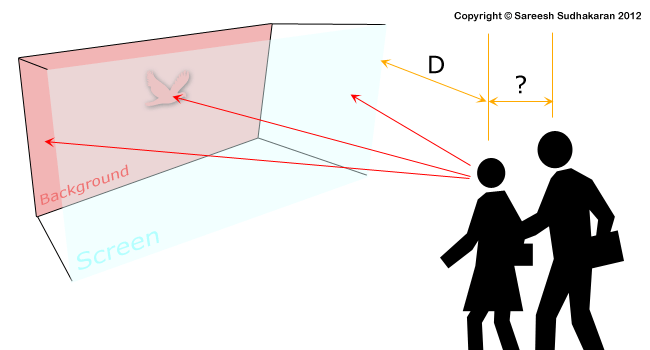
If you go higher than the maximum parallax limit, you will force the audience to diverge their eyes – which is painful. This is a definite no-no. If it happens for long enough, the audience will fight it, will feel uncomfortable, and eventually stop watching. This image should help you understand:
The reason we calculate the parallax limit in percentages is because screen sizes differ, but the inter-axial distance of the eye stays at 2.5″, and your parallax is a direct result of it.
In the first diagram, let’s say we replace the phrase ‘Screen Parallax in Pixels’ to Screen Parallax in %. You can easily draw an upper and lower line at the limit of parallax, ones that shout: “Do not cross!” Your graph can only dance within this range.
Inter-axial distance
Should the interocular distance of the eye be the standard throughout your movie? Should your cameras always be 2.5″ apart?
No, of course not.
But it could, in which case we call the experience Ortho-stereoscopy. This isn’t mandatory. Changing the inter-axial distance has its benefits. Analogy-wise, it is as important as changing the focal length.
The ability to manipulate the inter-axial distance is the most important artistic tool in stereoscopy.
Long story short, increasing the inter-axial distance brings depth into faraway objects like mountains, skies, etc. If you’re doing an aerial shot this might prove useful. Overdo it, and the large-scale objects will look like miniatures.
Decreasing the inter-axial distance allows you to shoot objects smaller and closer to the camera. Overdo it, and the small-scale objects will look like giants. It’s different from how you tilt up your camera to make something or someone look menacing. Here, you actually feel the unnatural affect.
Finally, if you can’t find a fine balance with the inter-axial distance and the objects at different depths in your image, you will also get cardboard cutout figures.
Let’s look at some ‘rules’:
1/30th rule –
This rule of thumb states that the inter-axial distance must be 1/30 of the distance to the closest object.
E.g., if your actor is 6 feet away, the inter-axial distance = 72″/30 = 2.4″. On the flip side, it also means every time you want to shoot at 2.5″ inter-axial, you can’t have anything closer than six feet.
1/60th rule –
This rule of thumb states that the inter-axial distance must be 1/60 of the distance to the closest object.
E.g., to obtain an inter-axial distance of 2.5″, the closest object must be at 12 feet.
There are more rules, like the rule of 1/100, 1/120, etc. Which is your ‘lucky’ number?
I believe these rules are a total waste of time simply because you can’t go by rules on a shot-by-shot basis. How would you feel if someone forced you to follow the Hollywood system of long shots, mid shots and close-ups in every scene, regardless of content? I feel such ‘rules’ are detrimental. Many people start following it without understanding why it came to be in the first place.
How do you handle this problem? Study your situation carefully, and arrive at your own rules.
Many movies must shoot at an inter-axial distance of less than 2.5″ because actors have to get closer than six feet. You are limited by the laws of physics and optics. It’s a constant juggling act where the number of objects you’re juggling changes on a frame-by-frame basis.
This is why movies with visual effects are ‘willing to be made’ in 3D, while those without visual effects tend to stay away from this technology. When you shoot live action, you have to deal with millions of unpredictable elements that are for the most part simply beyond your control. How can you ensure correct parallax in such a scenario? My answer (which is going to be of no solace to you) is, you can’t.
Let’s go past that.
Positive or Negative?
Let’s assume you want your actor at 3 feet from camera. In that case, going by the 1/60 rule (nothing special about 60 it’s just a number) the inter-axial distance should be 0.6″ (1.5 cm).
Our parallax limit, assuming a 30 feet screen, is (0.6/360)*100 = 0.17%. We know that parallax is both positive (behind the screen) and negative (in front of the screen). If the maximum positive parallax is 0.17%, ideally the maximum negative parallax should also be 0.17%.
The total parallax, which we call the Maximum Depth-Budget, is 0.17+0.17=0.34%.
Important Note: In practice, some like to go beyond the maximum negative parallax, as our eye is able to converge a lot more than diverge. It is not mandatory to stick to the maximum negative parallax.
Whew! I know all this is not easy to take in. You might still be wondering: How does one determine the actual depth-budget of any scene?
My answer, to the best of my knowledge, is: You do it through trial and error. If you set limits through purely geometric calculations, you’ll be confounded by real-world limitations. Here are a few spanners in the works:
- Every member of the audience watches from a different distance, angle, height and perspective.
- A movie will be shown on many screen sizes, and even in the best of circumstances, one can only approximate.
- If your project is for TV or the web, you have a lot more choices.
- Humans don’t relate to 3D in the same way as a camera and lens does. Every property of a lens changes things.
- Real stereopsis is based on 3D objects in real space. 3D movies are always projected on to a flat surface.
- The resolution of the video and the lens; and the loss of resolution caused by sub-sampling, compression, light loss, artifacts, color science, display technology, camera filters, sensor noise, etc., are all beyond our control.
See? It’s not as simple as drawing a triangle on paper and finding a length or angle. You need a real good intuition about things. For this reason I’m with Lenny Lipton:
“In order for stereoscopic cinematography to be a creative medium it’s got to be intuitive. If it’s not in the gut, it’s not going to succeed as an art form. If you have to rely solely on tables and calculations, composing stereoscopic images is not going to work.”
I strongly urge you to read Foundations of the Stereoscopic Cinema, by Lenny Lipton before you commit to anything 3D.
Convergence
Here, I’m with Tim Dashwood. Don’t converge if you haven’t done it before. The simplest way is to get it right on camera without converging. It also opens up many options in post.
If you do have to converge, do it under the insistence of an experienced stereographer. Even then, there must be solid irrefutable reasons for converging. When in doubt, don’t converge.
Resolution and Frame rate
Higher frame rates increase perceived resolution. Add that to high-resolution 3D imagery, and you get a heightened sense of realism. I’ve already explained about high frame rates here so I won’t go into detail.
Should you follow Peter Jackson (48 fps) or James Cameron (60 fps, maybe)? I believe so. I am a firm supporter of the 60p look. You may not, so stick to whatever suits your vision.
How many cameras per shot?
You need two cameras per shot, you know that already. But there’s also a school of thought that proposes three cameras:

Why not shoot with three cameras and get three inter-axial possibilities? Cool concept, though not easy to implement in practice, especially with beam-splitter rigs. It can be done with small cameras, though.
How many cameras per scene?
Finally, you have the consideration of having a multi-camera shoot. This is really tough to pull off, even in 2D. With 3D, you’ll need to always be juggling the parallax depth problem on every shot.
It’s not impossible, just tough for one person to do. It will play a big role in your decision to go 3D, so please don’t just ‘throw it out there’.
The three kinds of 3D rigs
The three kinds of 3D camera systems are:
- Beam-splitter Rig
- Side-by-side Rig
- Single camera rig
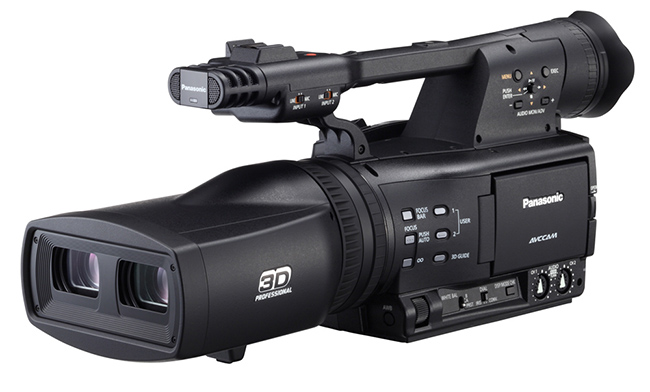
A single camera rig could include a mirror assembly system, but what I’m referring to is a 3D stereoscopic camera like the Panasonic AG-3DA1 (discontinued):

I’ll let you figure out the advantages and disadvantages of all these systems. Most of the time, your depth-budget and choice of inter-axial distance will decide which rig is best for each shot. On a feature length movie, you might find yourself using more than one type of rig. It’s common.
Now we’ll look at how 3D impacts post production and the actual budget and schedule of a production. By the end of this article you will have enough information to make an informed decision about your project.

Defining your 3D workflow
A 3D stereoscopic workflow involves twice the data as 2D. That’s a given. Ideally, you’d always want your left and right imagery separate so you can redo the 3D for different distribution standards.
Post Production
What do I mean by ‘redo’? How much can you ‘redo’ any 3D movie?
Actually, very little. Most 3D post production software is mainly for correcting what you have screwed up during production. They even have a word for it: Disparity. Any unwanted dissimilarity between the left and right images can be labelled a disparity.
In 3D movies, you avoid disparity like the plague. Here are some possible algorithms to correct disparity:
- Keystone correction
- Color and white balance
- Parallax correction
- Ghosting
- Alignment – vertical and horizontal
- Rotation – x, y and z axis
- Zoom, resize
- Floating window control
- Titling and basic motion graphics
- 3D (three dimensional, not stereoscopic) depth maps
- 3D calculators, scopes, inspectors, etc.
The basic workflow isn’t dissimilar to a regular 2D workflow, if you have shot your 3D perfectly. If you haven’t, 3D post production becomes a whole different departmental headache. Money you tried to save on set by ‘hoping for the best’ will be spent here, with interest.
If you cannot get your 3D ‘mostly’ right during production, don’t make a 3D movie.
Production
During production, you’ll need to log your footage as left and right, and will need to account for
- Double the storage capacity
- Double the cameras, or more, with matching lenses
- Cost of a 3D-rig
- Extra time to setup a 3D rig and align everything precisely
- Extra weight for transportation
- Extra crew (discussed next)
- Extra capacity for dollies, jibs, Steadicam, shoulder rigs etc.
Every production is different and complex, and adding 3D to the mix just increases the variations possible.
How many extra crew members will you need for 3D?
Do you need extra crew members for 3D? Or can you manage on your own?
The answer is, you need at least one additional crew member, and a very important one at that.
Stereographer
The stereographer is as important to a 3D movie as a DP is to any movie. I am absolutely convinced of the importance of this position, and consider it mandatory.
It is the responsibility of the stereographer to
- Study the project and assist the filmmaker in calculating the depth budget,
- Ensure your shoot goes well, and confirm you have captured the best stereoscopic imagery possible within your budget or constraints,
- Ensure all tools are the best possible, perfectly aligned and calibrated, and
- Sit through post-production ensuring the presentation is the best possible.
Next to deciding whether or not your movie will be in 3D, your choice of stereographer is the most critical decision you can make. Be thankful these people exist, and are willing to do all the complex calculations you don’t want to touch.
When in doubt, choose a stereographer with a proven track record over one who just knows the theory.
Operator
This is not a mandatory position, as a camera operator will be able to utilize the rig given proper instruction and training.
Once the rig is set up, there are few changes that need to take place during a take that aren’t in the regular purview of the operator.
Rig Technician
This is not a mandatory position. A rig technician is someone who knows the rig in question in full detail, and one who will be able to assist the stereographer in ensuring smooth and fast operation.
Since most rigs are rented, a good rig technician ensures a rig is in top shape, and is production-worthy. In any case, any decent stereographer will rigorously test rigs prior to commissioning them for a project.
How much extra will you spend on a 3D movie?
Now that you know how much time, money and manpower it will take it is fairly easy to estimate what it will cost.
Only an experienced stereographer can tell you exactly how much time each shot is going to take. Since every mis-en-scene is different, there are no fixed rules. It is critical to have the stereographer on board prior to budgeting and scheduling a 3D movie.
On average, people say it costs a third more for a stereoscopic project. But you would be foolish to use that as your rule of thumb. There are too many variables. If you have a well-oiled 3D crew, you might not have to waste any time at all on 3D. In fact, it would be very wise to test your workflow and crew on a smaller project prior to diving in on a feature-length movie.
Which 3D format is right for your project?
This goes back to our initial question: what are your distribution channels?
With cinema, you have the following technologies:
- Anaglyph
- Polarization systems – Read3D, etc.
- Active shutter systems – Nvidia, XpanD, etc.
- Interface filter systems – Dolby 3D, Omega 3D, etc.
- Autostereoscopy – no glasses
Here’s the deal. You don’t really have much choice of 3D technologies, especially when you look into how a 3D movie is actually distributed. Depending on the cinema and the systems they have installed, you might have to make do on a system that you don’t like. It’s part of the game.
You must know exactly which system you are going to project in, and must have these technologies ready for testing prior to the actual shoot. You must go through your entire workflow with your crew to get a feel for it.
The cost of a failed test is far lower than the cost of a failed movie.
If you have gone through all the steps laid out in this series, you will be in a strong position to decide whether your project is right for 3D or not. It’s all that is expected of you. This is one of those instances where you must put aside your inner longings and take a hard, practical and honest look at the logistics and financial side of things.
Think about this: You can go ahead and make a movie with no hope of distribution (as I did) and fail. Still, your movie can be watched on any screen now or in the future. But for 3D, once you decide your screen size, and if it happens to be a 30 feet cinema screen, your movie will not be very bearable on your home 3DTV or projector. You can’t watch your own movie in 3D, if it fails!
Take your time, and think hard.
What’s the next step? Talk to experienced people. Conduct experiments, and read a lot. Here are a few good resources:
- Foundations of the Stereoscopic Cinema, by Lenny Lipton
- Wikipedia – 3D Film
- Wikipedia – Stereo Display
I hope you have found this primer useful!