
In this article I’ll explain the eight key tools in color grading. These six tools cover most of color grading scenarios.
If you’re knew to color grading click here to know more about it, and also popular software and hardware related to color grading.
What are the most utilized color grading tools?
The major color grading tools are as follows:
- Brightness or Exposure
- Contrast
- Saturation
- Levels
- Curves
- Masks
- Tracking
- Mixers
I won’t be covering brightness, exposure and contrast since these tools are self-explanatory. Most people have an intuitive understanding of these tools.

1. Saturation
A saturation tool is usually a simple slider:
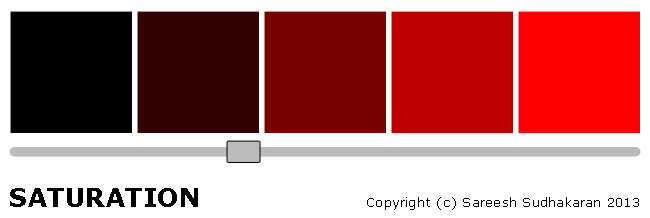
Saturation is the simplest tool you can find. It is a linear slider that moves from 0 (black) to 100%. The max value can be defined in many ways – a percentage, a 1, or a bit value (like 255 for 8-bit images, 1023 for 10-bit images and so on).
Whatever it is, the maximum value is “full saturation“.
Reducing the saturation (removing the color) is called desaturation.
If you just want to adjust the overall color saturation in an image, the saturation tool gets this done in one click.
However, if you were to manipulate each color channel separately in an RGB color model, when all three channels are fully saturated we get pure white. Thankfully, this is not how the saturation tool works in most color grading software. The saturation tool affects the whole image, together.
The operation is quite complex, as you can imagine. It’s not just pushing all channel saturations up linearly. E.g., if I have two pixels, one black and the other dark red, and I push the slider all the way to the limit, the pixel values in the second box will reach the end before the first one does. So that’s now how saturation works. But you get the idea.
Professional color grading tools might have different kinds of saturation adjustments. One common adjustment you’ll find as an alternative is Color Boost.
You can also manipulate saturation by altering channels separately, but this is beyond the scope of this beginner-level article.
Who would have thought a simple thing as saturation was quite so complex?
2. Levels
Levels is a combination of two tools, called the Input and the Output tool. They are both sliders, but each affect the image from a different perspective:

When you select the Levels tool you get the histogram of the image or frame. Both the input and output tool shows up at the same time. The easiest way to start thinking of these tools is as follows:
- Input – Contrast Tool
- Output – Brightness Tool
Remember, it’s not only a contrast+brightness tool. The levels tool offers far more control. The ways it does this are:
- You can adjust the Gamma.
- You can adjust the levels of each channel separately or as a whole.
- When you adjust each input slider, the gamma shifts – this is why it behaves like a contrast tool.
- When you adjust each output slider, the gamma stays unchanged – this is why it behaves like a brightness tool.
The input tool has three controls:
- Black – The lowest value is 0. Increasing the black input level adds black (a process called crushing the blacks) to the mid-tones. Think of it as black water creeping into the mid-tones like a flooding river. Changing this also shifts the gamma, but notice the white stays fixed.
- White – The maximum value is 255. Lowering it adds white to the mid-tones. Notice how the black stays fixed.
- Gamma – the levels tool allows you to change the gamma precisely.
All three controls also allow for numeric values, so you can precisely enter the values you prefer.
The output slider has two controls:
- Black – Lowest value is 0. Increasing this value brightens the image.
- White – Highest value is 255. Reducing this value darkens the image.
And, you can do all this separately across different color channels.
I cannot begin to tell you the power that the levels tool holds. You can grade an entire movie with this one tool, if you know what you’re doing. However, most people don’t find it intuitive, so they prefer the next tool.
3. Curves
The curves tool does exactly what the levels tool does, but it is more intuitive (and quicker).
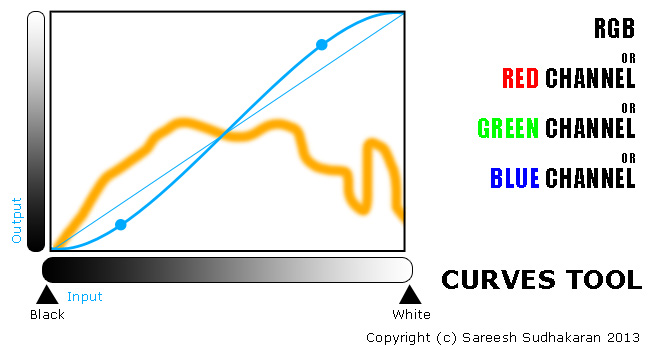
Some prefer the ‘precision’ of levels, while others prefer the intuitive nature of the curves tool. Try both and see what you find more intuitive.
The Curves tool has both Input and Output components. The key difference between it and Levels is that levels allow you to manipulate gamma directly as a value, while the curve allows you to manipulate gamma as a visual curve.
When you open the curves tool, the curve is always straight (represented by the thin blue line in the above image). You can click on any point on this line, and it becomes a “dot”, called the control point. You can then drag this dot around, and the curve changes shape.
You can add as many control points as the tool will allow, and make different shapes. The above image shows two control points in the popular ‘S’ shape.
When you move the points, you are varying gamma, while the white and black points stay put. But, you have the added control of manipulating the overall look of the image by just moving a few control points.
To do the same thing with the levels tool means playing musical chairs with all the sliders. See where intuition comes into play?
In addition to this cool feature, you can also vary the black and white points of both the Input and Output tool. This works exactly as the levels tool. As with the levels tool, you can manipulate individual channels too.
This is why most professionals, including myself, use the curves tool. It’s just faster, and the precision offered by the Levels tool isn’t that important in the real world.
Learn both!
4. Masks, Mattes of Power Windows
Isolating regions in an image to manipulate them is one of the most utilized aspects of color grading. Using masks is one way to tackle this problem.
Masks (or Mattes or Power Windows) are just outlines over elements in an image that need to be isolated:
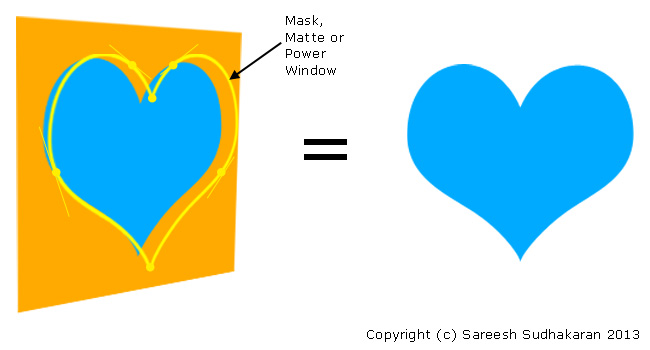
Masks can be hand-drawn, extrapolated by selecting only a few points, or selected using keying techniques (more about keying later). What you basically want is isolate a portion of the image you need to manipulate, while leaving all other pixels intact.
You draw around the object or region you want to isolate. You can use control points to create splines that extrapolate curves perfectly, as shown in the heart-example above. When the region isn’t geometric, you can use keying methods to isolate it. When both splines and keying don’t work, you have to hand-draw the mask or matte. This technique is called rotoscoping.
The true power of masks is: You can use more than one to isolate each element individually. In effect, you can repaint an entire image this way. However, the more masks you apply, the more processing power you need.
I find I use masks, power windows or mattes often. Can’t live without them. Having said that, my advice is: Try to avoid using masks if you can. Always look for simpler solutions first.
If you’re using masks, then you’ll most likely also want to move them as the image moves:
5. Tracking
Tracking is having the software follow a selected pixel or group of pixels around as they move frame by frame. As you might have guessed, tracking is a video-centric tool.
Usually you’re masking human beings or other objects in motion. You can’t (actually you can, but you don’t want to) draw masks frame by frame.
To save the hassle of resizing masks or mattes frame by frame, intelligent tracking algorithms exist that will move the mask as best as it can. Obviously, it never gets it right with complicated motion, changes of shape and light, and with motion blur or out-of-focus areas.
There are two broad classes of tracking algorithms: 2D-based and 3D-based. Each has its plusses and minuses for different scenes. Modern color grading software might include many tracking options, and you have to learn which ones work best for what kind of footage.
6. Mixers
Okay, a ‘mixer’ isn’t really a specific tool. Traditionally, color grading is divided into two broad groups:
- Primary Color Correction – changing RGB values directly, like with saturation, curves and levels
- Secondary Color Correction – changing selected pixel values only, like with keying, masks, etc.
If curves is just levels with better intuitive control, then using color mixers or wheels is the art of dealing with color as color; and not as a ‘science’.
This is what a color mixer or wheel looks like:
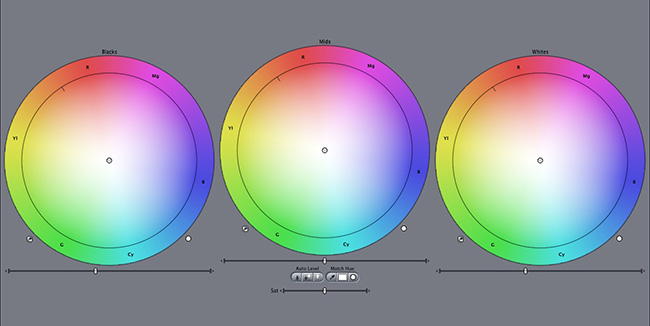
What is shown is a three-way color corrector, the most popular color mixer. In the color grading industry, they are also called Lift, Gamma and Gain. You have a birds-eye view of color, so to speak, and if you know color theory, you can apply it directly and intuitively here.
You can move your cursor anywhere within the wheel. You get three traditional categories of wheels:
- Shadows – this only changes colors in the shadow or darker regions.
- Highlights – this only changes colors in the highlights or lighter regions.
- Mid-tones or Mids – this changes colors not in either extreme.
The challenge for a good color mixer tool is to keep these three areas separate. It’s not an easy job to study an image and decide which parts are highlights or shadows – if you’re a computer algorithm.
The mixer or LGG tool is the most used tool in all of color grading. If you learn it, you will get better results faster, and that’s all the justification it needs.
Keying
Keying is an important element in color grading. Keying tools isolate certain colors so you can manipulate them.
There are many methods of keying – luma, chroma, and so on. And there are many algorithms. It can be a powerful way to isolate and change a specific range of colors.
However, I don’t recommend beginner colorists use the keying tool. I’ve found over many years of color grading (two decades worth) that I can get 99% of my results without touching the keying tool. I only use it when it’s the best solution for a particular problem. It’s never the first thing I reach for.
The reason is, when used without a lot of experience, you get weird artifacts and poor results with it. You need to be good at color grading before you can know how to use keying well. Don’t say I didn’t warn you!
By now you have a solid grasp of the fundamentals of the basic color correction and color grading tools, why it is used, and how to use them. These tools are usually present in all major color grading applications.
They don’t compare equally among all applications though. Some might be better at masking and tracking, others might have a great saturation tool, or whatever. Each algorithm is different. The color philosophies of color grading applications are somewhat different, even if the tools have the same name.
If you’re a newcomer to color grading, I highly recommend selecting an application (the best you can afford), downloading and reading its manual from end to end. They mostly do a good job of explaining the tools and when to use them.
I hope this article is useful in your color grading journey!
I must admit that I only developed an appreciation for what the colorist must go through by playing around with coloring in my videos. I am lucky that I only generally use one camera in one set of conditions, with one or two camera angles.
Wow!
It’s very addictive. As you get better the possibilities are endless.