Let’s start from the beginning.
What is a light stand?
A light stand is a stand that holds lighting fixtures.
Why does it have to be so complicated, then?

Why can’t I just buy the cheapest photo light stand on the market?
You can, actually. If it can do the job it was designed to do, then why not?
Photographers use light stands to hold strobe lights and modifiers. Nowadays, lower power LED lights are as light as strobe lights. The modifiers are pretty much the same weight.
If your work involves only holding up low power LED lights with modifiers like softboxes, beauty dishes, etc., then you might not need anything else.
Except sandbags. You definitely need those.
Bottom line, you can use photo light stands to hold up your low power lights. However, things change when you need to hold up heavier lights.

When is holding up a light fixture not just holding up a light fixture?
A light stand should be able to do the following:
- Support the weight of the light fixture and modifiers.
- Balance the light fixture when it’s heavy.
- Take up as less space as possible.
- Be as safe as possible.
- Allow to quickly position the light fixture on a shoot.
- Doesn’t impinge the movement of the light on any axis.
- Allow other light stands to come close.
- Stay straight on uneven surfaces or stairs.
- Keep doing this day in and day out for years.
- Be designed for easy storage and transportation in bulk.
Looking at it this way, the light stand seems like a mythical creature, filled with magical powers.
It is.
Let’s compare these set of features on two kinds of stands – a photo light stand, and a “C-stand”
| Feature | Photo stand | C-stand |
|---|---|---|
| Support the weight of the light fixture and modifiers. | Yes | Yes |
| Balance the light fixture when it’s heavy and the center of gravity is off. | No | Yes |
| Take up as less space as possible. | No | Yes |
| Be as safe as possible. | No | Yes |
| Allow to quickly position the light fixture on a shoot. | Yes | Yes |
| Doesn’t impinge the movement of the light on any axis. | No | Yes, but with additional equipment |
| Allow other light stands to come close. | No | Yes |
| Stay straight on uneven surfaces or stairs. | No | Yes |
| Keep doing this day in and day out for years. | Yes | Yes |
| Be designed for easy storage and transportation in bulk. | No | Yes |
You can see how a C-stand can do a lot more. Before I explain what a C-stand is, here’s one more comparison of the two kind of stands from the same brand, Impact:
| Feature | Impact Light Stand | Impact Pro Light Stand | Impact Turtle Base C-Stand |
|---|---|---|---|
| Price | $20 | $148 | $120 |
| Max Height | 6 feet | 10.8 feet | 10.8 feet |
| Min Height | 26.3 inches | 35.8 inches | 4.8 feet |
| Load Capacity | 1.8 kg | 9 kg | 10 kg |
| Folded Length | 26.3 inches | 34.8 inches | 4.8 feet |
| Mount | 5/8″ Stud with 1/4″-20 Male Screw | 5/8″ Stud | 5/8″ Stud |
| Weight | 0.8 kg | 2.4 kg | 9 kg |
The Pro Light Stand compares in height and weight capacity to the C-stand. It’s a bit more expensive, and lighter. I made this comparison to show you the price isn’t the major factor here.
Before we get into the details, let’s learn what a C-stand is.
What is a C-stand?
The “C” in C-stand stands (pun intended) for Century.
The base ‘footprint’ is usually 100mm (39.37″). This is where the word ‘century’ comes from.
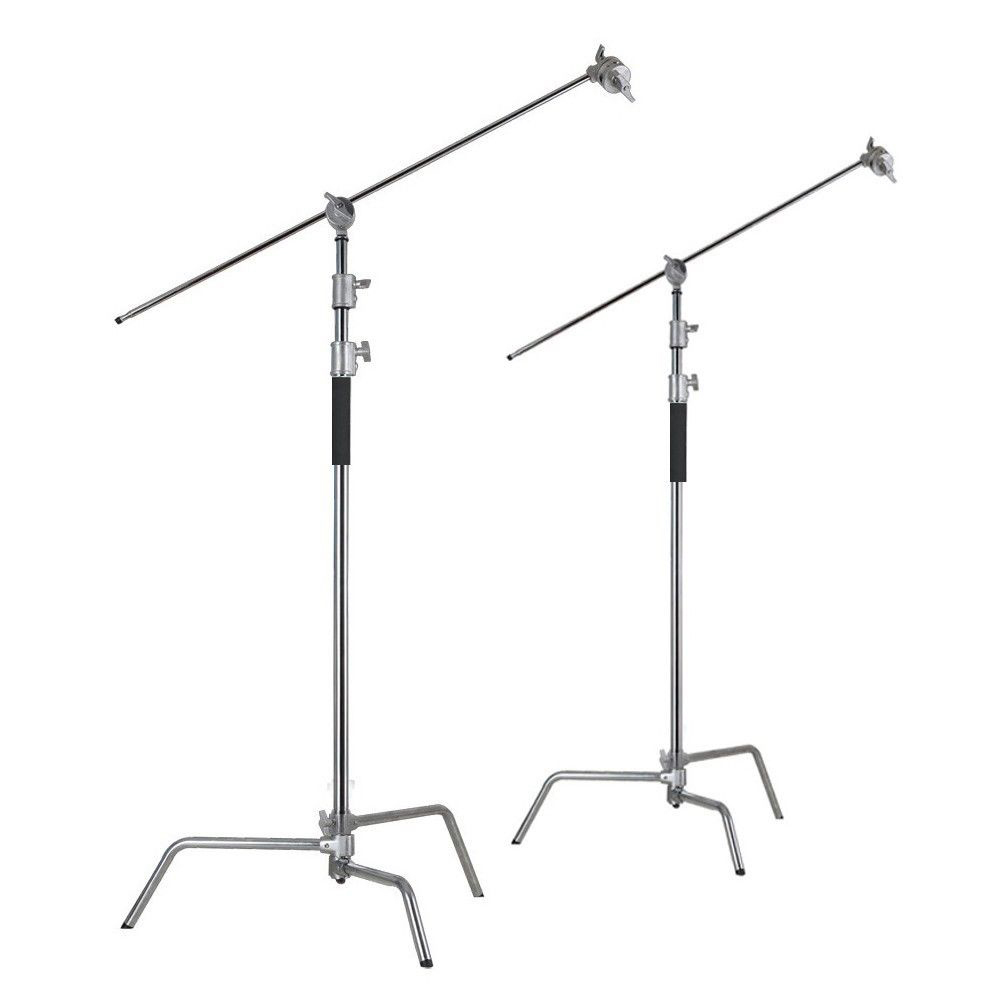
This is what a C-stand looks like:

At first glance it looks just like a photo stand. However, there are a few differences:
- A C-stand typically has a turtle base leg design. You can see the legs are bent. On a photo stand, the legs are straight.
- A C-stand turtle legs are typically at different heights. This means, you can raise just one leg, or two legs, to ensure the stand stays upright in any situation. A photo tripod has the legs at the same height, and they can’t be changed.
- Due to the different heights of the legs, C-stands can be stacked almost right next to each other, which is as close as they can get. You can’t get photo stands close to each other and keep them level at the same time.
- Because the legs are bent, it’s easier to keep sandbags on them.
- The legs of a C-stand can be closed to one plane for easy storage. This is what it looks like:
You can store a C-stand dismantled, or whole, but keep the legs in one plane. This allows the stands to be kept very close together for transport.
The reason this is important is, on a typical small film, there are about 7-10 C-stands on set. They can’t be taking too much space in a van or truck.
I think you’re beginning to see how a C-stand is probably more useful for film production work.
They’re usually made of metal, so can handle heavier loads.
The knobs are also made of metal and are more robust. The heavier the load is, the harder it is to raise or lower a light, and safety is important.
Are there any disadvantages to C-stands?
Yes. There are a couple:
- C-stands are typically heavier than photo stands. Even the lighter ones, as you can see from the table above.
- The minimum working height is often not even comparable. If you want to have a light lower with a C-stand, you either use accessories (we’ll talk about that next) or buy a shorter C-stand.
The main section of a stand comes in two standard lengths: 40″ and 20″.
A C-stand is sort of standardized so different film crews can use them reliably and consistently. The designs don’t tend to change radically.
What are the parts of a C-stand?
The parts of a C-stand are fixed, and only change in the details. Here they are, from top to bottom:
The Mount or Receiver
The tip at the top of a C-stand, the part that gets attached to a light fixture or accessory is the Mount or Receiver.
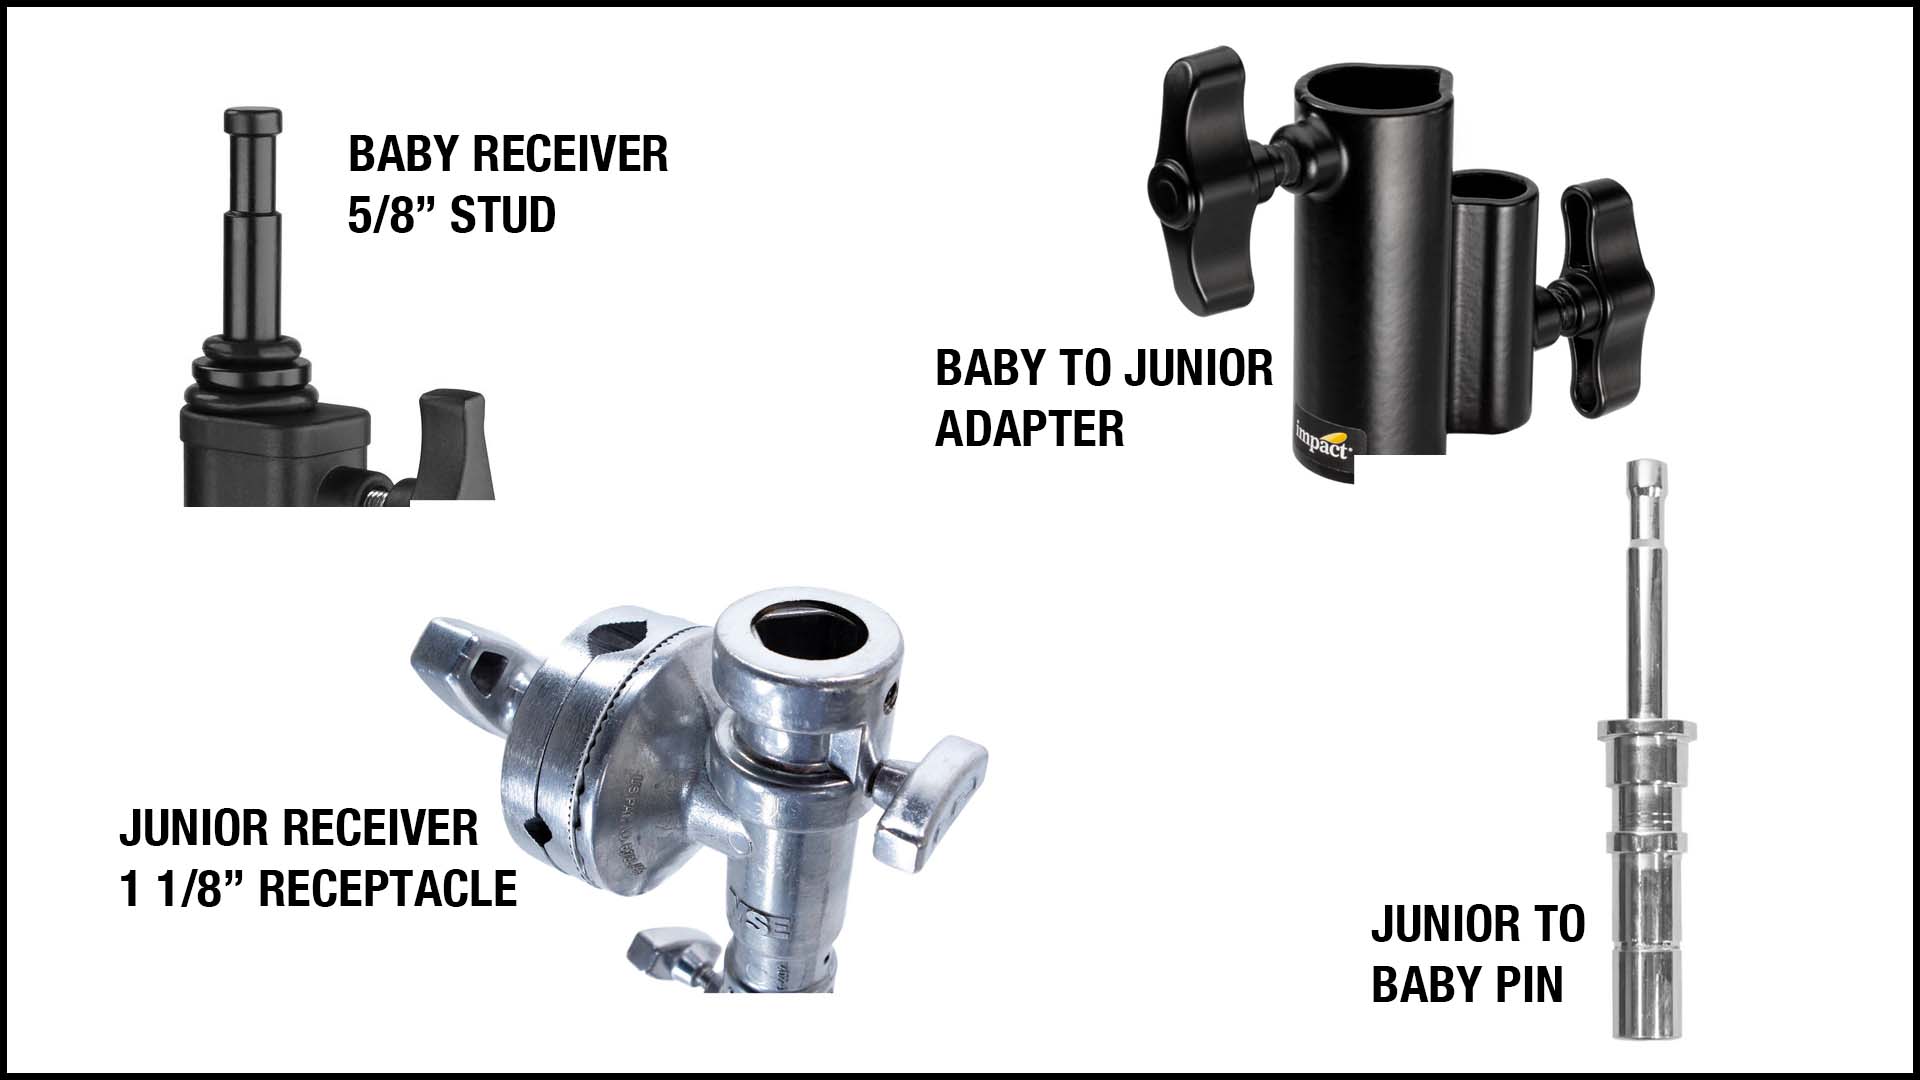
There are three standard kinds of receiver:
- 5/8″ (16mm) stud. This is the most common type. In the US, it’s also called a ‘Baby’ receiver.
- 1 1/8″ (28mm) bushing (female receptacle). It’s also called a ‘Junior’ receiver. This is the standard for heavier lights.
- Male thread screw. These are usually only found on light stands for photography or audio. Comes in two standard sizes – 3/8″ and 1/4″ threads. These threads get broken off easily with heavier lights, which is why they’re not used much in the film business. A note: If you use a photo stand with a thread, most likely it will also work as a Baby receiver.
C-stands don’t come with threads. To get threads, you use what are called ‘Spigots’.
As far as film lighting is concerned, you’ll be dealing mostly with Baby, Junior and adapters:
A receiver has to be long enough and strong enough to hold the fixtures you want to use. In addition to this, the metal it is made of must not be cheap and too malleable. Otherwise, it will wear off more quickly.
Professional C-stands are made of stainless steel, sometimes chrome plated to avoid rust. The cheaper ones use lower-grade alloys. All use aluminum wherever necessary. The thinnest section will usually have a diameter of 25mm.
Risers and Sections
In between the tip and the base lies the column or section or riser. It can be one fixed height, but that’s rarely useful. Typically, the column is broken down into stages or sections.
Just to clarify the terminology, risers and sections generally mean the same thing, except the number of risers is always one smaller than the number of sections. E.g., the most standard variety of stands have three sections and two risers. That’s because the lowest section cannot rise.
C-stands are typically named in relation to the length of each riser or section:
- 20″
- 40″
- 60″ and so on
Lights that need to go really low have their own stands, generally called ‘baby’ stands. These are smaller versions.
A common question is: Which riser do you open up first – the lowest riser or the top-most one?
The answer is sort of “anti-science”!
Physics dictates you should raise the lowest section first, and close the top-most section first. Why? The lower sections are wider and hence more stronger. The top-most one is the thinnest.
However, in practice, raise the top-most first and then the lower ones. That’s because if you start with the lower section, and you then have to go even higher, it’s not safe to extend the top most section while you’re in a standing position.
One important life-saver feature of sections is that they can be individually ‘cushioned’. This works similar to the shock absorbers on bikes. If you forget to tighten one section and the whole thing falls down, you want to ensure it doesn’t crash down. There are different methods of cushioning:
- Air cushion
- Spring
- Hydraulic (uses a fluid)
Cheaper stands will just have springs. Don’t drop them!
The Knobs
Most C-stands use heavy-duty knobs, also called T-handle knobs because they look like a T:

Cheaper photo light stands usually use plastic knobs or even latches, similar to those found on cheaper tripods.
The Base
The taller a light stand needs to go, the thicker and wider the base must get to hold the same weight.
Think: Mountain, or a house of cards.
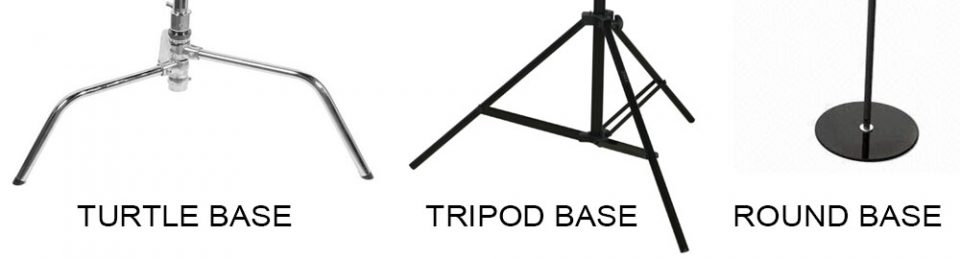
Light stands have three kinds of legs:
- Turtle-base C-stand (C stands for ‘Century’)
- Tripod base (three legs like a tripod)
- Flat base (like a home lamp fixture. Avoid at all costs)
The base ‘footprint’ is usually 100mm (39.37″).
For maximum balance, one always ‘puts one’s best foot forward’. In other words, point one leg of the stand in the direction the weight falls in. In case of C-stands, this will be the largest leg.
This ensures the stand will not easily tip over in that direction. This is also the leg that holds the sand bags.
One add-on feature which costs extra is to have sliding bases. Each leg can be slid up or down the column of the stand independently.
How does this help?
If you want to position stands on an uneven surface or stairs, there’s your solution.
Want to make the stand more mobile? Add wheels:
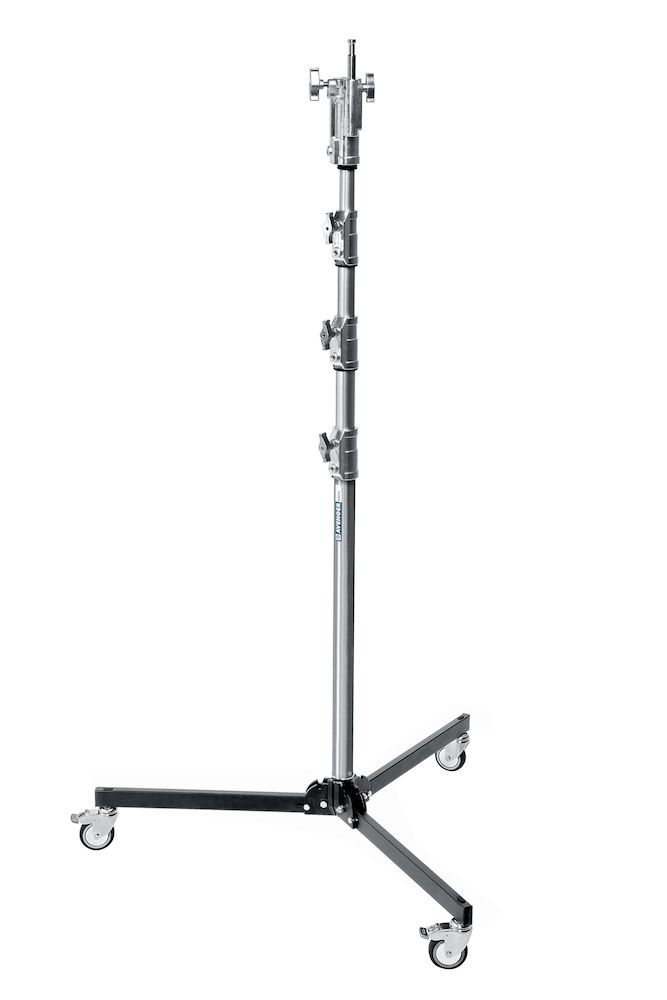
Wheels are really handy on even surfaces. Saves a lot of time.
One last feature about the turtle-base design is you have the option of having it spring-loaded. This means the legs snap shut easily, and fast.
For these reasons (and more, as we shall see soon), the C-stand is the de facto standard for filmmaking light stands. It is simply a more versatile design. On the other hand, a tripod-base stand opens and closes, and that’s it.
Weight and Payload
The typical 20″ C-stand weighs just above 5 kg (11 lbs) and has a payload of 10 kg (22 lbs). The 60″ C-stand can weigh as much as 8 kg (18 lbs) with a payload of 10 kg.
How much is 10 kg? Y
Not enough, really. For example, an Arri Skypanel S60-C weighs about 12 kg. Heavier HMIs need stands with greater payloads, some even with a capacity for 100 kg or more. Beware, these stands also weigh about 30 kg or more.
If you want to store or transport ten 20″ stands, you’re looking at a minimum combined weight of 50 kg without factoring in all the other grip and lighting gear, accessories, etc. Now imagine transporting larger and heavier C-stands. That’s why many balk at buying C-stands. You better be prepared to store and transport these things.
Combo Stands
The light stand you would be buying or renting for heavier lights is probably going to be a combo stand.
What is a Combo Stand?
A combo (combination) stand is one which has both baby and Junior receivers.

A combo stand is designed to hold heavier lights and go higher. For more stability they have a tripod-base design. This also helps with attaching wheels.
Here are the specifications of the Kupo Master Combo HD stand, which also has leveling legs:
- Maximum Height: 133.9 inches – 11.15 feet
- Minimum Height: 55″
- Load Capacity: 40 kg
- Weight: 9.2 kg
There are all kinds of light stands, but the three most common, especially for low budget productions are:
- 40″ C-stands
- 20″ C-stands
- Combo stands
But we’ve only covered half of what makes light stands useful! Now let’s cover the stuff that really makes a light stand shine.

The Grip Arm and Grip Head
There are two parts to this:
The Grip Arm (Gobo Arm)
A light stand should help you move the light in the space of the set. But, what if the light stand is in the shot, or if a piece of furniture is blocking the way?
What if you could have an arm that extends out of a light stand?
This arm is called the grip or gobo arm. In the image above, the plain rod is the grip arm. Nothing special about it.
The grip arm is usually made of 16mm (5/8″) steel and is not designed to hold heavy lights or gear. Cheaper arms are made of aluminum or cheaper alloys.
The two most common lengths for grip arms is 20″ and 40″.
How is the grip arm connected to the light stand? Through the grip head:

The Grip Head (Gobo Head)
A grip head allows the grip arm to spin 360o in a fixed axis, sort of like how a shoulder can help move the arm about.
A typical grip head has two parts – the adapter that fits on the light stand (usually a baby receiver), and a circular-looking thing with holes in it. This is the part that takes the arm, and a knob tightens it when the desired rotation is achieved.
What if you want to add another axis of movement? You can attach a second grip head to a grip arm:

A C-stand isn’t that useful or versatile without a grip head and arm!
It is at this point that our light stand becomes a grip stand.
Most grip heads come with 3/8″ or 5/8″ holes to take in baby studs and other common accessories. You also get heads for the junior receiver. They are called 2 1/2 and 4 1/2 heads. Depending on where you are in the world, these terms might mean everything or nothing. Finally, there are standard grip heads, and micro grip heads for smaller arms.
Enough said.
Let’s cover one more important accessory that literally extends the impact of a light stand.

The Boom Arm (and Menace Arm)
When a grip arm is too short, and you want a longer rod, you get a boom.
You can ‘boom’ anything: microphones, flags, cutters, gobos, lights, etc. An important aspect of it is to add counterweight to the arm, usually with sand bags.
The adapter that interfaces with the light stand and boom arm is called a lollipop (in the US).
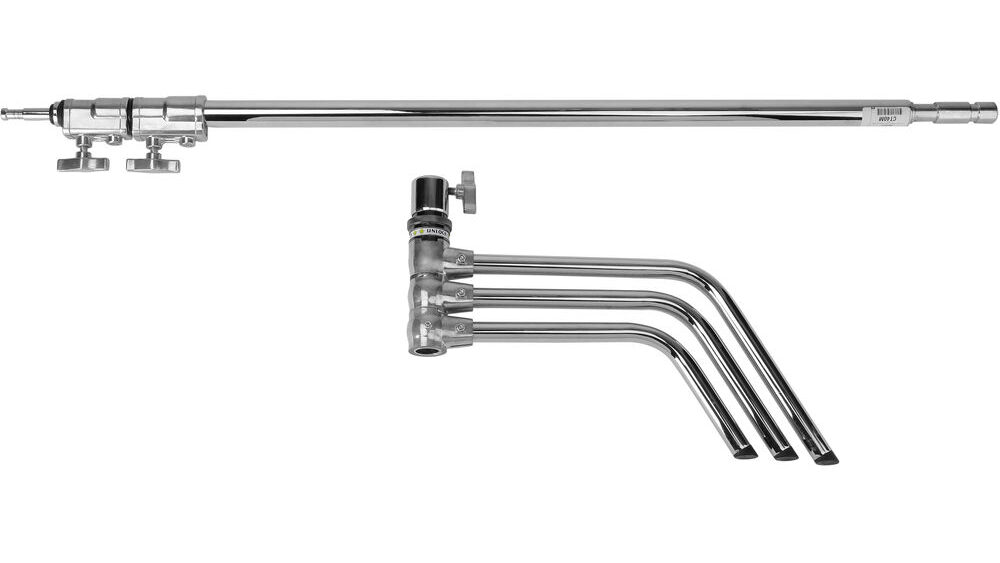
A Menace arm is more robust version of the simple boom arm. You purchase (or DIY) your own Menace Arm kit:

There are a lot more varieties of these things, but you might want to explore them at your own time.
At this stage this is enough information. Let’s end with two important accessories that will round up any low budget kit.

Holders
A holder is an accessory designed to hold something. Duh.
The most important accessories a light stand needs to hold are:
- Diffusion frames
- Polystyrene (foamboard) holder
- Reflectors
- Monitors or Trays
Larger frames (6×6′ and above) need two stands on either side.
The Sandbag
Sandbags are bags made of durable fabric or plastic that holds sand:

They are designed to be draped over the turtle legs of a C-stand. They come in other shapes and varieties but these will do for mostly any situation.
It goes without saying that you fill these bags with sand.
Why sand? There are two substances you can use: sand or water. In equal volume, dry sand is heavier because it is denser. Both these are easily available no matter where you are on earth (almost).
Water has the disadvantage that if not dried completely, it will help the growth of unwanted microbes and fungus or whatever. It can also leak faster, if your sandbag has a leak. Also, let’s save water!
Sandbags also help to balance a grip arm or boom.
They come in various weight capacities. Common ones are 20 lbs and 40 lbs, but you need enough of them to keep all your lights, accessories and stands secure. They are unavoidable!
Sandbags save lives every day.
The Cart
The last thing we’ll be covering is the C-stand cart:

You can’t transport C-stands, grip arms, grip heads and sandbags without a cart, unless you only have a couple.
It just takes too much time to carry all that equipment from the grip truck to the location and back. These things save time.
What does it feel like, to learn about all the kinds of light stands and grip accessories in filmmaking?
Right on the first job you’ll want to do something that your stand can’t get done. “If only I had this doohickey it would be perfect!” After a couple of jobs where the value of the doohickey in question is unquestionably justified in your mind, you buy it.
After a few more jobs you want your light stand + doohickey to do something it can’t, not unless you buy another thingamajig. This goes on and on, until you finally stumble upon the ‘industry standard’ which actually comes with all the things you need.
And then you ask yourself: “Why didn’t anyone tell me about these things before?”
Don’t fret. Everybody learns this way. Even if someone gave you a fully functioning light stand kit you wouldn’t be aware of all its possibilities until the need actually arose.
Here are some of the more well-known manufacturers of light stands:
Well, that’s it!
I hope this comprehensive introduction to film light stands has helped you. If you need any help feel free to ask me in the comments below.