Hello and welcome to the Panasonic GH5 Guide! You made the right choice. In this first video I walk you through:
- Battery and power solutions
- Checking to see if everything in your camera is okay
- Adjusting the Diopter
- Customizing Fn5
- Learning to navigate the menu
- Dual SD cards and setting the recording mode
- Setting the System Frequency
- Type of SD cards required and Formatting
- Testing for stuck pixels and sensor dust
- Pixel Refresh and Sensor cleaning
- Record Button or Shutter Button
- Level Gauge Adjust
- HDMI Cables and lengths
- Weather protection
Total duration: About 16 minutes.
Download Video (1080p) | Download Video (540p)
Important correction: I mention the original Panasonic charger is red when uncharged and green when charged. That is incorrect. The charger stays green while charging and turns off after having charged the battery.
Links
- Wasabi Battery Set (Amazon)
- Wooden Camera battery solutions (Amazon, B&H)
- U3 Sandisk Extreme SDXC Cards (Amazon, B&H) – I’ve found 64GB to be a great sweet spot for a day’s worth of shooting. But you might need more! Get Sandisk Extreme or Extreme Pro cards. When the 400 Mbps firmware update arrives, you’ll need V60 SDXC cards. Class 10 (V10) can record up to 10 MB/s (80 Mbps). U3 (or V30) can record up to 30 MB/s (240 Mbps). V60 can record up to 60 MB/s (480 Mbps). There’s a V90 as well!
- Blur-Rigger High-speed HDMI Cables (Amazon) – I have the 6 feet version, and it’s too long sometimes but useful for testing.
Ergonomics and controls
The dials on the GH5 are pretty standard, the joystick being the only innovation you won’t find on many cameras.
Here are the important top dials and buttons:

The record button is on the top, though the shutter button can also be used.
You also have three custom profiles (C1, C2 and C3) that you can store for immediate access. You use the top mode dial for this. The on/off switch is under it. Once you’ve set it you can press down the lock so it won’t change.
The Drive mode dial is not useful for video shooters, though the 6K option might come into play later for anamorphic 6K mode, we’ll see.
Here’s the layout of the back:
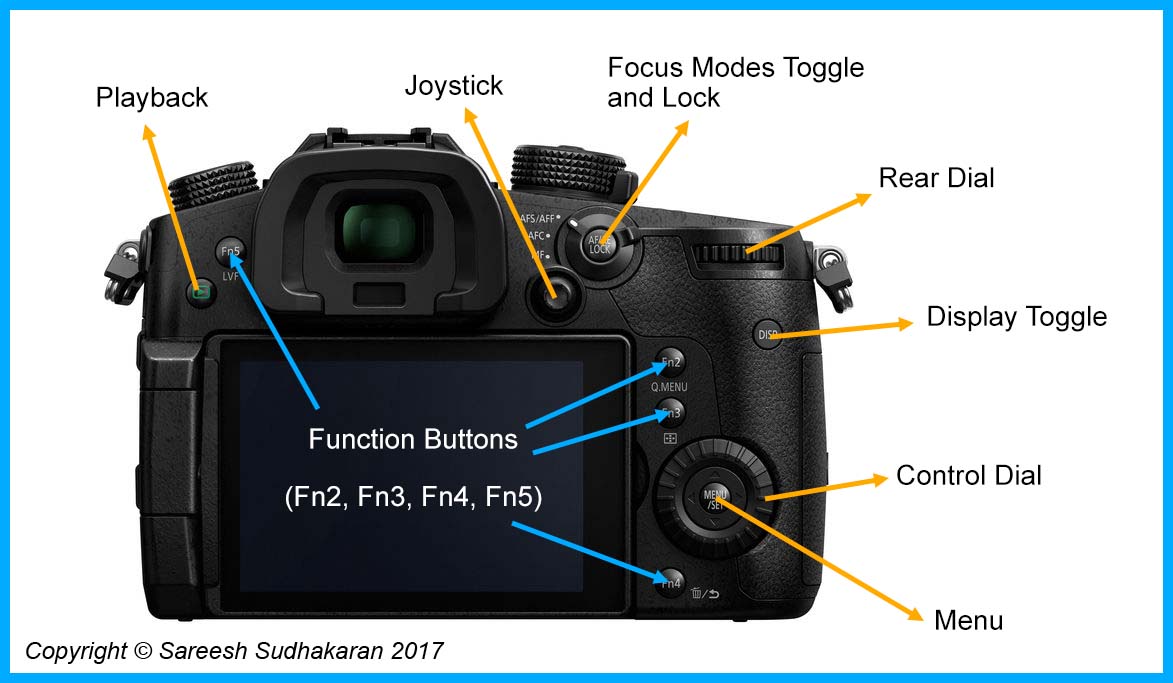
The major difference here is the joystick, which can be used for menu as well as setting AF points. I’m not sure how useful it is for video shooters who don’t look through the viewfinder.
You have additional Function buttons to program the way you want it.
The left-hand side:

It’s pretty self-explanatory I think. The GH5 ships with a cable holder that’s definitely useful to protect that fragile HDMI connector.
Finally, the right-hand side:

The remote isn’t very useful for video shooters, but the dual SD card slots are.