This is sort of an experimental post.
First we’ll try to understand what happens when you raise the color bit depth and/or color space before color correction or grading. The goal, of course, is to find out when it’s useful to raise the bit depth and color space, and when it’s not.
For the purposes of this article, I’m going to be using Adobe After Effects. There’s nothing special about this particular choice, just that I happen to know it well.
The tale of two camera workflows
There are two general ways you get your footage:
- 8-bit Rec. 709
- RAW (12-bit to 16-bit)
Sure, you also get 10-bit Rec. 709 but that’s covered in the second option above. Simply speaking, it’s 8-bit on the one hand, and everything else on the other.
First, let’s start with 8-bit, which is what 90% of the world is probably shooting.
Creating an 8-bit test subject
The total colors possible in an 8-bit image are about 16.8 million. This is more colors than the eye can see. In purely mathematical terms, we don’t need anything better than 8-bit…unless we do.
There are 256 tones or shades per channel in an 8-bit image. If I created an image 256 pixels wide, and applied a gradient from 0 (black) to 255 (R, G or B), each pixel should have one additional value. The end result should be a smooth gradient – both to our eyes and to our monitor (viewed 1:1).
I’ve used blue, but you can use any color. It’s actually a good stress test for your monitor, too!
Some browsers can’t display a TIFF image. If you are having trouble seeing it, right-click and Save to view it on your computer.
I’ve exported it as an 8-bit uncompressed TIFF in Rec. 709. Usually you’d have a lossy codec but I wanted to start with a strong image where the initial codec isn’t a factor.
The tests
What are we going to do? First, we create a composition in After Effects. I’ll add a keyframe position transformation to it so we can see the gradient problems clearly (when they’re static they tend to be hidden). Nothing fancy, just adding some motion so After Effects can do some motion calculations. After all, moving masks (power windows) simulate this behavior.
I’ll also add a layer of Curves (a hard S-curve) and some Exposure compensation.
The output color space for all the tests is Rec. 709, so you can directly compare it with our test image.
We’re going to change two parameters, in every permutation and combination:
- Bit depth – 8, 16 and 32-bit float
- Working Color Space – Rec. 709 and ProPhoto RGB (All in linear space)
Why ProPhoto RGB? It’s a huge color space, quite close to ACES, and it serves well for our purposes. Other spaces like DCI P3 are too similar to Rec. 709.
Anyway, we have six combinations. Each combination is exported as an H.264 8-bit Quicktime movie at 50 kbps.
In short, we start with a high-quality 8-bit image that we should be able to study perfectly on a calibrated 8-bit Rec. 709 (or sRGB, if you’re using a computer monitor) monitor. We’ll take it through the rabbit hole into Wonderland, were we’ll dazzle it with a high bit depth and color space, while also applying motion and color corrections, and finally send it back as an 8-bit file destined for web viewing.
A note on linear-mode: Adobe After Effects does not recommend linear mode in 8-bit depth. I’ve only used it to keep the math constant. In the real world, don’t use linear mode with 8-bit!
A note on chroma subsampling: There will obviously be some variances between going from RGB (TIFF) to H.264 4:2:0, though in my experience it shouldn’t affect the outcome by any tangible margin.
Observations and results
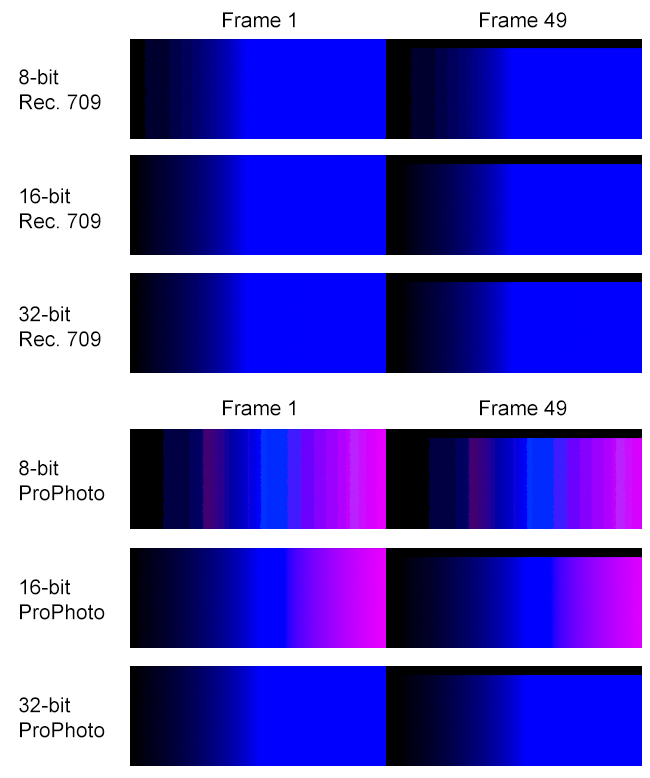
I’m only going to show you frame 1 and frame 49, two frames from the entire exported sequence. They are typical.
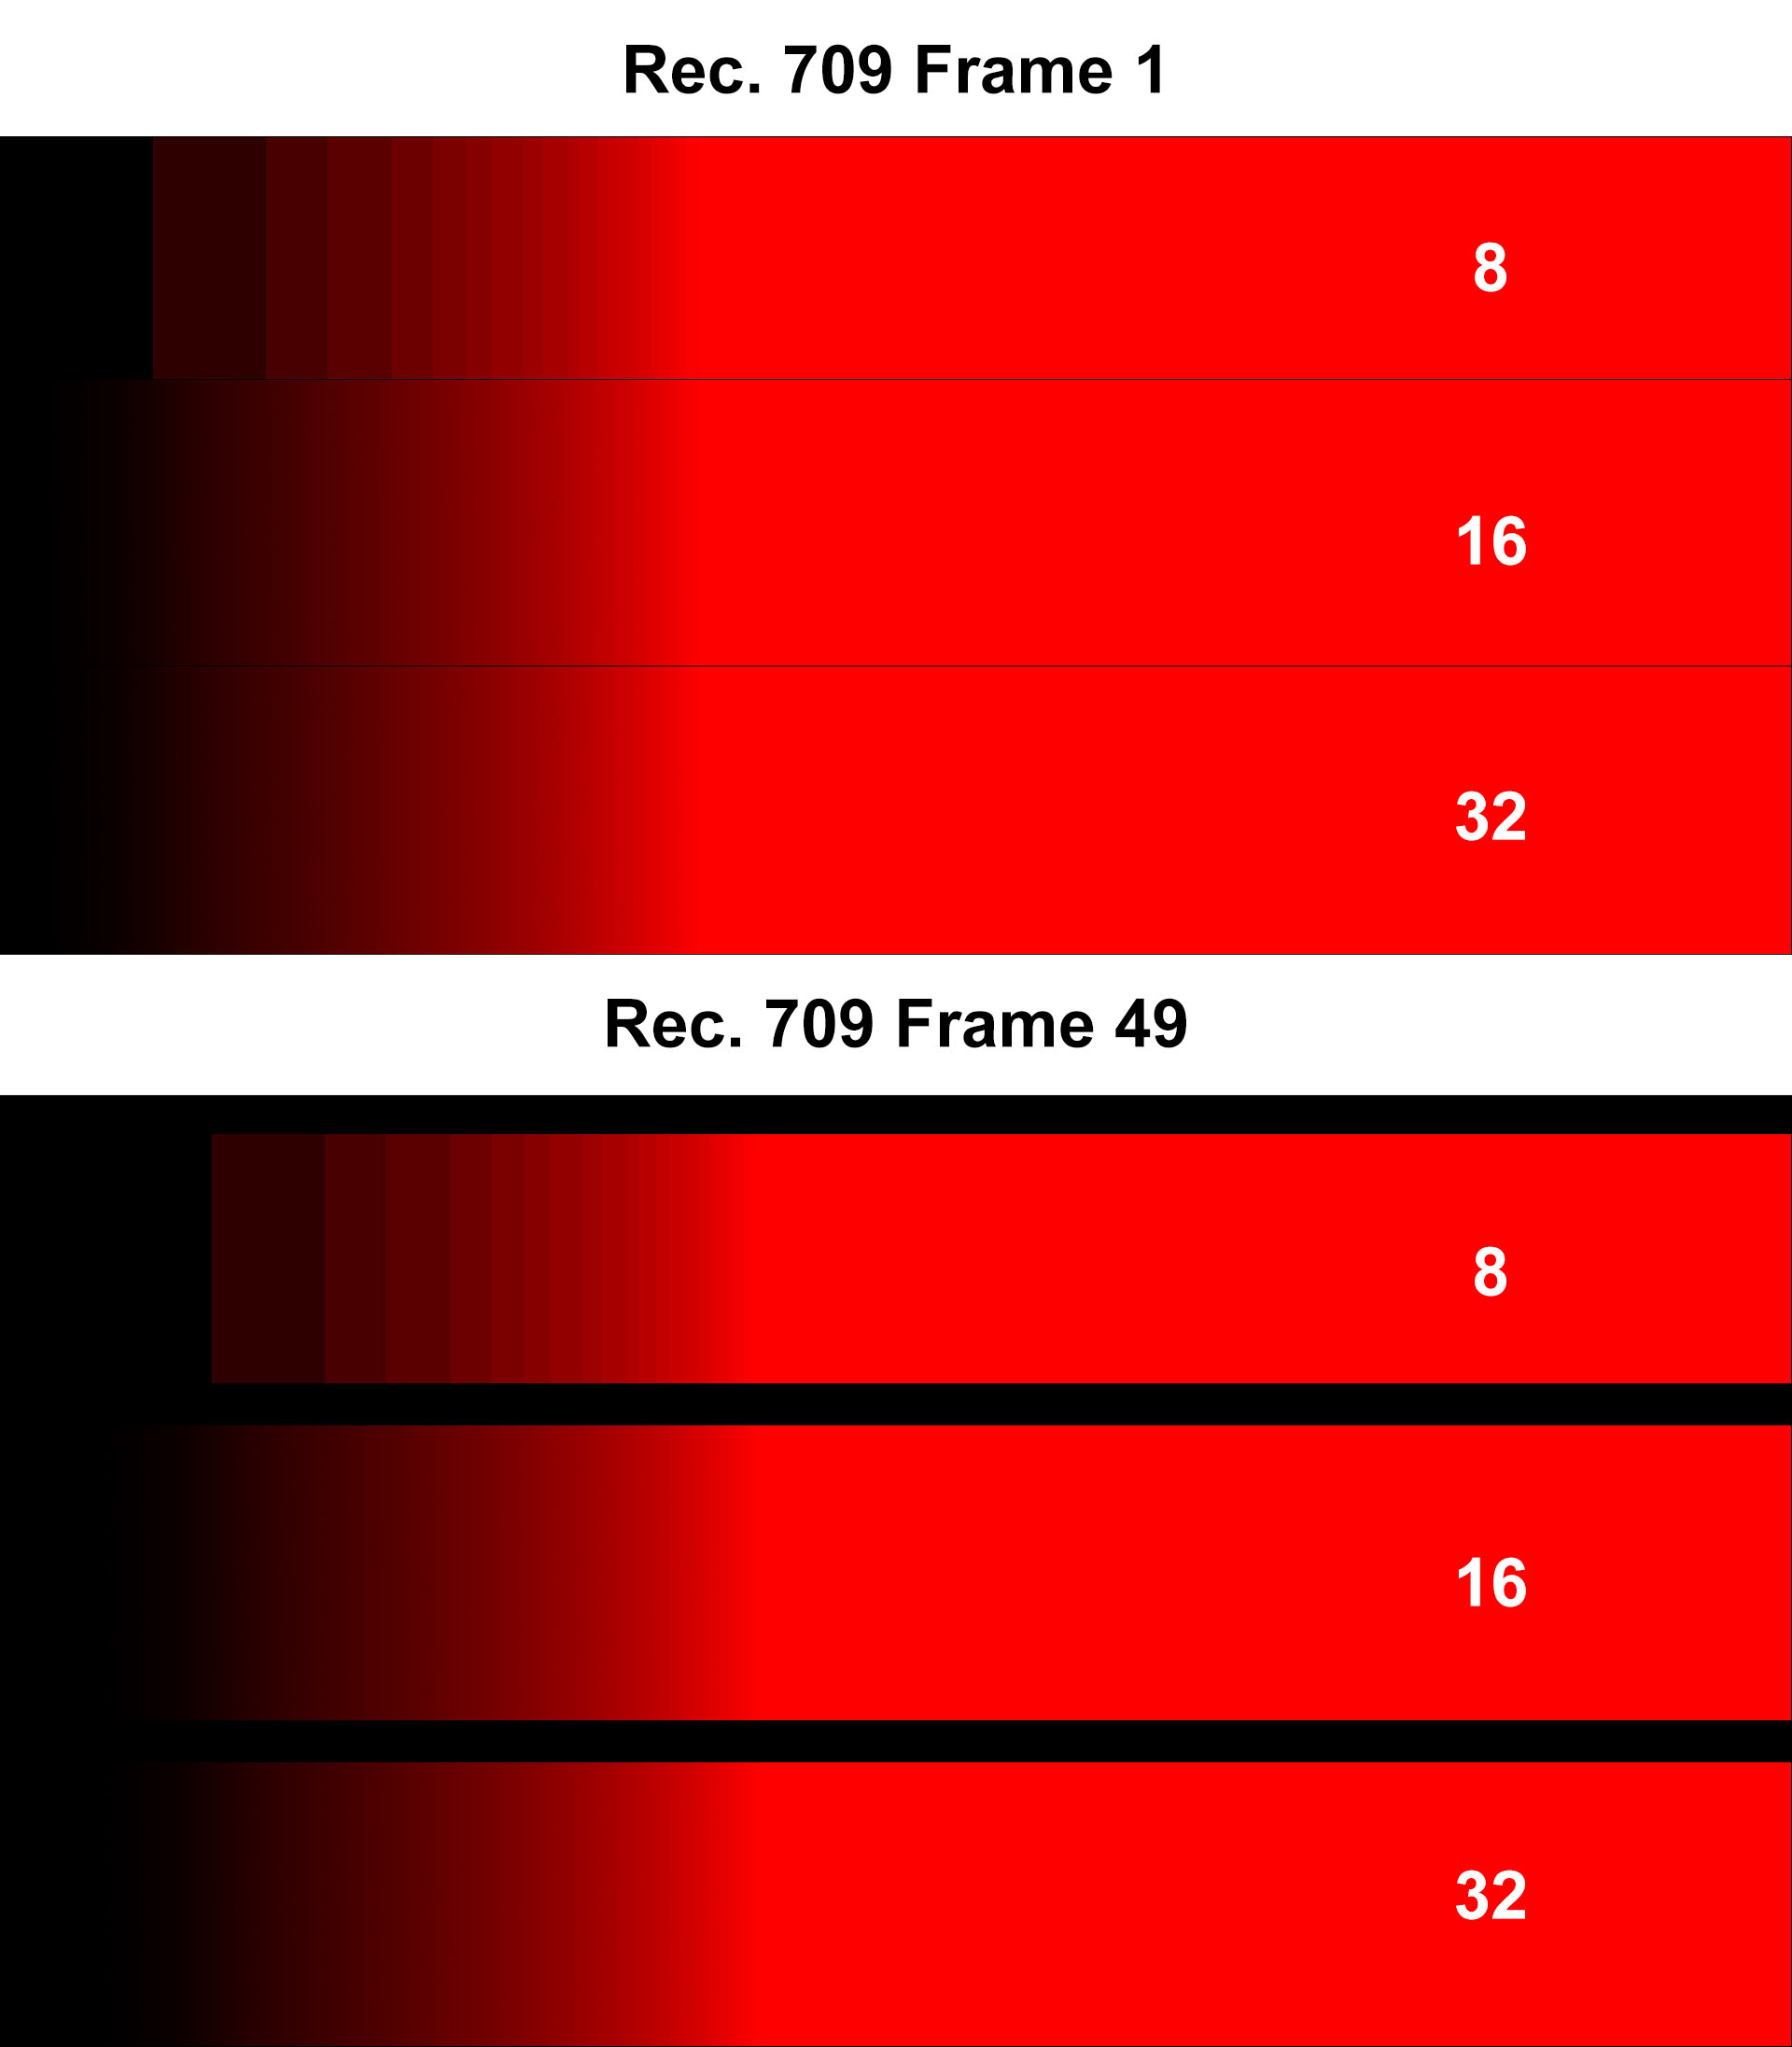
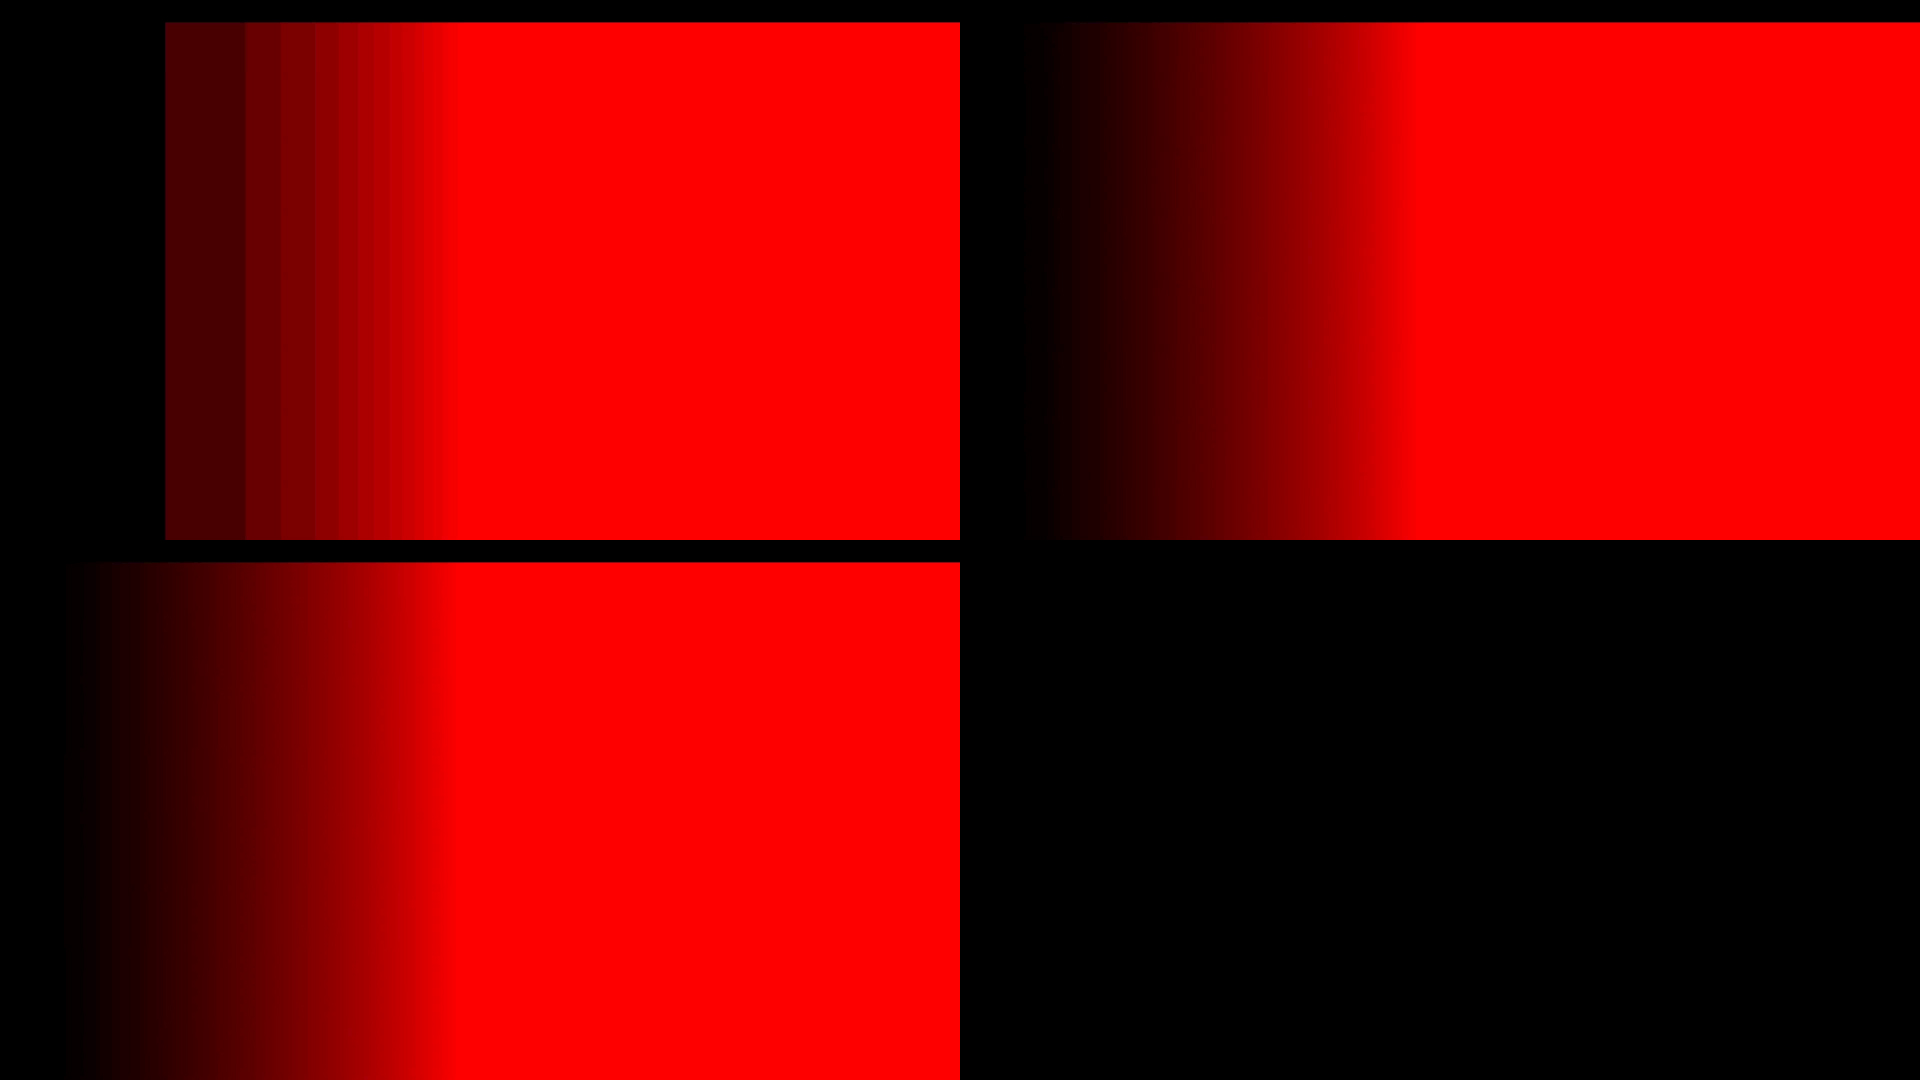
Here’s what each frame exported as TIFF (from the composition directly) looks like:
And here are the frames from the H.264 export (This clearly shows what compression does):

Remember, compression always happens at the end, after all effects and color corrections have been processed.
What can we observe? First, regarding changing the color bit depth in Rec. 709:
- Moving 8-bit to 16-bit or 32-bit helps a lot. Banding artifacts completely disappear, and effects and corrections are processed better. Even a straight export benefits.
- The difference between 16-bit and 32-bit are negligible.
- When these compositions are compressed via export to H.264, they are forced to go back to 8-bit. Even then, the advantages of having raised the color bit depth are clearly visible in frame 1. By frame 49, all of them look like mush (very similar-looking mush I must add!).
- After a certain point, compression destroys everything. All the good work can be undone with poor compression. That’s a scary thought.
What about scaling up to ProPhoto RGB?
- It doesn’t work for 8-bit or 16-bit (what are those pink bands doing there?)! Obviously, when you push colors in a larger color space, there is more space to move. Where these colors move to, though, might be totally not what you’re after.
- ProPhoto RGB does brilliantly with 32-bit float. It is markedly different than 32-bit float without ProPhoto RGB. You can see the difference even in the small thumbnails above.
- Even more surprisingly, heavy compression in ProPhoto RGB to Rec. 709 (which must happen when you export to 8-bit H.264) still maintains the quality, in both frame 1 and frame 49. This is great news.
What can we conclude? Does our 8-bit test image deserve five star treatment or not?
Of course it does. Based on the above test, we can say:
- If you’re only working in Rec. 709, move up to 16-bit.
- If you’re working in 32-bit float, move to ProPhoto RGB (or ACES).
The difference between 10-bit and 16-bit
10-bit images can have 1024 shades per channel, which translates into a billion colors. Kodak engineers found out long ago that you could put all the information from 35mm film into 10-bit log DPX or Cineon. The key word is log.
In the real world, color (light) behaves in a linear fashion, and so does a lot of the math. VFX and color correction applications have both kinds of math, log and linear. Sometimes, one is more helpful than the other. It is impossible for anyone to say that linear or log is a winner in absolute terms. That shows ignorance.
All right, what is the linear-equivalent of 10-bit log? Hard to say, but if I had to guess based on my experiences I’d say 16-bit. With 16-bit, you have 65,536 shades per channel, or trillions of colors. What’s the point of a camera having 16-bit colors?
Cameras are not eyes, nor are they theoretical color spaces. They are physical things that react uniquely to light. Each sensor has its own color gamut (which dictates its color space). The camera manufacturer decides to either:
- Map that into a standard color space like Rec. 709 (which happens on most consumer and prosumer cameras), or
- Give it to us RAW.
RAW files don’t have a color space attached to them, though their gamut is restricted to the sensor’s. You could theoretically map these RAW files to any color space, but in practicality, some RAW formats don’t work well with certain color spaces! E.g., this is why Red cameras have RedColor color spaces, or Sony F65 RAW has its own gamut mapped, etc. Similarly, it’s why the Arri Alexa is more ‘friendly’ towards log (Log C) – they come from film so they prefer to not rock the boat. Okay, all this doesn’t concern us much. We can’t dictate terms with camera manufacturers, just live with what they offer.
In practice, you normally record 10-bit Rec. 709. Sometimes, 10-bit DPX (linear or log) files are created in post or by an external recorder. Or, you record 12-bit (BMCC, Red, Alexa, etc.) or 16-bit (Sony F5, F55, F65, etc.) RAW. The future points towards 16-bit sensors, so we’ll look at 16-bit images. If the tests are helpful to 16-bit linear images, then anything else will benefit, too.
Therefore, our test subject is a 16-bit uncompressed TIFF image gradient, in Adobe RGB (1998). I’m going with 1920×1080. Here’s the image (it’s only Rec. 709 JPEG, the Adobe RGB TIFF is 12.5 MB):

Why Adobe RGB? Well, camera sensor gamuts are higher than sRGB or Rec. 709, but aren’t close to ProPhoto RGB or DCI X’Y’Z’ by any stretch of the imagination. Adobe RGB is close though, which is why it is included in DSLRs for stills. It’s an educated guess, and could be totally wrong. If you want to do similar tests, but know your camera exactly, you should specifically test that color space.
Please don’t blindly assume I’m right.
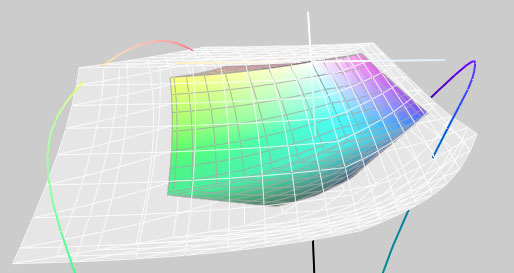
Just for fun, here’s the difference between Adobe RGB (smaller gamut) and ProPhoto RGB (larger grey gamut):
The tests
The tests are similar to what we did earlier. One major difference is that the H.264 Quicktime video will be rendered out at 1,000 kbps (about 1 Mbps). We’ll be looking at:
- Bit depth – 8, 16 and 32-bit float
- Working Color Space – Rec. 709, Adobe RGB and ProPhoto RGB (All in linear space)
That’s nine combinations. RAW footage is sometimes brought down to Rec. 709. Sometimes, you have the luxury of working in the camera’s native space. And sometimes, you trade up to ACES. The output color space is Rec. 709.
A note on linear-mode: Adobe After Effects does not recommend linear mode in 8-bit depth. I’ve only used it to keep the math constant. In the real world, don’t use linear mode with 8-bit!
We cannot see the full effect of a 16-bit image on an 8-bit or 10-bit monitor, so you’ll have to judge the results from the 8-bit videos and stills exported from Adobe After Effects.
A note on chroma subsampling: There will obviously be some variances between going from RGB (TIFF) to H.264 4:2:0. Unlike the 8-bit case, here, the differences might not be negligible. There’s simply more color to lose. Whether or not you’d notice it, is a different matter!
Observations and results
What happens in Adobe RGB color space? Here are the results (Click to enlarge):

As you can see, going to a higher bit depth certainly helps. What about Rec. 709? Here are the results:
The results are similar. Let’s look at ProPhoto RGB:

As we saw earlier, ProPhoto RGB and high gamut color spaces really need 32-bit float to come into their own. Except for that, there is no difference between 16-bit and 32-bit visually. It remains to be seen how they perform on compression.
Differences after H.264 compression
Compression always works better with higher resolution material, because the artifacts tend to be smaller and less visible. These images are from 1080p H.264 material with a data rate of 1 Mbps. The smaller view does not hide anything. (First rows – 8-bit and 16-bit, second row – 32-bit. Click to enlarge):
Adobe RGB (Frame 1)

Adobe RGB (Frame 49)
ProPhoto RGB (Frame 1)

ProPhoto RGB (Frame 49)

Rec. 709 (Frame 1)


Rec. 709 (Frame 49)
We can discount ProPhoto RGB, obviously. It has to be in 32-bit.
But what about Adobe RGB vs Rec. 709? You can clearly see that Adobe RGB has better colors than Rec. 709, though compression is equally fair to them both. The surprise is ProPhoto RGB at 32-bit, which looks the best.
The difference between 16-bit and 32-bit is negligible, which is similar to what we saw earlier. My analysis:
- When you’re shooting in greater than 8-bit, always go to an equivalent or higher bit depth, but 16-bit should be perfect for 90% of any workflow.
- Never go to a lower color space for post production. Maintain the highest color space until the last moment. If you’re shooting RAW, work natively in the manufacturer’s specified color space or go to ACES or ProPhoto RGB, etc.
Takeaways
What do we learn from this? I could summarize my findings into two rules, if image quality is your main concern:
- Always work in 16-bit or higher.
- Never lower your color space for post production (e.g., moving from RAW or camera gamut to Rec. 709 is not a good idea).
Enough said. What do you think?