
With a few well-chosen add-ons, any entry-level cinema or mirrorless camera can run longer and feel easier to film with. This quick guide shows how to build that upgrade path without breaking your budget.
The real secret is picking parts that work together. The rig you bolt around it could even decide whether the director, actors and crew trusts the footage!
Choose smart accessories and even a budget camera looks like a pro tool.
So, let’s get started!

The Starter Rig
Think of the starter rig as armor and life support. It protects ports, powers the camera for a hectic day of shooting, and grabs usable sound. All without blowing your bank.
A Universal Cage (Amazon, B&H) wraps the camera in aluminum. It prevents HDMI strain, adds NATO rails and mounting points, and kinda acts as a heat sink. Here’s the one I recommend:
If you’re getting a cage specific to the camera, I recommend SmallRig (Amazon, B&H), and don’t forget the top handle. It slides on with one thumb screw. The raised grip smooths low-angle shots and cuts wrist fatigue.
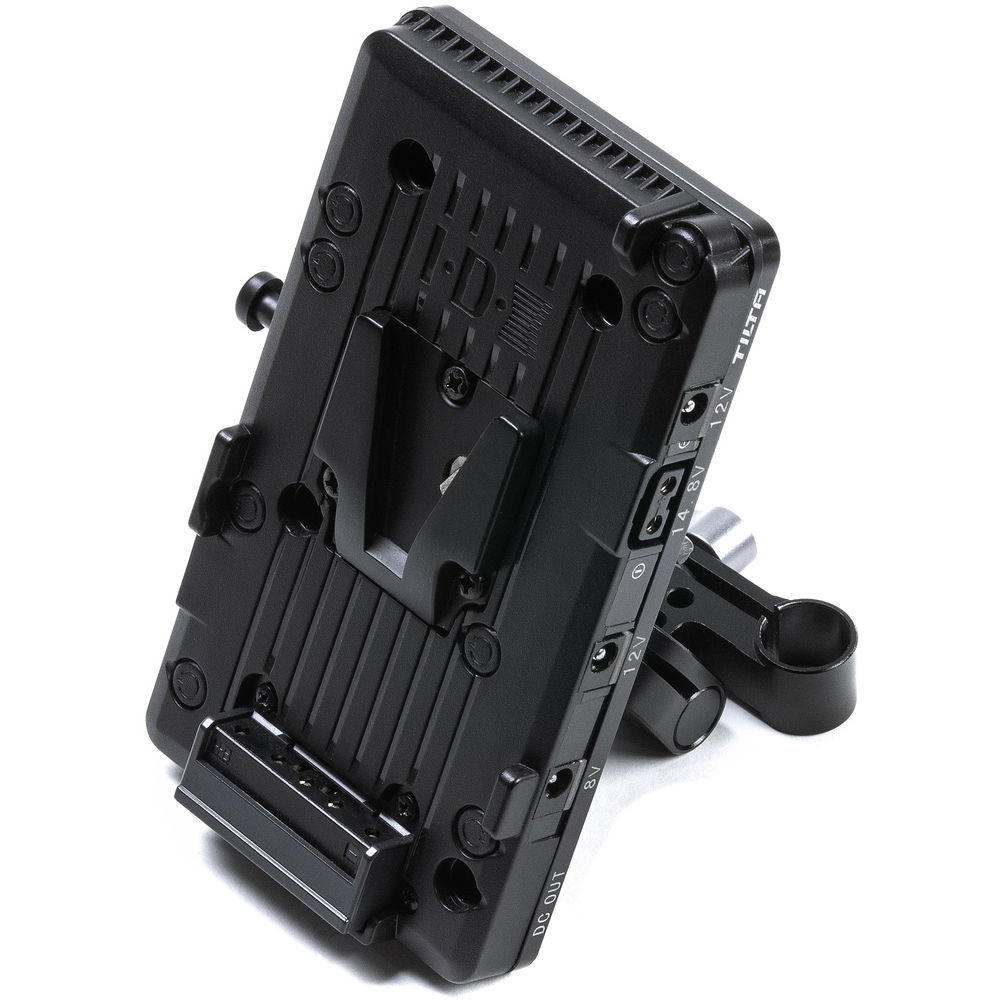
To this you add a Battery Adapter Plate with a Dummy Battery for your particular camera (Amazon, B&H). It clamps to rods or the cage. Its pivot hinge swings away, letting you change the battery without touching anything else.
The Fxlion Nano One (Amazon, B&H) packs 14.8V (I recommend getting a 98Wh if possible) in a shell smaller than a phone. A D-Tap to dummy battery feeds most cinema bodies while dual USB ports top up phones at lunch.
One brick now powers camera, monitor, and wireless video, keeping weight centered and torque off the lens mount. This battery setup outlasts many typical mirrorless camera batteries, saving swap time and charger space. A typical plate might also offer additional outputs for some versatility.
You can even split the power to run an external monitor. A Kondor Blue D-Tap Splitter (Amazon, B&H) feeds four outputs for lights and monitors. This is an optional accessory.
For day shoots and zero budget shorts none of this will make sense. But then again, neither will the camera or lens – or the film. But if you have more ambitious plans, you’ll need the accessories.
Just these two accessories can save you tons of time. The cage allows you to rig anything, move the camera quickly (especially mirrorless cameras) to position for a shot, and lets it run the whole day so you can worry about other more pressing matters.

Useful Upgrades
External monitors
On-board LCDs are small and low-cost nowadays. If your camera only gives you H.265 or H.265 or 8-bit video, an Atomos Ninja (Amazon, B&H) fixes that with a 1000-nit panel, accurate waveforms, and 10-bit 4:2:2 ProRes recording to SSD. It also doubles as instant playback on film sets.
If that’s outside your budget, and all you’re looking for is a cheap-ass but reliable external monitoring solution, check this out:
High-bitrate codecs fill cards fast. A Samsung T7 Shield SSD (Amazon, B&H) sustains over 800MB/s and survives a two-meter drop. Record straight from Ninja. A second one can also serve as backup. You can also use these drives as backups on set.
Secure the screen with a SmallRig Swivel Tilt Mount (Amazon, B&H) instead of a cheap ball head. A right-angle HDMI cable clamped at both ends protects the port.
Focus Control
Photo lenses suck for manual focus. A Tilta Pocket Follow Focus (Amazon, B&H) bolts to 15-mm rods in seconds. It ships with both rubber and 0.8-pitch gears, so you can drive still or cine glass.
Need remote pulls? Add a Tilta Nucleus Nano II (Amazon, B&H). Its wireless hand-wheel reaches fifty meters clear line of sight and sips power from the same V-mount brick.
Filter Control
Neutral density filters helps you with exposure, especially in daylight of if filming at a wide open aperture. A Tiffen Variable ND (Amazon, B&H) offers two to eight stops of ND and one large filter (I recommend an 82mm) can be adapted to smaller threads via step-up rings.
Professional Upgrades
These upgrades are more expensive, but might be just what you need.
A Tilta Mirage Matte Box (Amazon, B&H) weighs under nine ounces yet holds circular or 4×5.65″ filters. A quick-release mount pops off in five seconds for lens changes, and a top flag cuts overhead glare.
Sometimes you can’t escape wireless. Once you get used to them it’s hard to go back. A Hollyland Mars 400S Pro II (Amazon, B&H) beams 1080p up to 500 feet with about 70ms of delay. Both transmitter and receiver run on the NP-F batteries you already carry, simplifying inventory.
If you expect to jump to higher resolutions, an Atomos Ninja Ultra (Amazon, B&H) records 8K and offers more benefits.
Loose cables can pull on fragile ports and ruin a take. Use Kondor Blue Right Angle HDMI Cables (Amazon, B&H) with the locking screws on the cage to stop wiggle. Short runs reduce snags, but leave a gentle service loop so the monitor can tilt. Label each end with colored tape for faster setup in low light.
Finally, if you’re moving from gimbal to fluid head to slider head often, you might want to invest in a quick release system. A SmallRig Quick-Release System (Amazon, B&H) and identical plates on tripod, slider, and gimbal cut changeover time to seconds. Manfrotto is the standard, though I prefer Arca-type plates.
Finally, for a tripod I recommend the SCG StediFast (Amazon, B&H). Check out my comprehensive review of it below:
Why Spend all this Extra Money?
To save money. Technically you save time, and that saves money.
Some accessories last decades. A universal cage bought today fits any body in the future. V-mount batteries are compatible with anything, and also last long (unlike camera batteries). You get the idea.
Standards like 15-mm rods, NATO rails, and Arri Locating pins stick around for decades. Buy those mounts once and migrate them to your next body. HDMI and USB revisions change faster, so invest in quality cables with spare length and a locking clamp.
The trick is to buy to save money, and rent when buying doesn’t make sense. You can always rent accessories that are only required for a day or a short period.
A thoughtful accessory plan turns a budget cinema camera into a tool your director and crew can trust. Each new part solves a pain point, and it’s not something you understand unless you’re on set and realize a particular accessory could have saved you tons of time and frustration.
But that’s why I’m writing this! I’ve rigged all kinds of cameras for my shoots, and for a budget filmmaker, what I’ve outlined here are probably the simplest bunch of accessories you can find that will get the job done.
Hope you found this useful!
What type of slider are you using and what tripod did you mount on it?
I use whatever I can rent, but I personally prefer dollies.