‘Mistakes’ in lenses are called lens aberrations. The most important thing to remember is: There are no lenses in the universe completely free of aberrations. This includes our eyes.
This article is written for someone who wants to understand lens issues quickly and practically, without wanting to take a physics course. After all, if we discover a lens has aberrations, there’s very little we can do except send it back for inspection. All we have to know are:
- What aberrations are the most pronounced, and
- Will it affect our style of shooting?
What is a lens aberration?
Technically, the word aberration can be used in various ways:
- Anything that deviates from the norm.
- Strictly optical defects arising from the inability of light rays to focus on one point.
- Any optical defect in a lens.
These are definitions that are great for scientists and engineers, but for cinematographers and photographers, when I say ‘aberration’, I mean:
Any optical effect that deviates from the norm.
I didn’t say ‘defect’, but effect. Some ‘defects’ create character. If a lens distorts or vignettes (don’t worry if you don’t understand these terms, we’ll get to it) in a way we find aesthetically pleasing, then it really isn’t a defect, is it? Depending on how you see it, almost every lens defect can be used to create a work of art.
So, rather than think of lens aberrations as bad things, let us look at them as we look at human qualities. Aberrations produce character. All we should care about is: Do we like the characteristics of a lens or not?
A few things I won’t be covering
I won’t be covering the following topics in this article, as they are special cases not always relevant:
- Fisheye and other special-effects lenses
- Infrared and other forms of electromagnetic radiation
- Other scientific aberrations not relevant to filmmaking
I’ve written about how to select lenses in What lens to get?, and that might a good place to start if you are absolutely new to camera lenses.
Let’s begin. Think of the following process as entering an automatic car wash. Check one thing at a time, and come out clean with the least amount of trouble, money and time spent.
The Airy Disk and Diffraction
Light isn’t fair. There is an aberration that is caused not by the lens, but by the nature of light and the universe itself.
When light hits a sensor, it is never the perfect point that optical diagrams make it out to be. Light spreads to the shape of an airy disk:

The circular rings around an already-fuzzy blob are diffraction patterns/rings. When you stop down a lens, you are increasing the ‘blobbiness’ of a ray of light, and this results in a less sharp image. For this reason, after a certain point, if you stop down your aperture, the effects of diffraction will be very noticeable.
However, the little-known fact about diffraction (as explained in the above link) is, it’s always there. The resolving power of a lens is directly tied to the effects of diffraction. To test your lens, fix your camera on a tripod and shoot a newspaper at different apertures, without changing the focal length or point of focus. You will discover that your lens is sharpest (we’ll cover sharpness later) at probably one or two aperture values only.
If resolution is not limited by imperfections in the lens but only by diffraction, the lens is said to be diffraction limited. Since you can’t escape diffraction, you ideally want diffraction limited lenses.
The Image Circle
The first thing you need to look for in a camera lens, other than the price, is whether the damn thing will cover the sensor area or not.

Light that comes out the back end of a lens (did that come out right?) has a circular shape on a perpendicular plane surface.
At a particular flange focal distance, a lens is designed to cover a particular sensor, which should fall within the image circle. In the left image, the sensor is too big, and the lens cannot throw light on the whole area. Ideally, you want a lens that can fully cover any given sensor, as shown in the middle.
When you have the third situation, your brain gets fuzzy.
An image circle does not have a sharp edge always. Instead, the light falls off gradually. This means, there’s a difference in light levels hitting the corners of an image compared to the center region. This is called a fall-off. This gives rise to the next aberration.
Vignetting
It’s a hung jury whether vignetting is acceptable or not:

Vignetting is just dark sides and corners. With today’s technology, you can easily add a vignette in post production, in any size and shape you want. Still, one might feel it is faster to have a vignetting lens.
To test for vignetting or fall-off, shoot an evenly lit light-colored wall at different apertures. You will usually find that the widest apertures display the greatest vignetting. As you stop down, you will come to an aperture at which point vignetting is at its lowest.
To put things very generally, lens designers try to get the minimum vignetting at the corresponding aperture where diffraction is also the least. This aperture range (if it is more than one) is the sweet spot of the lens. Finding the sweet spot is one of the first things you should do with a new lens.
Focal length, Angle of View and Depth of field
You should choose focal lengths based on your unique requirements, as explained here.
I prefer the horizontal angle of view of a lens, which, in simple terms is: How much area does the lens cover horizontally?
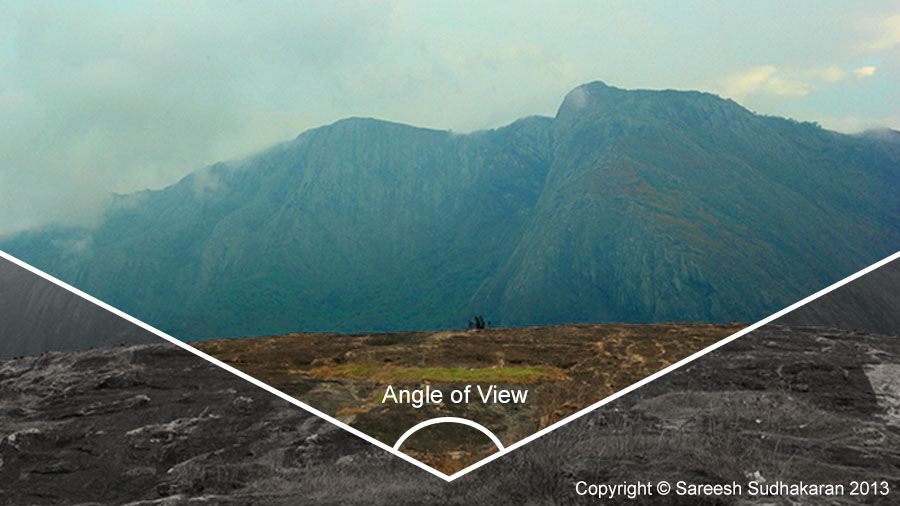
Understanding this will give you ideas on dealing with different spaces. Something that goes hand in hand with the angle of view is the depth of field (DOF):

At any given time, only a certain section of the scene can be in focus. When you can focus on the horizon, you are said to have infinity focus. When you can focus from a certain distance all the way to the horizon, you are using the maximum DOF possible with your lens, and this focus distance is called the hyper-focal distance. A good lens must always allow you to have infinity focus.
The most important property of a lens that controls the ‘length’ of the depth of field is the size of the aperture. At wide apertures, the depth of field is smaller than when the lens is stopped down:

In the above image, the blurred background was caused by an aperture of f/5.6, while the sharp background was caused by an aperture of f/32.
Understanding depth of field is critically important. You should have a complete grasp of which portions of your scene are in focus, which aren’t, and, how the first transitions into the second. In the above image of the flowers, there is hardly any transition. But if you’re trying to create drama or stick with continuity (in whatever form) you will need to have a keen eye for the way in which the out of focus elements ‘gel’ with those parts that are in focus:

Generally, when people think of the depth of field, they think of a box (or a wall). This is perfectly fine, because the sensor of the camera is usually aligned to the optical center of the lens, so whatever you point to will have a plane of focus that is parallel to the sensor:

See how the DOF region is parallel to the sensor? If you want the three tallest leaves to be in focus, you will either need to stop down, or tilt your camera so the plane of focus also tilts to keep itself parallel:

You can see how having an instinctive understanding of the plane of focus is helpful. However, there are some scenes where you can’t ‘get on top’. Landscapes are one good example. How do you stay on the ground yet apply the tilt principle?
Tilt-shift
Nobody said the sensor and lens have to be parallel!

The above image shows a view camera, but it isn’t any different from any other type of camera. The back part is where the sensor is, and the front part is the lens. You can see from the dotted lines that they are not parallel. By moving the sensor plane or the lens plane forwards or backwards (called tilting) we can actually control the plane of focus.
This famous ‘trick’ is called the Scheimpflug principle. Okay, modern cameras don’t have bellows, so how does one tilt anything? There are two solutions:
- Buy a lens that is designed with the tilt-shift function.
- Buy bellows or similar device, and put it between the lens and the sensor.
An example of the first case are the Tilt-shift lenses by Canon, etc. An example of the second case are the Lensbaby adapters
.
Shifting is the art of moving the sensor up or down, while keeping the lens at the optical center. The reverse works as well. Why would you want to do this? The coolest reason to shift is to keep straight lines straight:
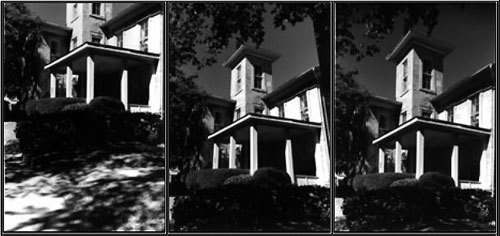
When you stand at the foot of a tall building and shoot upwards, the top of the building recedes into a point. The shift feature allows you to keep the building parallel (within certain limitations of course) as shown in the above image (second vs third photograph).
Bokeh
Let’s continue with our idea that one should pay attention to the areas in focus, out of focus and anything in between. The bokeh strictly applies to the out-of-focus areas.
I’ve already covered bokeh in here so I won’t be going into detail here. Suffice to say I define it as the blurred regions of the out of focus areas of a scene.
The out of focus areas of a scene are part of the image, so if its aesthetics are integrated with the overall message of the frame or scene, the better the result.
So far we have looked at the simpler aberrations – diffraction, vignetting, depth of field, focal length perspective, tilting, shifting, and bokeh. These are ‘macro’ aberrations, easy for the eye to see and study.
Next we’ll look at those aberrations that are hard to study, either because they are too small or because they only occur under certain conditions. You’ll have to dig hard to uncover these, but I feel it’s better to suffer at the beginning than find out when it’s too late. Some of these aberrations are too expensive to fix once recorded.
Let’s continue our car wash. We’re getting into the harder-to-reach places now.
Spherical Aberration
This is potentially the most serious aberration in a lens, because it has everything to do with the lens design itself. If you have noticeable spherical aberrations, there is almost no option but to replace your lens.
Remember the Airy disk? The effects of spherical aberration are similar to what happens due to diffraction. It turns what should be a point (dot) into mush:

Why does this happen? It usually happens because the lens is curved, or spherical. Rays have to converge at one single point for sharp focus. When the rays coming from outer edges of the lens don’t hit the right spot, you get the above result. It happens to all spherical lenses.
When you have a spherical aberration problem, there’s nothing you can do about it, except look for a different lens. How do you know your lens has this disease? If your images look blurry, and you have eliminated all the other reasons why it should be so, then whatever remains dictates you have to return your lens.
Chromatic Aberration
Chromatic aberration is possibly the ugliest looking aberration, because it looks like a toddler has used crayon to outline the sharp edges in your image. The frustrating part is, it only shows up under certain conditions, and the only hope of fixing it is in post production.
Chromatic aberration usually manifests itself as colors around hard edges:
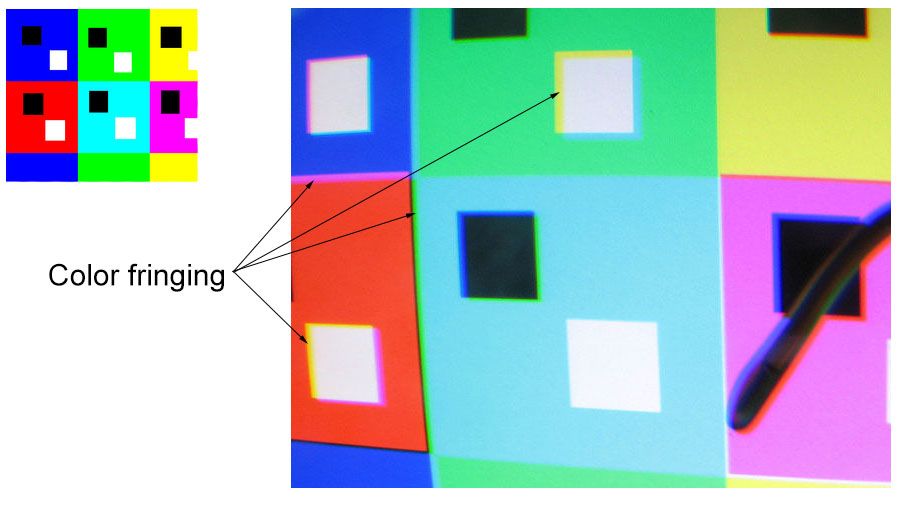
Just because we notice color fringing around the edges doesn’t mean the other parts aren’t affected. If colors shift across the board, then the color rendition of the lens will differ from the scene. All lenses change colors to a certain extent.
There are certain types of fringing, like purple fringing, that are not always caused due to chromatic aberrations. Modern-day bayer sensors have issues that bring in artifacts of their own. The only surefire way to know who the culprit is (lens or sensor) is to test them with other lenses or sensors.
Ever seen how a prism splits white light into different colors? Something similar takes place here – different wavelengths of light (colors) disperse through different mediums (glass of the lens) – at different angles (which is why you only see chromatic aberration at certain angles). If you do see chromatic aberrations across the board, change the lens. However, before you do, know that kit lenses, and other cheap lenses, usually show chromatic aberration as the norm. Some expensive lenses do too.
Wait a minute. Why would anyone buy an expensive lens if it shows chromatic aberration? That’s where your experience comes in. Every lens is a trade-off. Cheap kit lenses are cheap, but suffer optically. Expensive lenses have their strengths and weaknesses too, and manufacturers assume a professional with years of experience might have sufficient wisdom to know when to use what.
Or maybe they just feel they can get away with it.
When in doubt, study the corners of a lens and compare it with the center regions. Usually, the corners have the worst aberrations. An average lens that costs anything should have strong center performance. The most expensive lenses try to have good ‘equal’ performance on all four corners. If neither of the last two statements holds true, then lose the lens.
Coma
Think spherical aberration-like, but instead of all the blobs having the same center, they align single file:
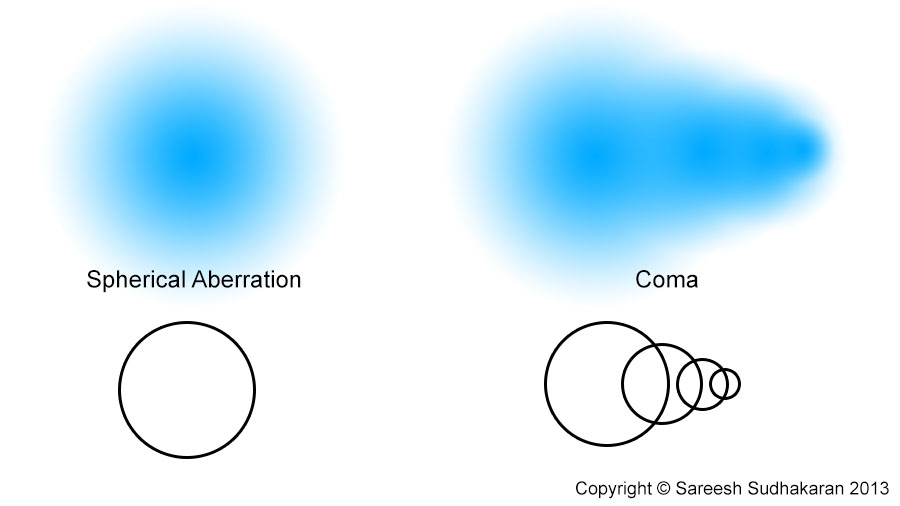
Just because coma looks like spherical aberration it doesn’t mean they are caused the same way. Coma is caused due to differences in magnification (one ray increases the dot while another might reduce it while a third might keep it the same size, etc.). The reason why they arrive at different points along a line is because coma is usually caused by off-axis light (coming from the side). Each ray takes a different path along the axis of the light and arrives at its place in the comet-like shape.
You can use a magnifying glass against the sun to see coma, just tilt the glass so the sun’s rays come in at a weird angle. Coma shouldn’t be very bothersome. One way to reduce off-axis light is to stop down the lens. Another, is to move yourself a bit. Coma, when it happens, should be confined to the outer edges of your lens, and never in the center.
Any coma that is always present signals its time for your lens to be lovingly handed back to the manufacturer or reseller, in the packaging it arrived in.
Astigmatism
Don’t let the name scare you. When we think of lenses, we think ‘perfectly circular’. But lenses don’t have to be perfectly circular. Most aspect ratios are horizontal, so it makes sense if a lens designer pays more attention to the horizontal and wider region than the vertical and narrow region. Anamorphic lenses are another example.
So, instead of a purely circular lens, you might have one that is slightly oval:
Now, imagine rays coming in parallel to the blue line, being affected by spherical aberration. The same rays, when coming through the orange line, might not be affected by spherical aberration because of the design. When this happens, you have the following strange situation:
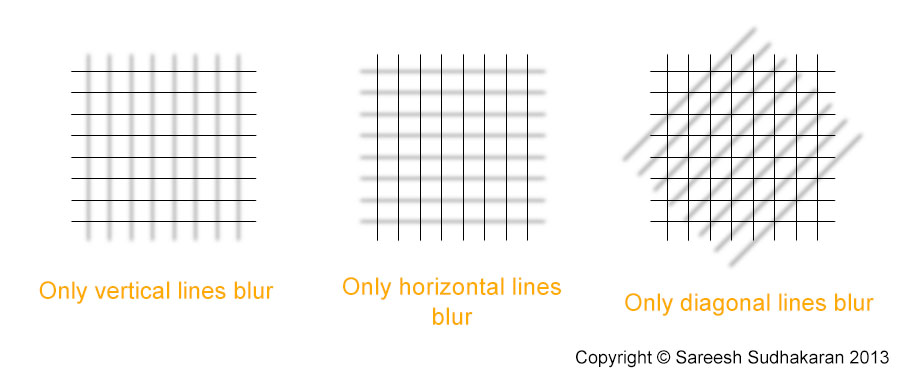
You might often hear about people complaining about lack of sharpness or resolution along a particular line. The culprit is astigmatism. It’s another form of spherical aberration, just happening selectively. Its effects are usually seen at the outer regions – the further you are from the center of the lens the more the astigmatism.
Astigmatism can also be caused by mis-aligned lens elements, but no matter what the cause, if the effect is severe or in the center of the frame regularly, it’s time to find a new lens.
Field Curvature
Field curvature is unintended Scheimpflug principle. Instead of having a vertical wall of the plane of focus, the wall is now curved:

Every lens has some form of field curvature, due to its spherical nature. You know field curvature from other aberrations when the blurriness (it shouldn’t be that bad!) or lack of sharpness appears an all sides, as if the plane has been curved. It might only happen along one axis, or like astigmatism it might effect each axes differently. In simple terms, it’s vignetting without the blackness.
There are very few lenses (especially wide angle lenses) on earth that don’t exhibit some form of noticeable field curvature. Shoot a newspaper and watch the edges. You can’t do much about it, except resign yourself to it or find a sharper lens. Lenses corrected for all the aberrations are the most expensive ones.
Resolution, Acutance and Sharpness
Now that we have seen all the aberrations, we can understand why different lenses have differing degrees of sharpness or resolution.
To keep it short:
- Resolution is the smallest detail a lens can render. The greater the detail the greater the resolving power of a lens.
- Sharpness is directly related to human visual acuity. It’s a perception that is caused by many factors.
- Acutance is the contrast in the edges of objects in an image. It is also called edge contrast, and is one of the reasons why we perceive an image to be less or more sharp than another, provided the resolution is the same.
Now we come to the point where everything you know about aberrations is turned upside down:
- Due to field curvature, if the borders of an image are blurred, the effect is somewhat similar to a blurred out of focus background. This draws the eye towards the center portion. The same can happen with vignetting.
- Chromatic aberration might increase the perception of sharpness because it will increase perceived acutance.
- If we align lines correctly, astigmatism may be used to bring out lines or objects in a certain axes while diminishing the resolution of the rest.
- Spherical aberration can eliminate moire.
This is why it is not always proper to talk about aberrations as defects. If a lens is advertised wrongly, that’s another matter. Lenses created for scientific, medical and military applications have to work as advertised. Lenses created for filmmaking and photography have aesthetics as the primary goal, not scientific or technical accuracy.
Even if we have a perfect lens, free of all aberrations, there is no guarantee all cinematographers, photographers and viewers will prefer the resulting imagery over an imperfect lens. This is why, rather than complain about minor imperfections, it is more productive to understand it as lens character and use that to your advantage.
Let’s look at three more aberrations that deliver loads of character.
Barrel Distortion
Distortion happens when the entire image is affected as a whole. The first notable kind of distortion is barrel distortion:
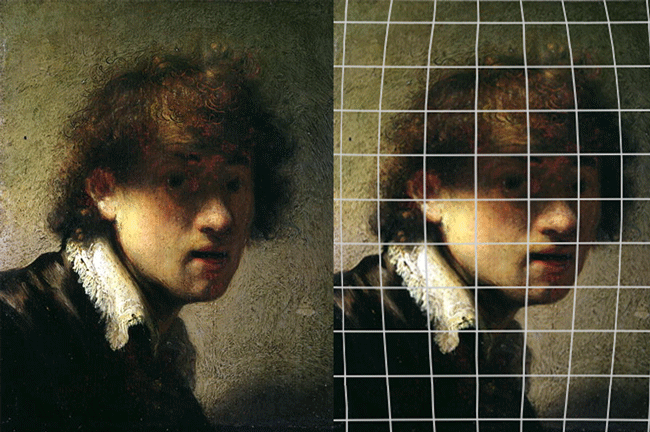
Barrel distortion is most prominent with wide angles.
Pincushion Distortion
The second image in the animation (the one that sucks his face in) is pincushion distortion. This kind of distortion is most prominent with telephoto lenses.
As you can imagine, these distortions can be used to make someone look fatter or thinner than they really are. There is a third kind of distortion, which is a combination of barrel and pincushion distortion. This is called the Mustache distortion:
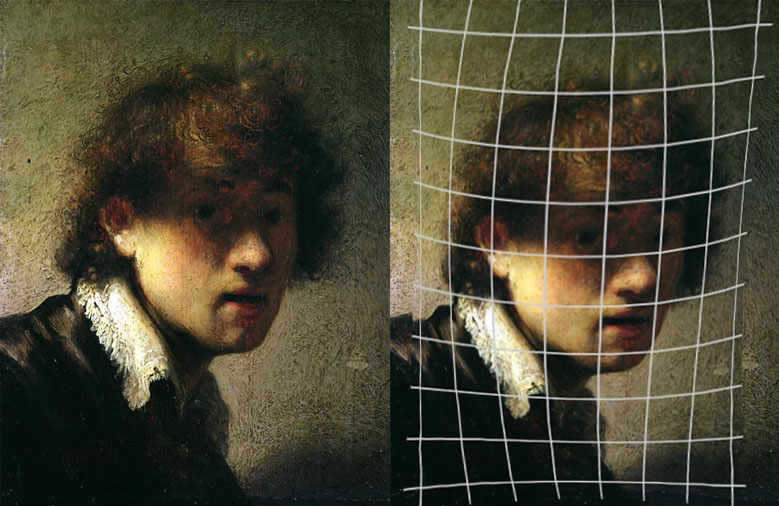
I just played with the image in photoshop. In a true mustache distortion, the center portion will stick out like a wart, which some people believe enhances the 3D effect.
To test for distortions, shoot graph paper or a brick wall at different focal lengths and apertures.
Flare and Ghosting
Ideally, one would want the light to pass through a lens directly onto the sensor, without bouncing around anywhere. To this end, the interiors of lenses and sensors are painted jet black. The lens mount is designed to be a twist-lock (screw or bayonet) system so that it is not the weak link in this chain. Yet, there is one weak link in this system, and that is the front of the lens.
Light falls into the lens from the scene you are aiming at, but it also spills in from the sides. In general, this effect is called Flare.

Flare always happens. Sometimes it manifests itself as solar or lens flare, a bright spot of light with circular bands, and is easy to see. Mostly, though, it is not very obvious, and the effect reduces the contrast of an image.
Ghosting is thought of as a kind of flare, but is really the reflection of something that is projected on to an element in the lens:

If you have bright sources of light shining straight into the lens, like light bulbs, etc., you might see ‘ghosts’ of it in other parts of the frame. Hence the name ‘ghosting’.
Since we are so used to seeing flare (even in our eyes), the effect seems natural when used with restraint. Some effects of flare, like anamorphic lens flare, are coveted as if they are brush strokes from Picasso himself.

Whatever floats your boat! Now you know that you can use aberrations just as creatively as you can use anything else related to filmmaking.
At the beginning I said only two questions were relevant:
- What aberrations are the most pronounced, and
- Will it affect our style of shooting?
Now you know what to look out for in a camera lens, what the aberrations are called, and how to test for them. The answer to the second question is entirely up to you.
Ultimately, let me repeat that photography and cinematography camera lenses are tools whose primary function is one of aesthetics, not technical accuracy. If you like the look of a lens, that’s all that matters. If you can become that confident, you won’t have to do another lens test in your life!
Thanks for making the distinction between “defect” and characteristic. I sometimes love to use a 40 year old Nikon 50mm for its rendering quality, other times an equally vintage Tokina mid-range zoom lens ($30 on eBay!) I can’t say exactly why, but I know “it” when I see “it.” Of course more modern lenses have their place too.