
In this article you will learn everything you need to know about the flange focal distance and how it impacts lens compatibility. Whether you’re a professional videographer or cinematographer, understanding flange focal distance can unlock a world of creative possibilities.

Flange Focal Distance is a terrible name for an interesting and useful feature. Don’t get bogged down by how bad it sounds. It’s actually pretty simple!
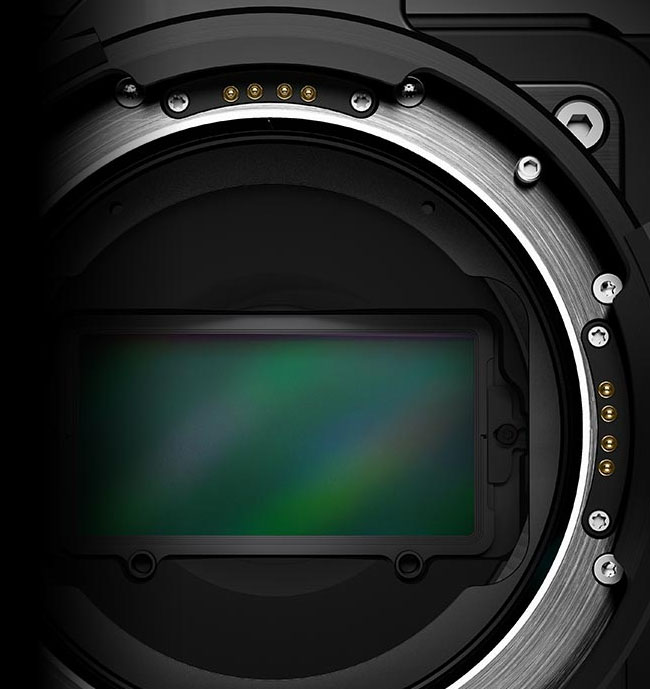
The lens mount
The lens mount is a construction that allows a lens to be attached to the camera body. It is made of metal and sometimes has electronic contacts (in gold in the above image) so information can be transmitted between the camera body and the lens.
The lens mount is like a piece of puzzle, one half of which is on the camera body. The other half is on the lens. The lens will have the other piece of this ‘puzzle’ so the two can be locked together:

Here are some important considerations of a lens mount:
- It should ensure a tight fit so the lens won’t slip off.
- In some cases, the lens mount also includes weather sealing so no air or moisture can get between the camera body and lens.
- The lens mount should be so mechanically sound it ensures the correct alignment of the lens to the sensor.
- The lens mount should be so mechanically sound it ensures the right optical distance from the lens to the sensor.
It is this last consideration we are most concerned about in this article – the distance between the lens mount and the sensor. What’s so special about this distance?
Why is it important to keep the distance between the lens mount and sensor fixed?
One of the most critical decisions any camera manufacturer makes in designing a camera system is deciding the distance between the lens mount and the sensor.
Once this decision has been made, it cannot be changed without changing the system itself. This single parameter actually dictates a lot of things.
Here are some important features of a camera system that rely on the distance between the lens mount and sensor:
- The image circle is dictated by the size and aspect ratio of the sensor. If the distance changes, the lens will no longer be able to project the same image circle.
- The Autofocus can be calibrated for a fixed position.
- Lenses can be designed specifically for the sensor keeping the optical path in mind. A change in the distance will throw this precision out of whack.
- The rear element of the lens can be designed to fall within the distance so it doesn’t scratch the sensor.
- You can use the same lenses on multiple camera models with the same lens mount. This means lenses have more longevity than camera bodies.
This last point is what we should be most concerned about as cinematographers. The other aspects are too technical and doesn’t impact our work.
However, if a manufacturer changes a lens mount, it could mean years of investment down the drain. Camera manufacturers don’t often change lens mounts, but there have been cases in the past where they have abandoned long-entrenched lens mounts for totally new designs.
As you can imagine, this did (and continues to do so) cause untold grief and suffering on countless souls who invested in a system believing it will last forever. This is why it’s important to understand this feature, and to make sure you don’t get trapped again.
Now that we understand the importance of this ‘distance’, let’s give it a name.
The Flange Focal Distance
The distance from the lens mount to the sensor is called the Flange Focal Distance:

In the photography world, a camera brand typically has its own proprietary lens mount, or mounts. Some examples:
- Canon – RF, EF, (older FD)
- Nikon – Z, F
- Panasonic – L, MFT
- Leica – L, M
- Arri – LPL, PL
The transition from DSLR systems to mirrorless systems has mandated changes in lens mounts cross the board. The distance has become typically smaller so the camera bodies can become smaller. This has a great benefit, as we shall see later.
Here’s information on each lens mount, in increasing order of the focal flange distance:
| Mount | Focal Flange Distance in mm |
| Z Nikon Z mount | 16 |
| C C-Mount | 17.526 |
| X Fuji X-mount | 17.7 |
| E Sony E-mount | 18 |
| FZ Sony PMW-F3 mount | 18 |
| EF-M Canon EF-M mount | 18 |
| XCD Hasselblad XCD mount | 18.14 |
| m43 Micro Four Thirds mount | 19.25 |
| RF Canon RF mount | 20 |
| L Leica L mount | 20 |
| G Fuji G-mount | 26.7 |
| M Leica M mount | 27.8 |
| FT Four Thirds mount | 38.67 |
| FD Canon Manual FD mount | 42 |
| EF Canon EOS EF mount | 44 |
| EF-S Canon EOS EF-S mount | 44 |
| LPL Arri LPL mount | 44 |
| A Minolta/Sony A-mount | 44.5 |
| K Pentax K-mount | 45.46 |
| F Nikon F-mount | 46.5 |
| R Leica R-mount | 47 |
| PL Arri PL mount | 52 |
If you want to use a lens made for another camera system on your camera body, then knowing the flange focal distances can help you understand whether it will work or not.
The birth of Lens Adapters
So what happens when the flange focal distance changes? Here are two scenarios:
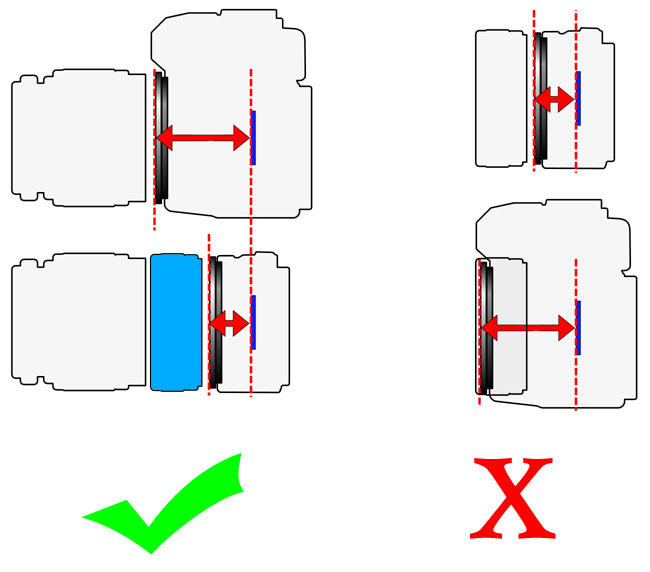
In the first scenario, you want to adapt a lens of a mount with a larger flange focal distance to a camera system with a smaller flange focal distance. You can do that, as long as you find some way to make up for the extra distance (blue thingy). The gear that makes up the distance is called a Lens Adapter.
In the second scenario, you can’t do the reverse because the lens will then have to be inside the camera body. Most times, you can’t saw open a camera body to stick a lens in. Yet, people have found ingenious ways to get it done, with some compromises:

You create another lens that manipulates the optical qualities of the first lens to make it work somehow. Such an adapter has one serious drawback – it changes the aesthetics of the original lens. The primary reason for using a lens is for its aesthetic and technical benefits (one hopes). Why would you compromise that? Two good reasons:
- The lens in question has features you want but your manufacturer doesn’t provide a lens with those features. An example is using an ENG lens on a cinema body for its servo zoom and low f-number.
- The adapter actually enhances and gives you something extra, usually cheaper than what it would cost you to get the ‘original’. Examples include the Metabones Speed Booster, wide angle converters, 35mm adapters, etc.
Lens adapters come in many varieties.
What to look for in a Lens Adapter
The ones that are built solely to make up the distance will typically only include:
- The lens mount of the lens
- Hollow space, but sometimes also other lens elements to modify the optical properties of the lens.
- The lens mount of the camera at the other end
- Electronic contacts to get some or all of the same functionality (not always necessary or possible)
There are other factors which determine which lenses can be adapted to which mounts. One of these is the fact that some lenses have protruding elements that move when focusing or zooming, etc. This protrusion is acceptable because the flange focal distance the lens is designed for will take this into account. However, using such a lens on a camera with a smaller flange focal distance might cause the protrusion to scratch the sensor or hit the mirror assembly in a camera.
Secondly, not all adapters allow you to focus to infinity.
Then there’s the problem of the image circle. Lenses made for smaller sensors or film sizes might seriously vignette on larger sensors, even if you could find an adapter. A good example is C-mount lenses on a Micro Four Thirds Camera.
Next are the electronic contacts, which might or might work ‘as advertised’. A camera circuitry is usually designed to read and ‘understand’ the data coming from lenses by the same manufacturer. There are also patent and licensing issues on cutting edge technologies like auto focus, image stabilization, metadata, etc.
Let’s say a certain feature was allowed, like autofocus. An adapter will never be as good at autofocus as the native camera body. The proprietary circuitry cannot always be reverse engineered, as has been shown by the worse autofocus performance of third-party lenses.
Finally, the biggest drawback of using lens adapters is distance error. No matter how well an adapter is made, there are always minute variances that change the distance. Poorly made adapters might not be perfectly level, and will cause optical side effects.
The better manufacturers provide thin slivers of metal that you can add (like a rubber gasket) to fine tune the distance. This process is called Lens Shimming. Lens shim kits are usually only found from better manufacturers.
Using an adapter is a matter of weighing the pros and cons, and then living with the compromises.
How to use the flange focal distance to know when a lens is compatible
Look at the chart listing the flange focal distances. The lower the distance, the more universal your mount.
What does this mean?
E.g., You can’t use Sony E mount lenses on a Canon RF mirrorless body because the RF-mount is designed so that the mount sticks 20mm away from the sensor; while the E mount needs 18mm to work the way it is designed to. One will have to break the RF mount to the get the lens 2mm closer to the sensor.
On the other hand, you can theoretically use Canon RF lenses on a Sony E mount camera with an adapter whose width will make up the difference. I say theoretically because how do you make an adapter that’s only 2mm in total thickness while also having enough depth to fit both the lens and the camera body?
Therefore, even if the distance can be made up, sometimes it’s just too small for any practical purposes.
A camera with a smaller flange focal distance has three major benefits:
- It allows you to use many lenses,
- It makes camera bodies smaller, and
- It makes lenses smaller (generalizing here).
This is why the modern trend has been to move to lens mounts with smaller flange focal distances. Even the ubiquitous Arri PL mount was dropped for the LPL mount with a smaller flange focal distance of 44mm.
Having a larger flange focal distance also has benefits. The sensor is safely tucked away in the camera body, protecting it from dust and the elements while changing lenses, etc. The smaller flange focal distance is one reason mirrorless cameras and cinema camera sensors collect dust more often!
Examples of Lens Adapters
What to look for in a lens adapter:
- Precise machining, with a shim kit if possible.
- Made of metal. Strength to handle heavy unbalanced systems.
- Capable of Infinity focus
- Electronic compatibility using CPU contacts, if necessary
- Aperture control
- Autofocus, if necessary
- Stabilization, if necessary
- Minimal optical degradation. There shouldn’t be light leaks or internal reflections in the adapters. It’s important the inner material be not reflective in any way.
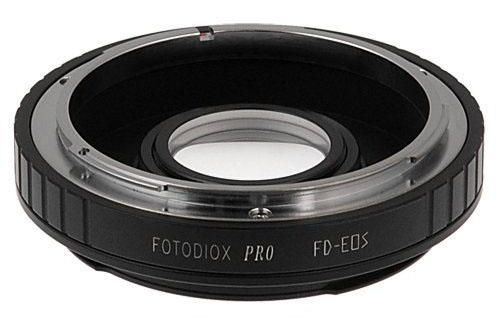
The best bet is to buy an official lens adapter like the Canon range of EF to RF adapters:

Or the Nikon FTZ II adapter for F-mount lenses to Z-mount camera bodies:

Here are a few lens adapter manufacturers who sell a range of lens adapters and have been around long enough:
| From Camera Manufacturers | Third-party Manufacturers |
| Arri | Metabones |
| Blackmagic Design | MTF Services |
| Leica and Leitz | Novoflex |
| Canon | Fotodiox |
| Nikon | Voigtlander |
| Red | Wooden Camera |
| DZOFilm | |
| Kipon | |
| Sigma | |
| Vocas |
The bottom line is, unless you are experienced enough to have strong preferences for certain third-party lenses, I suggest you stick to the lenses made specifically for the body of your camera.
In the last fifteen years or so, I’ve used all kinds of adapters, from really cheap ones to expensive adapters. I’ve never been truly comfortable with adapters. It’s always one more link in the chain that can go wrong.
The cheap adapters are hit and miss. Sometimes they’re too loose and the lens rattles on the mount. This is dangerous because the mount can get damaged. It also means there are enough sized gaps to allow dust or moisture to seep into the camera body and ruin your sensor.
Sometimes the lens adapters are too tight, and won’t come off or on. Trust me, you don’t want to be in this position on a shoot. It looks highly unprofessional. If you get truly mad and twist and turn the lens adapter any which way, you’re in danger of scratching your sensor.
Don’t go for the cheap lens adapters, especially when the lens and the camera body are expensive. I understand budget concerns. If you really have to, at least try them on in a relaxed environment many times before you commit.
It is not uncommon for Hollywood DPs to have custom adapters made to adapt specialized lenses for a certain camera. E.g., medium format lenses from Hasselblad and Mamiya have been adapted for 65mm film and IMAX cameras. They have the budgets, so why not?
The lens mount exists to integrate camera and lens into one seamless system The lens adapter is now responsible for the same function. If it fails, it’s a third wheel in the relationship.
In a nutshell
- Pick a camera body with a lens mount that is as high up as possible in the chart I provided. The Nikon Z system is the current winner for full frame camera systems.
- Look for the lens mount of the lenses you want to use. Ideally, they’re further down the list.
- Calculate the difference. If it’s too small, you might not find an adapter as it’s physically impossible to build one so thin yet sturdy.
- Look for the adapter from lens mount A to lens mount B on B&H or Amazon. Chances are, one exists!
I hope this article has helped you understand the importance and practical utility of the flange focal distance. If you have any questions, please ask me in the comments below.
Nice overview, very well explained, thanks!
But it looks like you mixed up one picture, the one shown below this “…an official lens adapter like the Canon range of EF to RF adapters:”
It seems to have a lens, which is not needed here (and might degrade the quality).
Thank you! Canon provides three variations of the RF-EF adapter. One of them can take rear filters instead of the typical front filter.