The Panasonic GH5 is one of the rare cameras that offer 4:3 internal recording at 3.3K (and hopefully a 5K version in a future firmware update). This means you can use an anamorphic lens to get that anamorphic look many love.
But the problem is, anamorphic lenses are extremely expensive and outside the budgets of even the most professional and high-end shooters. Most people just rent anamorphic lenses, but even then, they are expensive to rent. It is insane to expect someone who can only afford a GH5 to use an Arri Master Anamorphic set with it. That’s why we have cheaper solutions.
One way to shoot inexpensively (relatively) is to find a cheap anamorphic lens in the PL mount that can then be adapted to MFT. But this is not easy, because these lenses don’t show up very often. So as a general recommendation, it’s not very practical. SLR Magic makes an anamorphic lens that can directly adapt to MFT, though.
The only practical solution that most readers can adopt and try is the anamorphic adapter.
What is squeeze and desqueeze?
I’m assuming you know what an anamorphic lens is and why it’s important to you. If you don’t, then don’t bother. It’s not worth the effort at this point.
Here’s a shot of me with a real anamorphic lens (Optico-Elite, if you must know) adapted via a PL to MFT adapter (Amazon, B&H):

You can see it is ‘squeezed’. This particular lens has a 2x squeeze. This means it squeezes the image horizontally two times. Later in software you have to ‘desqueeze’ it by the same ratio (2x):

The three common squeeze ratios you’re likely to find are:
- 2x – the one motion pictures use. Many projector anamorphic adapters use this ratio as well.
- 1.5x
- 1.33x – this has become popular with the advent of 16:9 sensors. I don’t like this because it eliminates many of the advantages of the anamorphic look.
But there’s a catch. With the Panasonic GH5, the aspect ratio is 4:3, or 1.33:1. True anamorphic is 2.39:1. This means, to get 2.39:1, you’ll need to squeeze 4:3 to exactly 1.79x.
If you’re using a 2x squeeze, you end up with 2.66:1, as shown above, and you’ll have to crop off the sides to get 2.39:1:

If you’re using 1.5x, you’ll only get 2:1. You can get this internally with the Cinema 4K setting, which has an aspect ratio of 1.9:1 already.
So as far as I’m concerned, either we need a 1.79x or 2x adapter. This will give us:
- The true compression of space similar to cinema anamorphic lenses
- Oval bokeh
- Distortions unique to anamorphic
The parts of an adapted anamorphic system
So what do I need? I’m not an expert with is, and it took some days of research. So I might be wrong here. Generally, you need the following things:
- A taking lens. This is the normal ‘spherical’ lens. E.g., let’s say you have a 50mm f/1.8 lens. This goes on the camera just like always. It’s called the taking lens. The diameter and filter size of this lens is an important number, because the next item on our list needs to adapt to it easily. This limits the kinds of lenses you can use. Zooms with larger diameters are out. More compact primes are in.
- An anamorphic adapter. This has an optical element that squeezes the image. It looks like an oval piece of lens. This has a focusing ring as well. This means you need to focus using two rings – one on the taking lens and then on the anamorphic adapter. It’s tricky!
- A clamp. The clamp is to mate the adapter with the taking lens. Many cheap adapters are for projectors, so don’t have a way to get it fixed to a normal lens. This is why you need a clamp, and anything else to get it to work. You don’t want light leaks or alignment issues. The options I’ll cover in this article all come with clamps, so you don’t have to worry. Since I shoot professionally there’s no time for DIY solutions.
- Single-focus mechanism (optional). If you don’t like to dual focus (who does?), then you need to get a separate mechanism that will allow you to focus using just one ring. It’s an added adapter, and an extra expense because, it, too, needs an optical element in it. So in total it would be the third lens!
- A diopter (optional, but important). Once you add all these lenses you lose the ability to focus close (many stop at 3 feet, not close enough for close ups), so you need diopters to get a closer focus distance. There are many powers for diopters, and you’ll need to invest in a whole kit. The good ones are not cheap! This is the fourth lens in your anamorphic train.
As you can see, hacking together an anamorphic setup isn’t that simple nor that cheap. I did all this research to figure out if I really wanted to go this route. Mainly I’ve decided to just rent anamorphic glass with PL to MFT adapters. I just don’t have the patience for this kind of setup, but you might.
So let’s get to the options.
Three options to get shooting anamorphic quickly with the GH5
These are not the only options, there are plenty. But I needed the following:
- Single focus mechanism
- A full system, so I didn’t have to bother with clamps or whatever
- Slightly newer lens designs for 4K
So my options boiled down to these three, with the order being least preferred to most preferred:
#3 Isco Micro 2X Anamorphic Lens – $650 for adapter and clamp
You can get it on Ebay here. It’s an Ebay listing so the link won’t work after a while. Just google it and if it’s available you should be able to find it.
Unfortunately, even though this is cheap and somebody has already done all the dirty work for me, it doesn’t offer a single-focus mechanism. This is why it’s third on my list. If you want to adapt other combinations of anamorphic adapters, this is how you do it. You just have buy the parts piecemeal.
Here’s some footage shot with it (not mine):
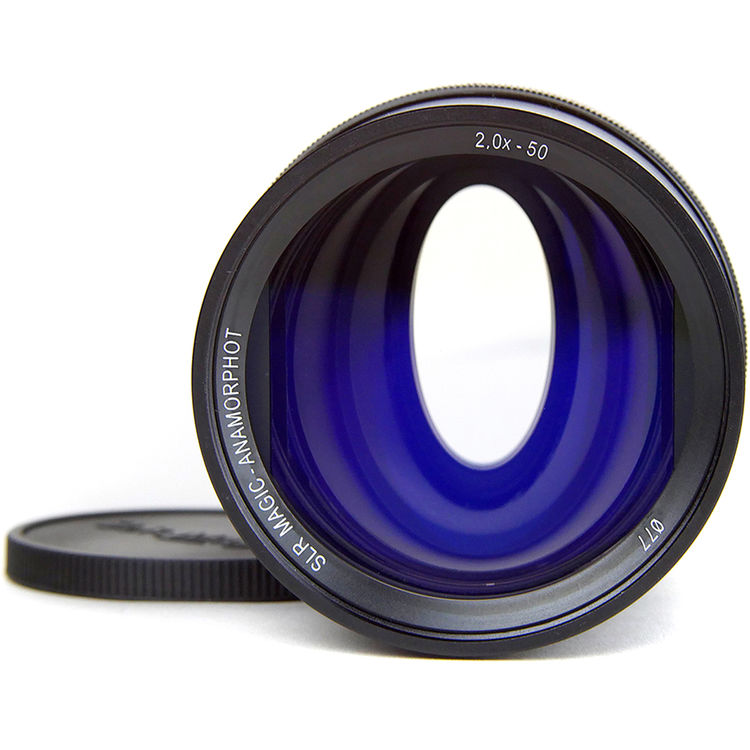
#2 SLR Magic Anamorphot-50 2.0x Anamorphic Adapter ($1,199) with Rangefinder Cine Adapter ($599)
The rangefinder adapter allows you to get single focus. Without it you’re stuck with dual focus. Another company that just makes a single focus mechanism is Rectilux, with a product called CoreDNA.
You can find SLR Magic on Amazon and B&H.
Here’s a great video that explains it all (not mine):
#1 Aivascope 1.75x
1.75x!! This is the perfect ratio for the GH5. And it comes with a free single focus mechanism. You can buy it on Ebay.
Here’s footage shot with it (not mine):
Then all you need to look for are diopters, which you can find on Amazon or B&H. Get high quality ones, every time you add a lens it makes the image quality that much worse. Many have found you have to stop down to get sharp images with anamorphic adapters. Lots of compromises, ifs and buts. Which is why I’ve decided to abandon it.
But I hope you found this useful. Let me know what you think in the comments below.
Hi Sareesh.
Thanks for this nifty article that breaks it down and three great options.
I’m fairly new to the game of anamorphic shooting, and I’m trying to find out if it’s possible to achieve something that at the moment looks impossible.
I feel like it’s wishful thinking at this stage to try to get a wide angle (24mm full-frame equivalent or something close) on the GH5 with an anamorphic setup. I know it’s way easier to just opt for a camera with a bigger sensor, but I thought I’ll search for possibilities first since the GH5 is my main camera at the moment.
What are your thoughts on this?
I’m not a wide angle person so I never experimented to get that look. I think 24mm should be doable but you’d need to test a combination of adapters and lenses to find the right balance. You could also shoot in the 4:3 5K mode to get a further crop for 4K.
Thanks very much for this! I really appreciate the time and effort you’ve put into this.