In this lesson I’ll walk you through the process of recording and monitoring audio in the Sony a7S/a7S II/a7R II.
Here’s the video:
Notes:
- There is always a limiter applied to audio, regardless of the setting of levels.
- I don’t use Phantom power, because my recorder eats batteries.
Audio Solutions for Internal Recording
One way to record audio is to directly connect a microphone into the camera. The other way is to use a preamplifier (preamp) so you can record more than one microphone.
Sony provides an XLR adapter for the Sony A7s/a7S II/a7R II, the XLR-K1M, which retails for $798 (includes the ECM-XM1 shotgun microphone):
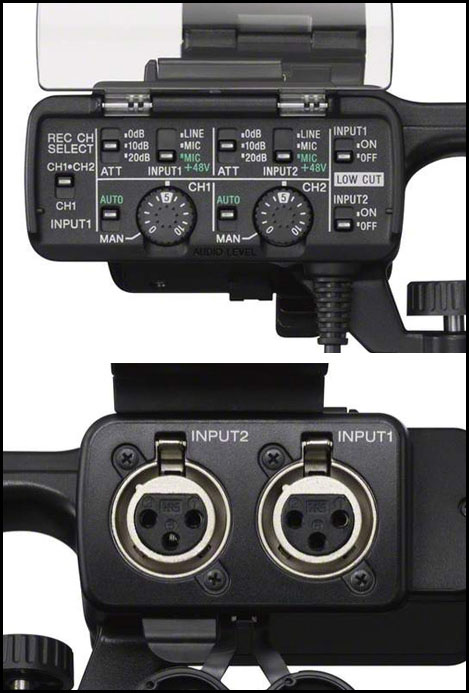
The adapter allows you to connect up to two phantom powered XLR microphones with both mic and line level ability. It also gives you direct control over gain and levels with tactile controls similar to those found on ENG video cameras. The power consumption will be too minor to affect recording times. The two disadvantages are:
- It must be connected to the hot-shoe adapter, which makes it difficult to mount the Shogun in the base configuration. Also, the hot-shoe mount is the weak link and is susceptible to damage over time.
- It is too expensive.
For ultimate quality, I prefer Sound Devices mixers, though they charge accordingly!
If you only want preamps, either the JuicedLink or a Beachtek will deliver the best bang for the buck.
In the next lesson, we’ll go over the process of recording dual system audio.
FAQs
These are important topics raised by subscribers that shed more light on this lesson.
Q. Beginner tips on recording with the Tascam DR-60D (with Rode microphones) and audio recording in general
A. Here’s everything I know, in a nutshell:
- Position your mics as close as you can to the subjects. This is the best and only way to keep signals high and noise low.
- Don’t use any cutoff filter on the mics themselves. I know my ME66 has a filter that I turn off, if the Rode has it, turn it off.
- Set the recording mode to 1 or 2 (for XLR, 1/4″) or 3/4 (3.5mm TRS) and corresponding monitoring mode. I record in 24-bit 48KHz WAV.
- Keep the headphone level to 0 and then put on your headphones.
- I set the main volume/level dial for whatever channel I’m on to max. Keep the other unused ones at ZERO. Very important. Sometimes you get static from them.
- Now slowly raise the headphone level for a comfortable listening experience. When I’m in a noisy factory, I might have to jack it way up. In a quiet studio, sometimes less than 5. Tt doesn’t matter which level you listen to, as long as you can hear.
- Listen to your audio. When I pay for an audio guy I’m not paying for someone to hold a recorder or boom, I’m actually paying for their set of experienced ears. What should you listen to?
- Is there any noise that you can also hear otherwise? Then go to a quiet location or get the mic closer, as said in point #1.
- Is there any reverberation or echo in the voice? This is deadly. You must get rid of it. Change location if you must. In a crunch put up blankets or furniture or human bodies between the source, mic and reflective surfaces.
- Is there any noise that you can’t hear otherwise? Like static, audio equipment noise (both these are always there, even on the most high-end equipment), air-conditioning, comb-filtering, interference, etc? This is where the professionals have us amateurs beat. They can hear stuff we can’t, and they understand when to compromise for post production.
- What if you can’t hear the audio well? Rode mics have low signal strengths (one reason why they are cheap, and this part isn’t advertised) so you need good preamps to boost the signal. This is the “Gain” setting. The Tascam does a great job (the reason it’s better than a Beachtek, A7s or JuicedLink), but it does introduce problems:
- In the recording mode, you have the option to set the Gain to Low, Mid, or High. For all my mics, I set it to Low. However, for Rode mics, you might have to set it to High.
- This will introduce noise, but that’s the price one pays. You can eliminate this noise later using the post process I’ve shown, so it’s not a deal-breaker.
- Once the levels and gain are to your satisfaction, the next filter is the ‘limiter’ or ‘low-pass filter’. This cuts off high frequencies – the noise that only trained ears can hear. The Tascam has a limiter filter as well that you can experiment with. You need good quality headphones to actually hear it. I’ll be honest, I struggle here. If it sounds okay to me with the limiter turned off, I move on.
- Use the dual recording feature on the Tascam to record two levels. Try to push the Rode as high as it will go without clipping so you can get the strongest signal possible. For backup, you will record audio separately at –6dB. You only use this backup to repair the ‘clipped’ parts, if any. I also record audio on the camera for syncing, backup and reference.
- Be aware of when the talent/subject raises or lowers their voice, since this affects the overall levels. I’m always mastering to –12 LUFS as explained in the video. However, I’ll admit this bit is hard, because as a single shooter, you can only focus on so many things. I just watch the audio levels visually. There is nothing much you can do at this point. You can’t raise the levels any further and you can’t increase the gain because it’s already on High.
- If you have to lower the audio, use the levels. Leave the gain on high. Remember, this only applies particularly to Rode mics.
- This is where the Tascam hits the limit of its capabilities, and it’s good enough for 99% of video productions. For cinema grade work, where the audio will be judged on expensive speakers, you need high-end stuff like Sound Devices, Nagras, DEVA, etc. What do these guys have that our super-cool Tascam doesn’t? More filters, better preamps, beautiful and uncompromising circuit boards. If and when I ever move up to appreciate these finer tools, I’ll buy a Sound Devices, but for now, the Tascam is a better recorder than I am an audio person.
- Of course, audio professionals also listen to the quality of the audio, the voice of the speaker – its pitch, tone and timber. You can alter these a bit in post, but good audio professionals carry many microphones and use the best one for the person+location. Most of us shooters just have one mic and live with it.
- For critical work where your career and brand is on the line, hire a decent audio person. This is one way I judge whether I should take on a project. If it can’t afford a sound guy, better not do it.