
Watch the video:

The tools of cinematography have changed a lot over the last two decades.
Today’s budding cinematographers are used autofocus settings and Instagram filters and Look-up Tables (LUTs) – things traditional cinematographers probably won’t even consider as real cinematography.
In fact, when I hear the word cinematography, the first thing that comes to mind are classic cinematographers like Roger Deakins and Vittorio Storaro.
But the truth is, cinematography hasn’t really changed in all this time. Whether we’re watching a movie on Netflix or on the big screen, many of the same concepts that made movies great then still apply to movies today. At its most fundamental level, cinematography is simple, and needn’t be unnecessarily complicated.
With that in mind, here are the 5 most
powerful elements of cinematography that you should be incorporating in all of your projects:
1. Exposure
One of the first things to consider when creating a shot is the exposure. In a nutshell, this is my definition for a beginner:
Exposure is the amount of light you think your subject needs.
Sareesh
To know more about it, read the following article and watch the video:
Of course, as a beginner, you’re scared of exposure. You tend to navigate to the auto exposure mode by default.
However, if you have your camera on auto mode, it will attempt to regulate the exposure itself. You may notice this when you move your camera and see the image suddenly darken or become washed out.
If this happens while you’re rolling, it can look a bit jarring in the recorded video. To have more control over the look of your footage, set the exposure yourself.
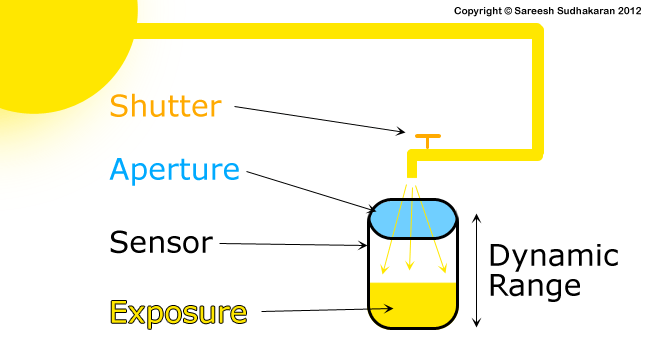
To do this, you’ll need to adjust the shutter speed, the aperture, the frame rate, and the ISO. That may seem like a lot, so let’s take them one by one:
ISO
The ISO is what adjusts the sensitivity of the camera’s software. A higher ISO will create a brighter image, but will also be grainer. This is what happens when you take a picture at night on your smartphone. The built-in software automatically increases the ISO, which makes the image visible, but grainier.
In the daytime, you can use a lower ISO and get a crisper image. A typical sweet spot range is between ISO 100 and ISO 3200, although some cameras can go even higher. But, just because you can shoot in extremely low lighting conditions doesn’t mean you should. You’ll have to decide on the right balance of brightness and graininess for your image.
Aperture
The aperture refers to how open the iris is, which impacts how much light gets into the camera. The aperture is measured in f-stops or T-stops, with a smaller number (f/3.5) referring to a wide open lens and a higher number (f/22) referring to a smaller opening.
Aperture also impacts the depth-of-field of your image. The larger the aperture, the blurrier your background will be, while a smaller aperture can give you a sharper, crisper image from foreground to background.
To know more about aperture, watch this:
As with the ISO, the best f-stop to use for a scene will depend on whether you’re shooting indoors or outdoors and how far away your subject is. The most common general aperture setting over decades has been T2.8 for Super35mm. More on this here:
Shutter speed and frame rate
The shutter speed and frame rate are often confused for each other because they seem to be dealing with the same thing. However, they vary quite a bit.
The frame rate refers to how many frames are created per second (the standard frame rate for film is 24 frames per second) while the shutter speed refers to the length of exposure of each frame.
We’re dealing with fractions of second! Does the frame rate and length of exposure really matter? It does! It’s what makes an image look either natural or unrealistic.
And read this to understand how shutter speed changes the motion characteristics of film:
You may have head about the controversy over Peter Jackson’s decision to shoot The Hobbit at 48 fps, which some viewers found to be too “lifelike” for a fantasy film. Increasingly, big-name cinematographers have been experimenting with various frame rates.
For the most natural results, the shutter speed should be set to as close to twice the frame rate as possible. That means if the frame rate is 24 fps, a 1/48 shutter speed (or 1/50 if you’re shooting on a DSLR) will look most natural to the human eye.
The higher the shutter speed, the less motion blur and the darker the image; a lower shutter speed will have more noticeable blur but the image will be brighter.
Watch this video to learn more about shutter speeds:
You’ll have to choose the right speed based on how bright it is and how much motion you want to capture. If your subject isn’t moving at all, then prioritize brightness; if it’s an action scene, then you may want to have a darker image with more fluid motion.
In the end, exposure is the interplay between these four elements. They all affect brightness, but have different effects on other aspects of the image. To recap:
- ISO affects graininess
- aperture affects depth-of-field
- frame rate and shutter speed affect motion blur
That’s simplifying things a bit, but will give you some tools to play with next time you pick up the camera. Try playing with these settings in various lighting conditions to see how they influence the final image.
As a beginner, it might be difficult to grasp the relationship between these elements, so check out this video to help you get started:
2. Composition
The second most powerful element of cinematography is the composition of the shot. How are the separate pieces of the image arranged? Are your subjects in the center of the image or the side? Background or foreground?
Composition is especially noticeable on the big screen. On a smartphone, it can be easy to overlook the sides or the background of a shot. On a big screen, you’re more likely to notice the extras in the distance or the characters on the edge of the frame.
To learn more about composition, watch this:
A talented cinematographer pays attention to how the characters move throughout the scene and adjusts the position of the camera accordingly.
Many traditional cinematic techniques derive from painting and portraiture. It’s common for close-up shots to adhere to the rule of thirds, with an actor’s eyes lined up a third of the way down the screen. It’s ok to break these rules, but keep in mind that leaving too much headroom or two much negative space to either side of an actor can leave the frame feeling empty or off-balance.
Likewise, keep an eye on how buildings, trees, clouds, and even mountains appear in the frame. If the horizon is visible in your shot, make sure that it’s level – unless, of course, you’re going for a sense of imbalance or unease.
Consider how Gus Van Sant makes use of these outdoor elements in My Own Private Idaho, particularly in shots of River Phoenix’s character lying down on the road or looking toward the horizon.
When characters move through the frame, don’t just have them move left to right along an x-y axis. Including some diagonal movement in your shot adds some depth to the scene and keep it from looking too staged.
3. Camera Movement
Your characters may not be the only thing moving during a scene. For each shot, you’ll have to decide whether you want a moving or static camera.
In the early days of cinema, cameras had less freedom of movement than they do today. A tracking shot might involve setting up a lengthy dolly track. A 360-degree shot meant strategically hiding crew and camera equipment where it wouldn’t be seen.
These days, with the rise of Steadicams, gimbals and drones, anyone can do a tracking shot without breaking the fourth wall or relying on an elaborate camera setup.
Consider the “dolly zoom,” a shot made famous in Alfred Hitchcock’s Vertigo and Steven Spielberg’s Jaws. In this shot, the camera moves toward or away from the subject on a dolly, while the lens zooms in the opposite direction, causing of sense unease.
You could do a zoom the easy way, by keeping the camera motionless and zooming in toward your subject, but it doesn’t have the same effect. Try it yourself – put your camera on a wheelchair or skateboard and move toward your subject while zooming out. Get the timing right and you’ll have a particularly disorienting shot on your hands.
Another popular motion is the whip-pan, made famous in 70s martial arts movies and by contemporary directors like Wes Anderson and Edgar Wright. Consider the opening of Hot Fuzz, which incorporates multiple whip pans into an extended montage.
Typically, a whip pan is produced by shooting two shots separately, and using the blurred footage during the “whip” motion to transition between them. When you shoot them, make sure that you turn the camera in the same direction, and at relatively the same speed, to allow for a smooth transition in the editing room.
Finally, consider the long take or the tracking shot. These kinds of shots were incredibly difficult in the days of film, when a reel only held a limited quantity of film stock. Now, you can shoot a movie in a single take, or follow your characters all over the city. Here’s a lesson I made on the subject:
When shooting a tracking shot, don’t just wing it. See if you can block out the path your actor will be taking, and find a well-composed shot to begin and end on.
If you’re struggling to keep your actor in frame, it will be obvious to the viewer. Keep an eye on composition the entire time, and don’t forget to adjust your exposure if you move from one lighting condition to another.

4. Camera Angles
Another important element of cinematography is the angle of the shot. In fact, some of the subtlest camera motions are simply changes in the camera angle.
Tilting up from a character’s feet to their face might emphasize their height. An overhead shot that tilts down can can produce the opposite effect. Titling diagonally will produce a Dutch angle, which can create a sense of dizziness or unease.
Dutch angles are especially useful in point-of-view shots: if a character is lying down, or turning their head to look back while running, a level shot might feel too static.
Consider some more unusual angles as well. Quentin Tarantino is known for the “trunk shot” – a camera pointing upwards at the actors from inside the trunk of a car.
For mid-budget productions, drone shots can be especially useful for outdoor scenes to emphasis the vastness of the landscape.
And with the rise of wearable tech, it’s easy to get a POV shot while your actor walks, runs, or cycles – or even swims underwater.
Too many unusual angle can be “show-offy” and distracting, but they’re one of the most important tools you have at your disposal as a cinematographer. If you’re excited about camera angles, read this:
5. Color
The use of color often gets overlooked as an element of cinematography. Isn’t that the set designer’s job? Or, in the case of clothing, the costume designer?
While some decisions may be made by the director and other crew members, the way that color shows up on camera is a vital part of your role as a cinematographer.
First, you’ll need to consider the color
temperature of your shot. Fluorescent light, tungsten light, and natural light all create different color temperatures, as do clouds, shade, and direct sunlight.
Traditionally, film stock was produced specifically for indoor or outdoor use. Now, most cameras have built-in settings to adjust to a variety of lighting conditions.
If you aren’t using automatic settings, then you’ll need to understand a little bit about color temperature and how to properly white balance your shot.
The hue of a light source is measured in degrees Kelvin, and typical light sources range from 1000K (the flame of a candle) to 5000K (fluorescent light) to 15,000K (clear sky). The higher the color temperature, the more of a blue tint the image will have; a lower color temperature, such as that of tungsten light, will produce an orange hue.
In order to avoid any unusual color variations between shots, you’ll need to give the camera a reference point.You can either do this by selecting the setting that matches your lighting conditions (i.e., sunny or cloudy), or doing it manually.
To set it manually, you’ll find an object that is naturally white (such as a white picket fence, or a piece of paper) and press the white balance button on your camera. Now, the camera knows to adjust the color temperature relative to that shade of white.
But incorporating color into your cinematography doesn’t end there. You’ll also need to consider color contrast and saturation. A scene that’s vividly colored in real life can look dull and drab on camera if not shot properly.
Some of the color can be manipulated in post-production, but it’s important to talk with your director and set designer to make sure you’re on the same page.
A noir movie may call for a grey color palette with low color saturation, while a sci-fi movie may use a variety of colors with a lot of contrast between them. Directors like Akira Kurosawa use color to establish themes and create symbolism.
When designing your shot, pay attention to how the colors of your subject’s clothing and props interact with their environment. Do they pop out or blend in? Adjust your lighting and color settings and see how that changes the look of the shot. Remember that what you see on camera will be different than what you see with the naked eye.
Here’s a video that shows you how powerful color can be (it’s from the perspective of grading, but the same principles apply):
Don’t be afraid to experiment and try new variations on these elements. Cinematography is constantly evolving, and no doubt we’ll have even more tools to work with in five or ten years than we do now. But these basic principles won’t change.
Learning to master these 5 elements will give you an edge over other cinematographers regardless of the tools that you have at your disposal.
Nice article. Useful. Nothing about lighting? C’mon…
Thanks. I’ve explained why lighting isn’t in the list.
Where does LIGHTING stand under this title?
After the above.
I have watched your videos and read some of your articles. Thanks for making this magnificent and complex art, to look simple and beautiful. Enough for the audience to enjoy our stories and appreciate our cinematography.
You’re welcome!
You should have referenced your F stop and T stop differences as they pertain to film and photography … so, here’s a link to help clarify that: https://petapixel.com/2016/12/30/f-stops-vs-t-stops-difference-explained-plain-english/
Thanks! Here’s the source: https://wolfcrow.com/t-stops-vs-f-stops-why-is-one-used-for-photography-while-the-other-for-cinema/
Freaking awesome and extremely useful.
Thank you!