
In this article we’ll learn what a Look-up Table (LUT) is, and how it should be used.
What is a LUT or Look-up table?
Think back to a multiplication table in school. They wanted you to memorize the whole thing.
It’s easy to remember 2 x 2 = 4, but try 196 x 314 or 457432 x 938483.
In many ways, this is a look-up table, because if you want to find the answer to a multiplication, you just have to ‘look it up’.
If a computer program has access to a table it can simply “look up” the answer. This saves compute power and time, especially in color grading. In fact, even a modest laptop can benefit from the extra speed when processing video.
So, in a nutshell, what is a LUT or Look-up table when it comes to camera and post color work?
A LUT (Look-Up Table), is a pre-calculated reference table that maps input values to output values. It is used to quickly transform color data from one set of values to another.
Now let me simplify this to show you how it all works.

How LUTs work
I’ll help you understand with a pizza analogy.
Imagine your local pizza chain is robbing you blind. You feel they are reducing the number of pepperoni slices (substitute your favorite topping here) in your pizza. You decide to investigate.
Their website says: 18 slices per pizza, no matter what. A pizza is $18. That’s $1 per slice.
Their pizzas are square in shape, and they cut them into nine squares:

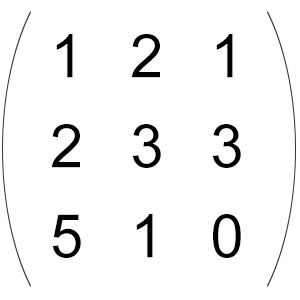
You, being a math genius, figure out that each square must contain two whole slices of luscious juiciness. To show off, you write your wisdom in this way:

This is called a ‘matrix’ in math.
The matrix you created above is the ideal version. The pizza you got delivered, obviously, isn’t the same:
However, now you realize the total number of pepperoni slices is still 18. Technically, they haven’t cheated you.
Well, maybe just morally.
Now, imagine the horror when one friend discovers their slice is a pepperoni-free wasteland. How will you ever face them again?
So, you decide to complain to the pizza place. But you need better proof. Mathematical proof.
You stay up all night to devise a devious formula. You are going to find an average that you think is fair – an average value for each box using this convoluted formula:
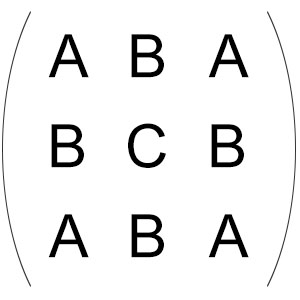
- Formula A – for the corner boxes = [Actual Box Value + (Sum of values of the three boxes surrounding it)/3]/2
- Formula B – for the side boxes – [Actual Box Value + (Sum of values of the five boxes surrounding it)/5]/2
- Formula C – for the middle box – [Actual Box Value + (Sum of values of the eight boxes surrounding it)/8]/2
Your formula matrix looks like this:
When you apply this formula matrix to the ideal pizza matrix, you should get the ideal values. Nothing will change. Try it and see for yourself!
But what if you applied the formula matrix to the actual pizza matrix you received? Here’s what you will get:

Clearly, this desperate math born out of a pizza famine isn’t going to fly with the pizza joint, your buddies, or even you when you’re nursing that hangover the next morning.
But it does teach us a lesson about how LUTs work.
You were able to transform one matrix into another with a formula-matrix. This formula-matrix is a LUT.
Are LUTs formulas?
Not technically, but in a way you could think of it as one.
Imagine putting a red candy wrapper over your eyes and seeing everything in red. That red candy wrapper is a filter, but it’s also a kind of LUT.
No matter what scenery you present it with, it will make the conversion like a dumb thing. It can’t do anything else. LUTs change data, but it does it in a dumb way. It doesn’t know or care what you present it with.
What is a 1D LUT?
A 1D LUT is a one-dimensional LUT. It’s the simplest form of LUT possible.
The above pizza-borne matrices look two-dimensional but in fact they’re not. E.g., you could represent your values in a line instead of a matrix, like this: 1, 2, 1, 2, 3, 3, 5, 1, 0; and you could represent your formula in a line like this: A, B, A, B, C, B, A, B, A.
1D LUTs can be sufficient for basic Tone, Gamma, Brightness and Contrast adjustments, etc. A 1D LUT can also handle a Log to Rec. 709 transformation efficiently.
However, in the world of filmmaking, the kind of LUT you’ll encounter the most is the 3D LUT.
What is a 3D LUT?
Instead of pepperoni pizza, what if you ordered pepperoni+chicken+mushrooms pizza? You could eat this pizza any way you want – all in one go, or just take individual pepperoni or chicken pieces and eat them separately. You do you, right?
I’m going to end the pizza analogy here, and revisit why LUTs exist in the first place: to save time on calculations.
A 3D LUT is a three-dimensional LUT, and it reduces the number of calculations required. How?
Every pixel value has three color channels – R, G and B, for Red, Green and Blue.
A 1D LUT could work on one channel. Then, you’d need three of them for each channel.
There is nothing wrong with this, mind you.
But, what if you could connect R, G and B values (join them at the hip) so that when you change one value, the others are forced to change as well?
It’s simple 3D geometry (Don’t be scared by it!):

You have three axes – Red, Green and Blue. Now imagine a point right in the center, where these three intersect. The values for R, G and B are 0, 0 and 0.
That is P1 in the above image.
Now, imagine moving from P1 to P2. You are moving along the ‘B’ line, careful not to step into R or G territory. After taking 10 steps, you stop, at point P2.
You have moved only in one dimension, and your RGB values have changed to 0, 0 and 10.
Let’s say you start walking upwards 5 steps, careful to be on the G-B axis, without stepping into Red territory. I haven’t shown it in the image, but you can easily imagine how the values can change to 0, 5, 10.
Now you have moved in two dimensions, and have changed two values at the same time.
Now imagine moving to P3, where you take 3 steps to the negative side of red, 11 steps to the positive side of blue, and 9 steps to the positive side of green. You have moved in three dimensions.
Here’s the beauty: You only had to move once, and yet, all three values have changed.
This gives you a lot of power:
- If you move along only one axis, you only change one value.
- If you move along two axes, you can change two values while keeping the third constant.
- If you move all over the place (3D), you can change all three values.
A 3D LUT is three times as fast as a 1D LUT (well, sort of).
The mathematical juggling to achieve this feat isn’t that easy or simple to understand, but the execution is as simple as using a red candy filter.
In real-world applications, colors are often represented in systems like RGB or Y’CbCr, both of which use three components. A 3D LUT is a three-dimensional array that connects these values so that a single adjustment can control one, two, or all three color channels simultaneously.
This is especially useful for quickly converting one color space to another, for example, converting an image from Rec. 709 to DCI P3, or whatever.
Practical Uses of LUTs
The most precise way to use LUTs is for color space transformations:
- In the Camera: Let’s say you are filming in Arri Log C. You could apply a LUT from Arri to convert it to Rec. 709, DCI P3, HDR, or whatever. This can be used for viewing or even be baked into the footage.
- Broadcast Monitor: You could load a LUT into a broadcast monitor to change the color space, just like above.
- Color Grading Application: Your color grading application, like Resolve, has built-in LUTs to transform from one color space to another. You even have dedicated nodes that allow you to manipulate many of the details to get exactly what you want.
All these conversions happen in real time as you view your footage. That’s the power of LUTs.
You could also use LUTs creatively. This is converting footage in one color space to another or the same color space, but manipulating the colors to achieve some sort of ‘look’. Film emulation is one example of this.
Good grading applications have creative LUTs installed. Arri gives us a Look Library of many looks we can use with their cameras and in grading. Anybody can create a LUT using color grading software.
But only true color space to color space LUTs are precise in the way we intend them to be. With a creative LUT, maybe it will look good on X footage, but the same LUT on y footage might look terrible. That defeats the purpose of getting a ‘look’ with LUTs.
Are LUTs perfect?
No, they’re not. What’s the downside?
To achieve speed, LUTs must sacrifice accuracy.
E.g., a 10-bit image has 1024 values per channel. R x G x B = 1024 x 1024 x 1024 = a billion colors. For all practical purposes, a 3D LUT cannot be one billion pieces big, or it will be too large.
Instead, what LUT generators do is define the size of the LUT to a number that achieves good approximation for practical purposes. A common number is 17 points, instead of 1024. 17 x 17 x 17 = 4,913.
Isn’t this way too low? Actually, no, because the human eye isn’t that perfect!
A particular 3D 17x17x17 LUT calculates only these 4,913 points, and the rest are interpolated (also calculated, but in a ‘broad mathematical sweep’ sort of way).
For critical color grading work, you need as many points as you can get.
LUT Resolution
When it comes to 3D LUTs, resolution refers to the number of sample points stored along each color channel.
In a 17x17x17 LUT, there are 4,913 (17³) points. This resolution is one of the most popular choices, but higher resolutions like 33x33x33 or 65x65x65 are also available.
Here’s a closer look at the differences and when you might choose one over the other.
17x17x17 LUTs come with smaller file sizes and therefore are better for faster, real-time processing. It’s great for monitor viewing and in-camera work (not baked in).
Higher-Resolution LUTs (e.g., 33x33x33, 65x65x65) offer greater accuracy and are definitely better for color grading work. This allows the color conversions to be more precise, resulting in lesser artifacts and errors.
Obviously, the downside is larger file sizes which has greater memory demands. However, I think it’s a good tradeoff, as computers are much faster nowadays.
For most color grading work, a 33x33x33 3D LUT should suffice. But when it doubt, test!
Only you can decide whether the trade-off between speed and precision meets the needs of your project.
The next time you work with color, remember that a LUT is like a cheat sheet that lets you apply complex changes with a single, quick step.
But always remember, LUTs are dumb. They do as they have been made, and if you’re using a LUT that isn’t from an official camera manufacturer, results might be all over the place.
I hope you’ve found this primer useful!
It really helped when you mentioned how an LUT able can reduce the number of calculations you need to do when trying to find the best colors for your camera. I can understand how anyone looking into this would want to take the time to understand how to properly use an LUT and find the best way to find the colors you need. My brother was talking about how he wanted to find a good LUT to help him capture the best images.