Before we can shoot with the Sony A7s, we need to understand what it is capable of. What are the features useful to me, and which ones should I avoid? In this lesson we’ll go through the general configuration and customization settings in the Sony A7s. More specific settings will be dealt with in later modules.
The idea is, rather than waste time going over each setting in the menu individually, we’ll go over the important ones and set them for life. My motto is: Do it once, do it quick and do it to forget!
Of course, it goes without saying that nobody likes looking at the menu all the time – so if you want to skip to sections that are important for you right now, use the contents below. Or just read my cheat sheet below on what to turn on, turn off, etc!
- Changing the display information to suit your style of shooting 1:00
- Customizing buttons and dials
- Function Buttons (Fn) 3:33
- Custom Buttons (C1, C2 and C3) 5:42
- Memory Banks (1, 2, M1, M2, M3 and M4) 6:31
- How to White Balance the Sony A7s 8:25
- An overview of the white balance presets in the camera 10:14
- A look at Creative Styles 10:35
- A look at Picture Effects 11:54
- A look at Picture Profiles 12:11
- Noise reduction settings 12:45
- APS-C mode and the crop factor in APS-C mode 13:10
- Frame guides/Markers and how to use them 13:35
- My field test /calibration chart – the DSC Labs OneShot Pocket 14:04
Stuff to turn on
| Where you’ll find it* | Setting | Quick Reason |
| Menu A34 | AF Illuminator | Off only for manual lenses |
| Menu A75 | Audio Recording | Helpful for sync sound or as a backup |
| Menu A81 | Audio Out Timing | Set to Live for normal monitoring, Set to Lip Sync if you’re exporting audio also via HDMI and need it to sync. Requires further testing. |
| Menu A82 | Wind Noise Reduction | Software or hardware does it better; use wind jammers or low cut filters on microphones |
| Menu B12 | MF Assist | Very handy, zooms in video for accurate focus |
| Menu B31 | Live View Display | Shows the effects you have selected. Log looks like look, cine looks like cine and so on. |
| Menu B42 | AF w/shutter | Off only for manual lenses |
Stuff to turn off
| Where you’ll find it* | Setting | Quick Reason |
| Top/Mode Dial | Program Auto | Automatic mode |
| Top/Mode Dial | SCN Scene selection | Toy Picture Effects mode |
| Top/Mode Dial | Auto | Automatic mode |
| Menu A22 | Dual Video REC | Second recording is in MP4, almost useless |
| Menu A26 | Red Eye Reduction | Do it in post |
| Menu A34 | AF Illuminator | Off only for manual lenses |
| Menu A44 | DRO/Auto HDR | Do it in post |
| Menu A54 | Long Exposure NR | Software does it better |
| Menu A55 | High ISO NR | Software does it better |
| Menu A62 | Smile/Face Detect. | Nope. |
| Menu A63 | Soft Skin Effect | Use software or diffusion |
| Menu A64 | Auto Obj. Framing | That’s your job! |
| Menu A74 | Auto Slow Shut. | Doesn’t work in Manual, blurs motion |
| Menu B54 | Face Registration | That’s your job! |
| Menu C15 | Airplane Mode | Off. Switch off networks in an airplane! |
| Menu F22 | Mode Dial Guide | Irritating. It’s not that hard! |
Explanations and suggestions of other menu settings
| Where you’ll find it* | Setting | Quick Reason |
| Menu A33 | Focus Settings | Allows dials to select focus box and zoom in using the ‘Enter’ button |
| Menu A53 | Focus Magnifier | Just magnifies the image. You can use the Custom buttons instead for easier access. |
| Menu B24 | Peaking Level | Mid (Good enough for 99% of situations) |
| Menu B25 | Peaking Color | Yellow (What the eye responds to most) |
| Menu B26 | Exposure Set. Guide | When this is on you get the ISO/Shutter/Aperture wheel on the display so you know what you’re changing to. I recommend you keep it on until you become perfect at judging exposure. |
| Menu B56 | AF Micro Adj. | Works only with Sony lenses and A-mount lenses |
| Menu B61 | Lens Comp | Works only with Sony lenses |
| Menu B72 | MOVIE Button | Always, unless you’re never shooting video. I have yet to accidently press the record button. |
| Menu E14 | Display Rotation | Manual. In Auto, it will rotate if your camera rotates. |
| Menu F15 | Audio signals | Camera sounds. Switch off unless you need some sort of feedback. |
| Menu F23 | Delete confirm. | “Cancel” first. Better the extra button push than accidently deleting a shot or clip! |
| Menu F24 | Display Quality | High – it makes negligible impact on battery life. |
| Menu F36 | HDMI 4K Output | Only works when you have a 4K-capable recorder connected via HDMI |
| Menu F52 | File Number | Series for each project. Reset after each project. |
Key
First alphabet is the main setting header:
- A – Camera Settings
- B – Custom Settings
- C – Wireless
- D – Application
- E – Playback
- F – Setup
The first number is the sub group number (or page) on top. The last number is the line item per page. E.g., F15 means – in the Menu, under the Setup group, first page, fifth item, which is Audio Signals.
FAQs
These are important topics raised by subscribers that shed more light on this lesson.
Q. Is there anything we can do about the recessed RECORD button?
A. A user posted this workaround (Warning: May ruin your camera and void your warranty. Do so at your own risk!!):
I applied a very tiny droplet of silicone clear adhesive to the record button. Yes, all the usual caveats would apply, such as voiding the warranty perhaps. And as a practical matter, the thing really is tiny so care must be used to not smear it also on the body and thus have a stuck button.
But the good news is that it is only silicone adhesive and can be removed.
The rubber-y stuff is clear so even the red dot shows! And as it is a flexible rubber-y substance, the tactile feel seems right under one’s finger.
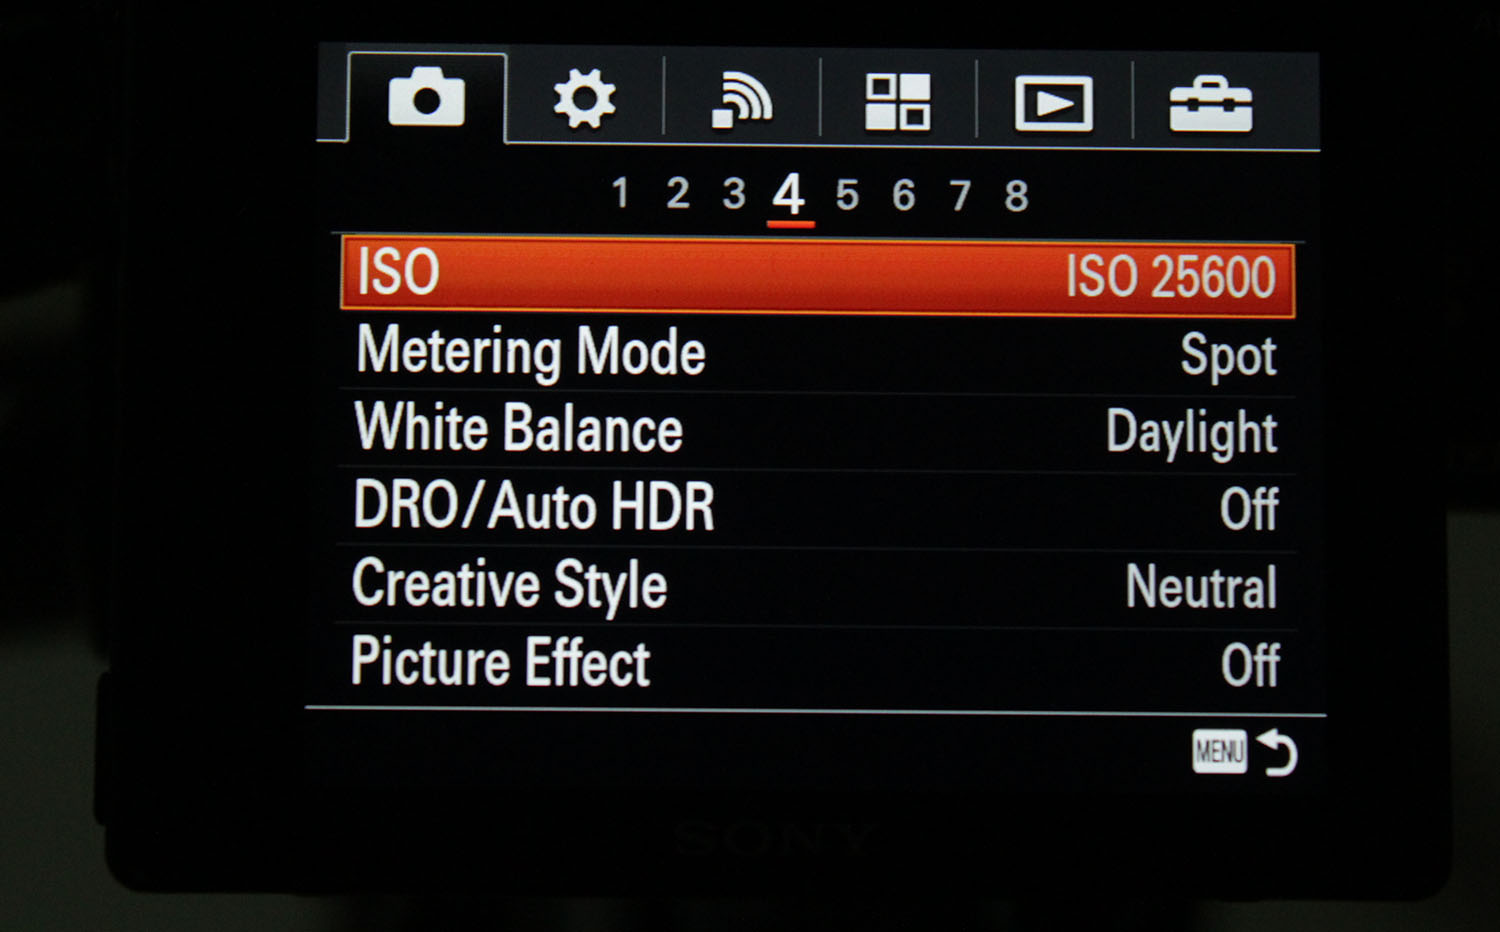
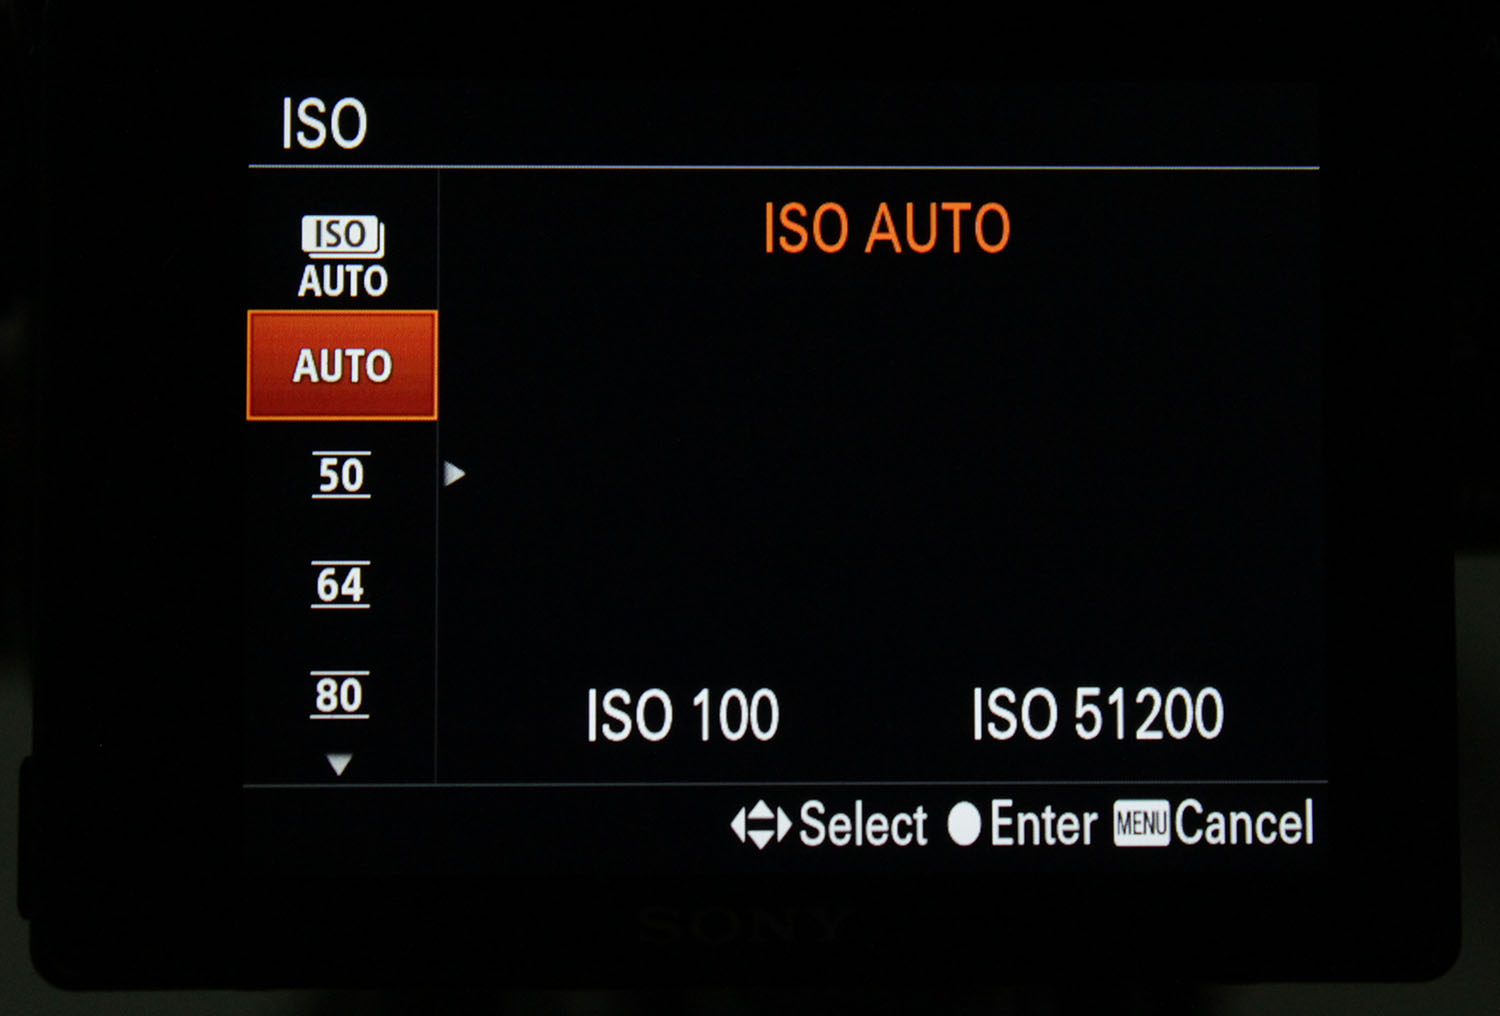
Q. How do you set limits for the ISO in Auto ISO mode?
A. In the menu, go to CAMERA > 4 > ISO:
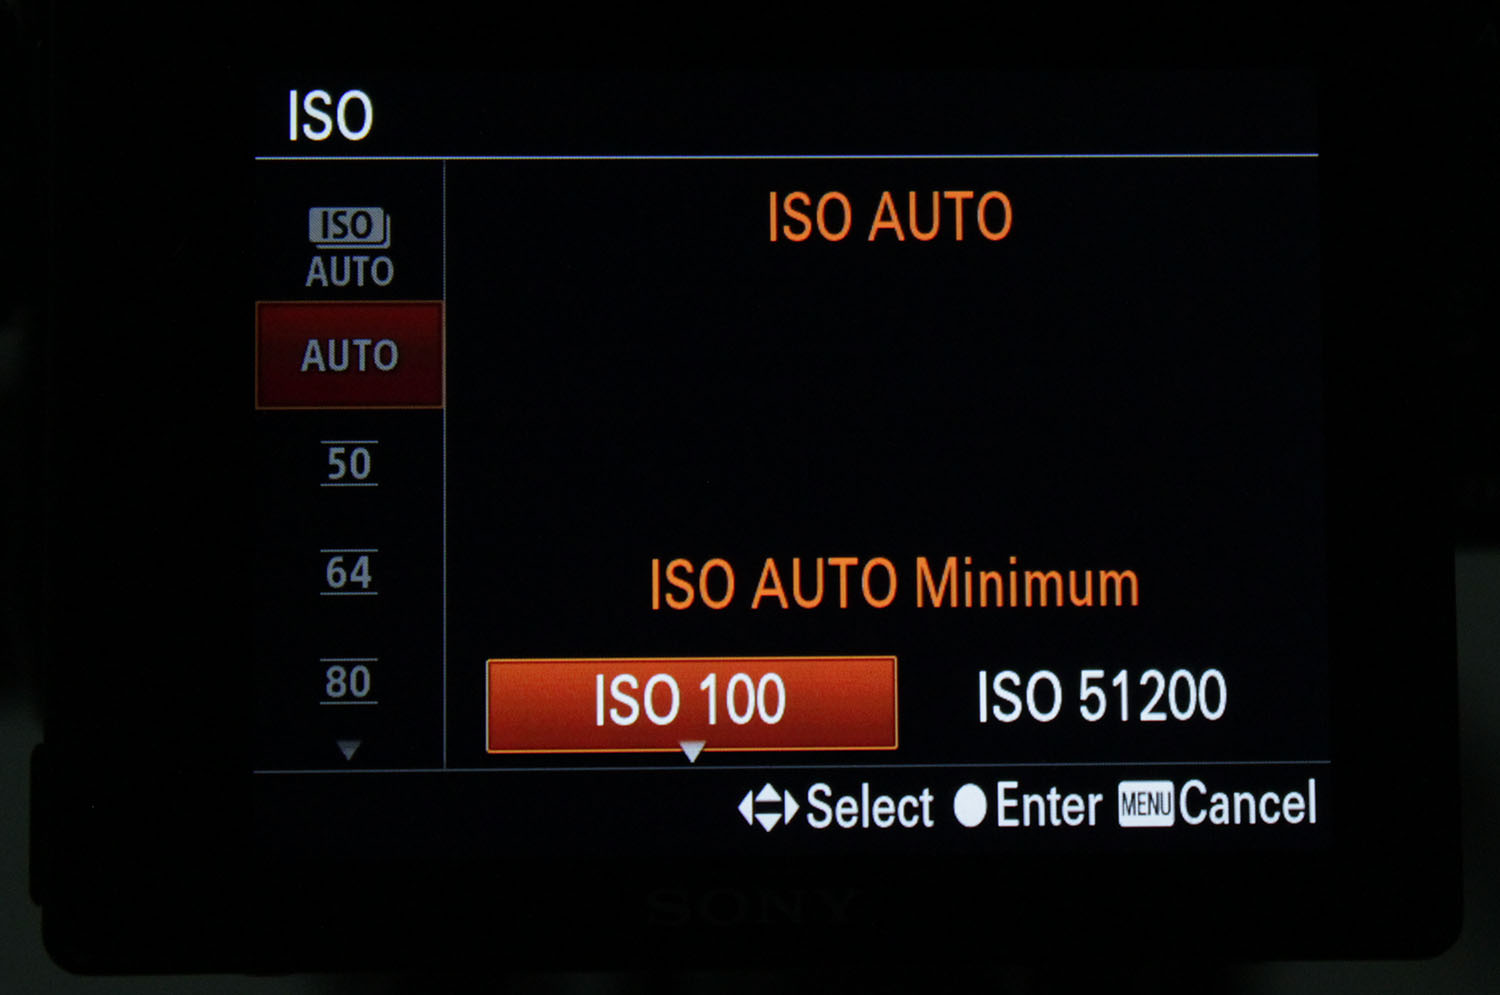
Scroll to AUTO: Click the right arrow (on the back dial). Then choose the AUTO Minimum:
Scroll right and choose the AUTO Maximum:
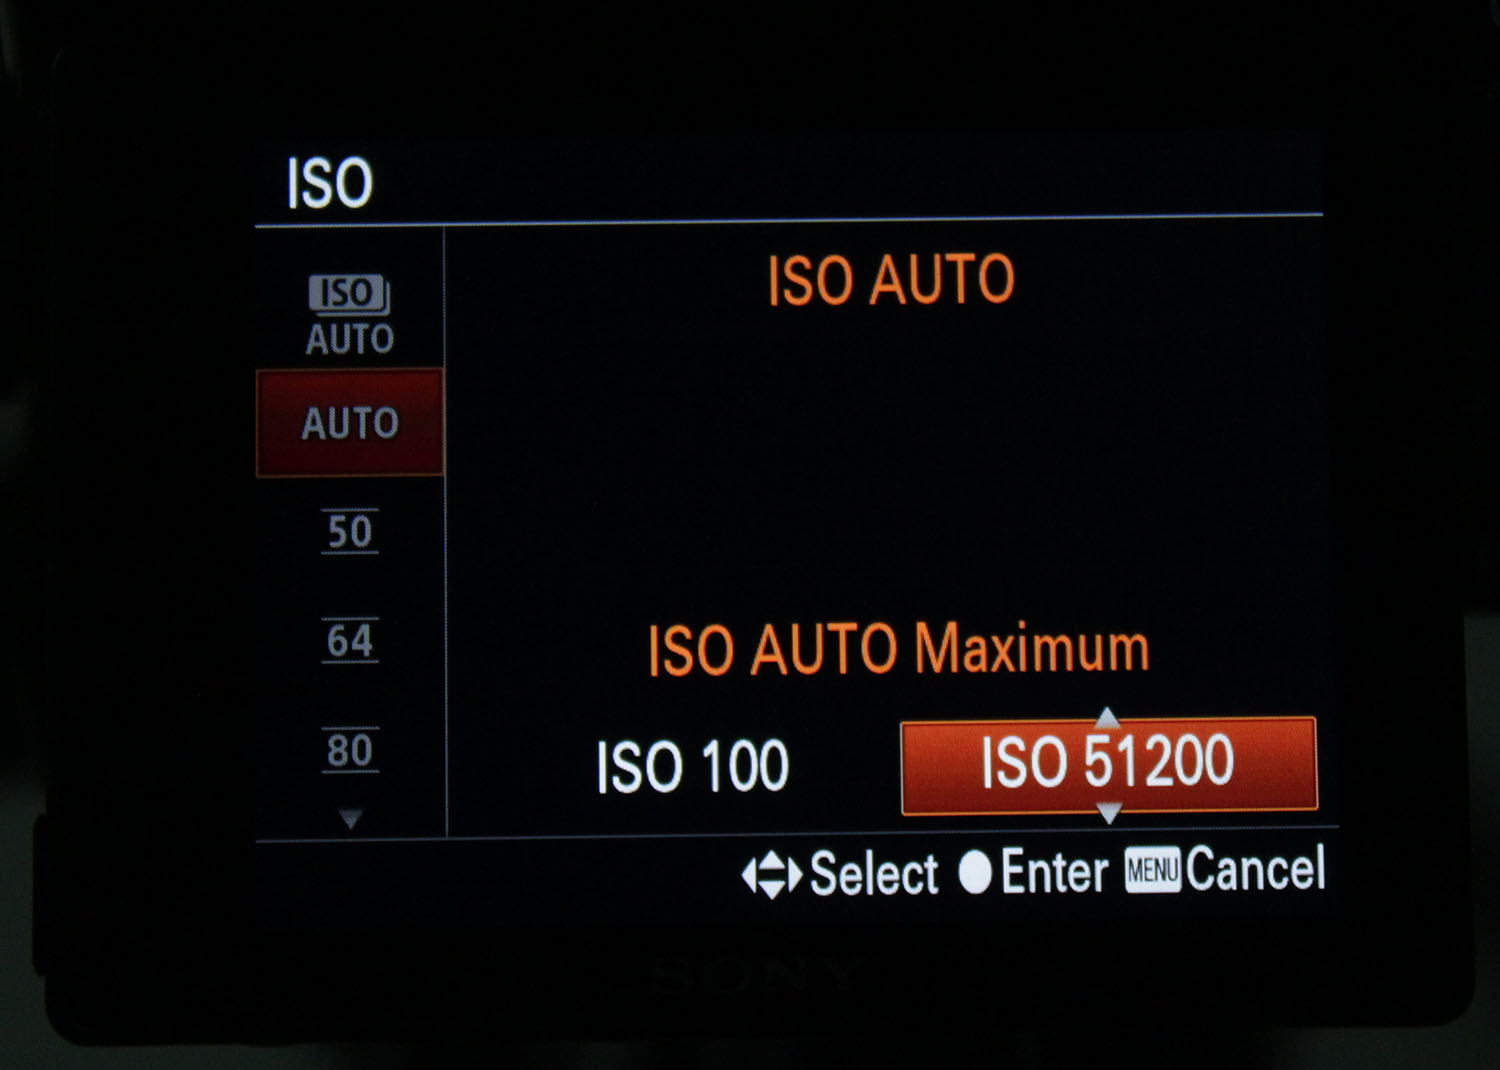
Press Enter (middle button on the back dial). That’s it!
Q. Does changing the shutter speed reduce the effect of rolling shutter?
A. No.
Q. What can we do about rolling shutter?
A. Using APS-C mode works to a certain extent. Wider angle lenses distort less, or the perception is less. Anytime you have straight vertical lines or shapes, and they move laterally, you’re going to see rolling shutter. Avoid such shots if you can.
Q. What shutter speeds to use for video?
A. Here are the conventions (which you are free to break):
- 1/50s for 24p and 25p
- 1/60s for 30p
- 1/100s for 50p
- 1/125s for 60p
- 1/200s for 100p and
- 1/250s for 120p
Slower shutter introduces smearing, like those ‘stoned’ shots you see. Faster shutter speeds introduce a staccato-effect.
Q. Can you explain what AEL is?
A. AEL is Auto Exposure Lock.
When you’re shooting in auto mode, the camera judges exposure for you. However, with some scenes, the exposure can be calculated differently depending on where you focus or how you frame the shot. So, in this mode, you use the spot meter to meter the subject only, then turn the dials to get the right exposure. Once you’re happy, press AEL to “lock” exposure so the camera won’t re-meter or change anything.
Once locked, you’ll see an asterix * on the LCD/Viewfinder telling you it’s locked.
Now here’s the tricky bit: Keep pressing the AEL button and press the shutter half way to autofocus. When focused, click the picture.
Here’s the cool bit about AEL. You can maintain the same exposure by never letting go of the AEL button. As long as your thumb is on it you can keep clicking away without changing exposure.
If this sounds tedious, I can assure you it will become second nature if you practice for a few weeks. DSLRs have had this feature for ages.
Click on the link below to the next lesson or head over to the main menu (above). If you need help with something, feel free to send me an email. I’ll try to get back to you as soon as possible.