In this lesson I’ll walk you through the file organization and metadata capabilities of the Sony A7s.
SD Card folder structure
The A7s records stills, AVCHD, MP4 and XAVC S. Each has its own folder path. This is what it looks like:

And here’s the exploded view:
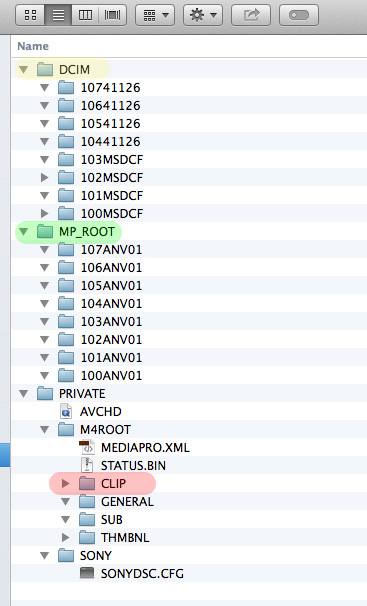
The Yellow folder, DCIM, is for stills. You can create sub-folders within it (next section). The green folder, MP_ROOT, is for MP4 only, and it can also hold sub-folders.
XAVC S is stored under PRIVATE > M4ROOT > CLIP
AVCHD files are all under that one ‘file’ called AVCHD:

You have to open it in Quicktime (or another app) to view the contents inside. It’s a messy way to work, which was why I recommended you avoid AVCHD.
The thumbnails for video footage are stored in the THMBNL folder.
This structure is fixed and cannot be changed. All video footage, regardless of codec, is stored in a *.MP4 wrapper. RAW stills are in the proprietary *.ARW wrapper, and JPEGs are in *.JPG.
File organization capability in camera
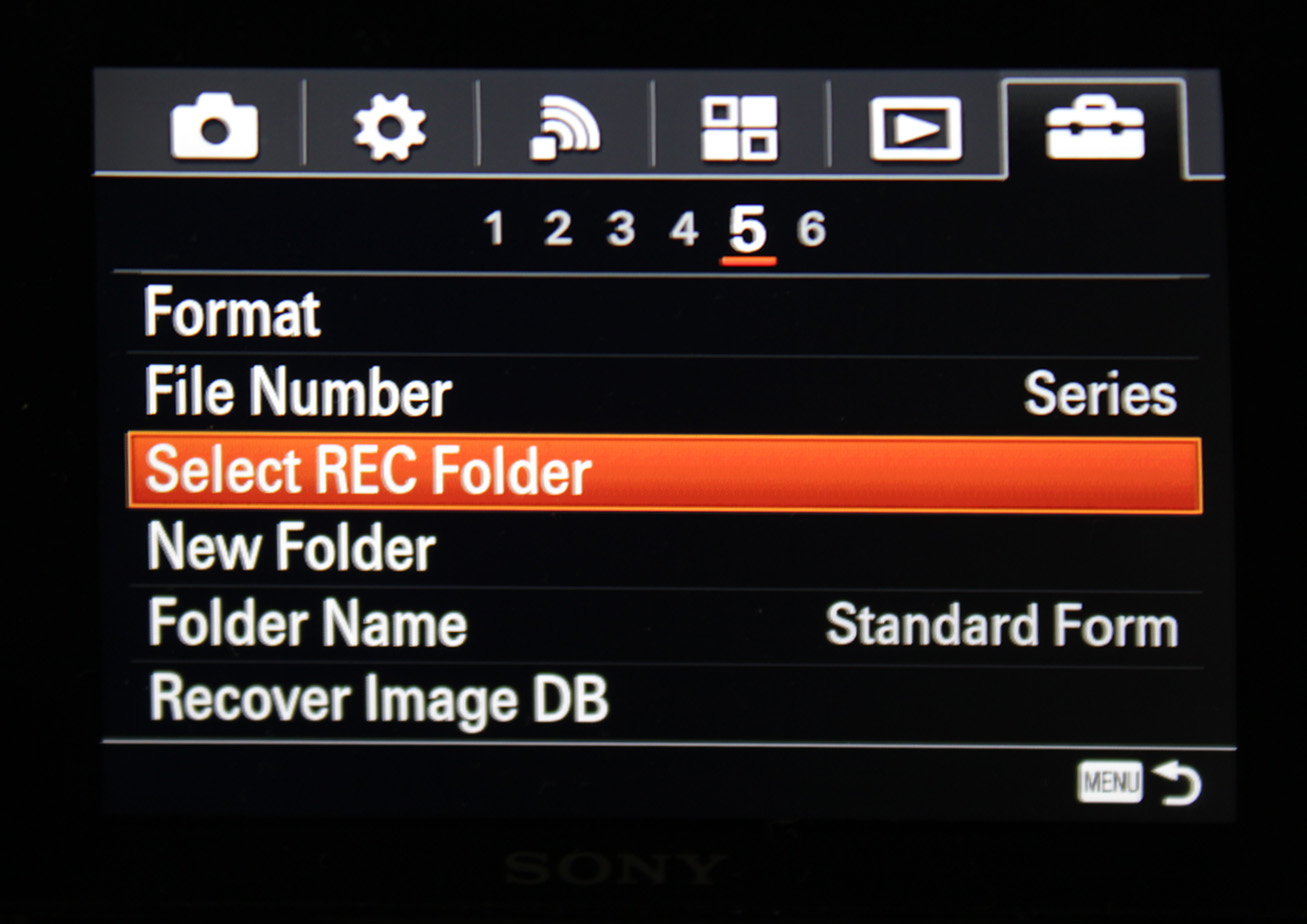
The menu for file organization can be found here:
File Number selects how you want to ‘start’ numbering your files. You have two options:

Select REC Folder allows you to select which folder to record to:

Unfortunately, you can only record stills and MP4 files into folders, and not XAVC S! What a shame.
To finish off, you can assign two sets of folder names:

For stills:
- the standard form follows this system: xxxMSDCF
- the date form follows this system: xxxxMMDD, where MM is the month and DD is the date.
For MP4, whatever you create becomes xxxANV01. x is a digit.
Important: When you delete clips in-camera, newer shots will first be written to these serial numbers before carrying on. E.g., if you have five clips called 1, 2, 3, 4 and 5, and decide to delete 2 and 3. When you press record, the next clip will NOT be called 6, but 2. The next one after that will be called 3, and the next one after that will be called 6, and so on. Confusing, so be careful when you delete clips in camera.
Either way, except for shooting stills, the folder organization system is pretty much useless.
One system of setting up folders for better organization
Since you can’t organize your clips in camera, the only way is to do it while you are ingesting (copying to a hard drive).
The traditional system is to divide each day into scenes or setups. Large scale productions might also still follow the REEL format, but that is beyond the scope of 99% of all productions.
In your hard drive, create a DATE folder, and within it, store a SCENE folder. Under the SCENE folder you can store a SETUP folder, for each shot angle or setup. Within this you have the takes specific for that setup. This is what it’ll look like:

You must replace DATE with the actual date, in a standard format like YYYY-MM-DD or whatever. Scene numbers can range from 1 to 100 or more, depending on the scale of the production. If you know you’re going to end up with 400 scenes (documentaries are a good example), then you can start with 001. If you know you’ll reach 1000, start with 0001.
The same principle applies to the SETUP and SHOT number. In case of the SHOT number, you must ideally follow what has been laid down in the shooting script, as that’s what the director will refer to later. Sometimes shots are made up on the fly, so you must use your best judgement. Ultimately, follow what the director or AD recommends.
You will then rename takes on-the-fly, on first viewing, for easier reference:

You can also name takes with descriptions, like Good or NG (Not Good) or whatever. The more information you put in here, the easier editing gets.
Finally, on top level, you have PRODUCTION, if you’re shooting more than one gig at a time. You can also create a CAMERA xxx folder if you’re shooting multi-cam, etc. Every production has different needs. You must find a system that works for you and anyone who has to use your media down the chain. There is no perfect solution that applies to every case.
It is pointless to Reset the file number in camera, since there is no reference to it anyway. E.g., you might forget to reset it once or twice in the heat of the moment. Why bother with the aggravation? Avoid it completely, and do it in Finder or Explorer or your preferred ingest application (Prelude, On-set Dailies, Resolve, etc.).
Metadata capabilities of the Sony A7s
In the above image, you will have seen that the A7s writes XML metadata sidecar files. What’s in them? Here’s a peek (click to enlarge):
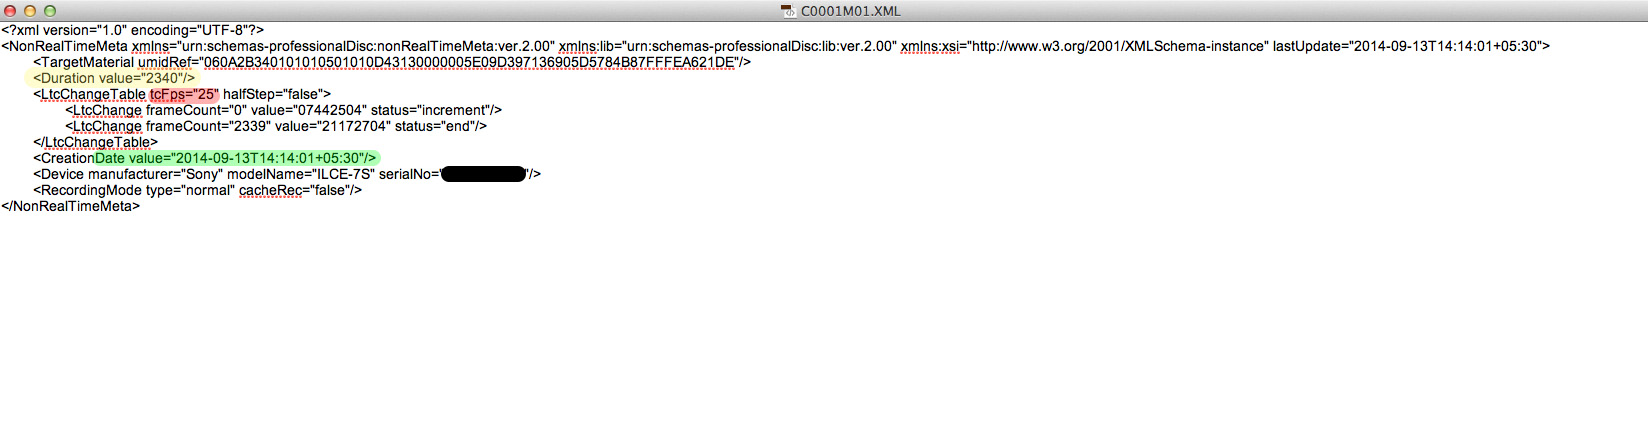
The yellow box shows the frame count, and the red box displays the frame rate. Below that you have the start and end frame count. The data in green highlights the date and time. Underneath that you have the camera identification information.
That’s it. Even without this XML sidecar, any NLE can find this information because it is basically in the MP4 wrapper itself. For this reason, you might want to delete all XML files to avoid clutter. Unless a future firmware update includes more helpful info, they are redundant.
As you can see, the file organization and metadata capabilities of the Sony A7s are rudimentary at best, so you’re on your own.
From the next lesson onwards, we’ll look at how to create dailies and LUTs, and then tackle a full-blown grading workflow.