If you have Microsoft Word, even the basic one, this article will show you how to format it so you can write your screenplays.
A side note: If you’re writing screenplays and making a living from them, I highly recommend Final Draft (Amazon, B&H). The program gets out of the way and allows you to focus completely on your craft. Also, it’s the industry standard.
For a free software that works great, take a look at Fade In. You will have to pay to remove the watermark and publish your pages, but at least you can get your script written.

I have used MS Word for six years without any problems.
The only two ‘must-haves’ for a serious screenplay writer are a great keyboard and a great chair. If you’re writing on a tablet, get a bluetooth keyboard and pound away.
I’m assuming you know what the correct format is. If not, please start by reading this article:
How is A4 different from US Letter for screenplays?
You might be wondering if there are any practical ramifications of using A4 over the standard US Letter format. If you’re sending a web PDF document, then consider where it will be printed. If it is going to the US, then it will be printed on US Letter.
The screenplay format is designed for US letter, and not for A4. I’ve been using it for A4, since that’s the only kind of paper I can buy in India.
Courier 12-point should give you 4.23mm (0.166″) per line. For A4 paper, this means 55-64 lines , and for US Letter paper, this means a maximum of 51-60 lines. How many characters does that make?
- A4 – Between 3,135 to 3,648 per page.
- Letter – Between 3,060 to 3,600 per page.
That’s an approximate difference of 2% between the two. If one page equals one minute (60 seconds) in US Letter, it would mean 61 seconds on A4. For a 100 page script, it would approximate 100 minutes in US Letter, and 102 minutes in A4. There is no difference. Also, don’t forget to take note that you are allowed to use double or even triple spaces between lines, or break up your page breaks for better readability. This by itself is a 10% difference per page!
To recap, don’t worry about the paper size. Stick to the margins, and keep your font fixed at Courier 12-point 10-pitch.
The font for a screenplay
The font is Courier 12-point 10-pitch.
Where do you find Courier 12 pt 10-pitch?
The easiest way is to download a demo version of Final Draft. Then copy the font to your font directory before the trial version expires. Then you’ll have it available for Microsoft Word or another word processing application.
Before you use fonts for any commercial activity, make sure there are no licensing fees involved. Some fonts are not usable for any purpose, commercial or personal. When in doubt, use the default Courier font on your word processor. Nothing bad will happen.
How to format MS Word for the page layout
I’m going to be using Microsoft Word, but you can do the same with any word processor.
Open a new blank document. Go to Layout and choose the paper size – stick to US Letter or A4.
Go to Margins and select Custom Margins…:
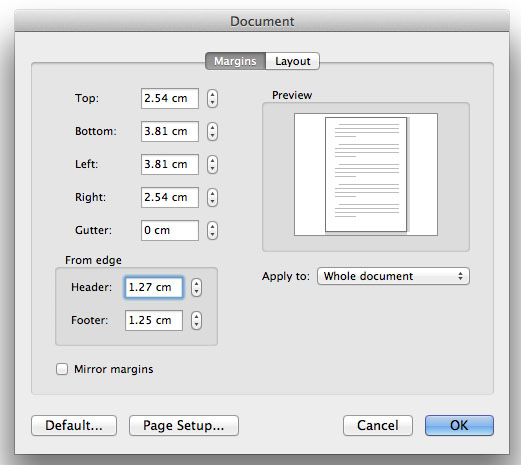
Click OK. Go to Insert > Page Numbers and select Top and Right. Page numbers should be displayed from the first page. Note: Some people shift the page numbers a bit to the right but it doesn’t matter. Start the numbering from 2 (1 is reserved for the title page).
Finally, select the Courier 12pt font.
That’s it, your main document is ready. Save it on your hard drive before proceeding. We’ll come back to it after the next section.
How to create the title page for your screenplay
Create your title page only after you’ve finished writing your script. Otherwise you might spend months with just the name of your movie!
Open a new Word document and select the same paper size as your preferred screenplay format. Choose your font.
The title is centered somewhere just above the middle (doesn’t matter). On the next line (or you could leave a couple of lines) you write ‘by’. On the next line write your full name (only first letter is capitalized).
No jazzy stuff, bold fonts or styles or colors. The page number shouldn’t be visible on the title page.
On the bottom right (align to the right), write down your address, phone number and/or email address (Many competitions forbid you to include this information). Nobody’s going to study your title page and gush at your layout skills. It shouldn’t draw attention to itself. If your script is good, then the reader will want to meet you.
Save this as a title template and you’re done.
Next let’s look at the elements that form a screenplay, and how you can ensure the smoothest writing experience with Microsoft Word.
Now let’s create the elements of a screenplay.
How to get elements into Microsoft Word
Word has a crazy system of adding spacing to the margin, so you need to get rid of that first. Type these to the script template:
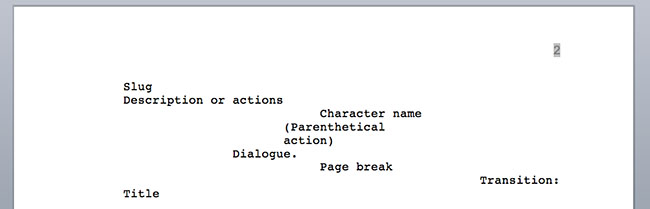
Slug
Description or actions
Character name
Parenthetical action
Dialogue
Transition
Page break
Title
Select them and right click. Select Paragraph…. Make sure the Alignment is ‘Left’ and Indentation is ‘0 cm or inches’. Hit OK.
Character name
Place the curser at the beginning of ‘Character name’. Right click and select Paragraph…. You have two choices:
- Change the left indentation to 6.86 cm (2.7″). Use this if you’re using the 4.2″ formatting.
- Change the alignment to ‘Centered’. Use this if you’re just centering the character name.
Parenthetical action
Place the cursor on Parenthetical action. Repeat the steps above to get to the Paragraph popup. Because the paranthetical action position is related to the character name, you have two choices:
- If you have opted for the 4.2″ system, set the left indentation at 5.59 cm (2.2″).
- If you have opted for the centered system, set the alignment to ‘Centered’. Then set the left indentation at -1.27 cm (0.5″).
Dialogue
Place the cursor on Dialogue. Repeat the steps above to get to the Paragraph popup. Because the position of the dialogue is relative to the character name, you have two choices:
- If you have opted for the 4.2″ system, set the left indentation at 3.84 cm (1.5″). Set the right indentation at 2.54 cm (1″).
- If you have opted for the centered system, set the alignment to ‘Centered’. Then set the left indentation at -3.81 cm (1.5″). Set the right indentation at -4.44 cm (1.75″). This will center the text and give you a width of 3″.
Centered looks better for online reading but the 4.2″ system is better for MS Word formatting. The ‘centering system’ is harder to implement in Word, don’t worry.
Transition
Same steps. Align to the Right.
Page break
Same as Character name.
For Slug, Title and Description, don’t make any changes yet. If you’ve done everything okay, this is what your template should look like:
Changing the fonts and line spacing
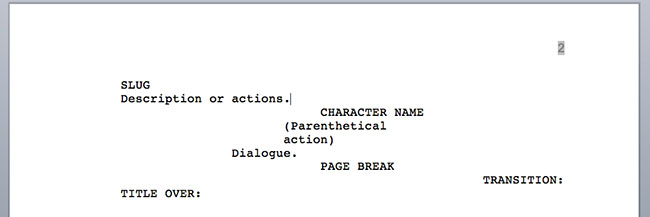
The next step is to make sure the fonts that are always in upper case be assigned that style.
Fonts
Choose Slug, Character name, Page break, Transitions and Title one by one, right click and select Font…. Check ‘All caps’. This is what it will look like:
Finally, we manipulate the line spacing so each element behaves the way it is supposed to.
Line Spacing
This part could have been done alongside indentation and alignment, but this way it is more foolproof for first timers. First, let’s understand how line spacing works in a screenplay:
Double spacing follows these elements, always:
- Slug
- Each paragraph of a description or action.
- Diagloue.
- Transition.
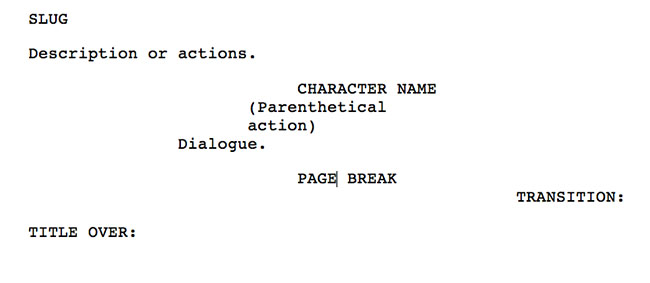
Why not add them in automatically? We can do that.
Select each of these elements one by one, right click and select Paragraph…. Change the Spacing, After to 12 pt. This is what it will look like:
There shouldn’t be a double spacing before the Page break. However, this only applies rarely to a screenplay, so you can just hit backspace when you need it. There are some writers who like to have two spaces prior to every slug. You can use the same method to change things up.
With this system, you don’t have to worry about line spaces before any element because it will follow automatically after another element.
Add Actions to your template
What are actions? Simply put, there are some rules that always hold true in a screenplay format:
- A slug or scene heading is always followed by action/description.
- The end of a transition is always a slug or scene heading.
- Dialogue is assumed after each character’s name, unless a parenthetical action is necessary. After every parenthetical there is always a dialogue.
- More likely than not a dialogue will be followed by another character’s name.
Software like Final Draft makes it easy to write because as soon as you finish one line of the above and hit ENTER the next line assumes the next logical step – saving you many keystrokes. To get the same benefits in Microsoft Word, you must try to create actions (term borrowed from Photoshop) that make it as easy as possible.
Let’s go in this order:
Description or action
Select/Highlight Description or actions in your template. Go to Format > Style > New…:
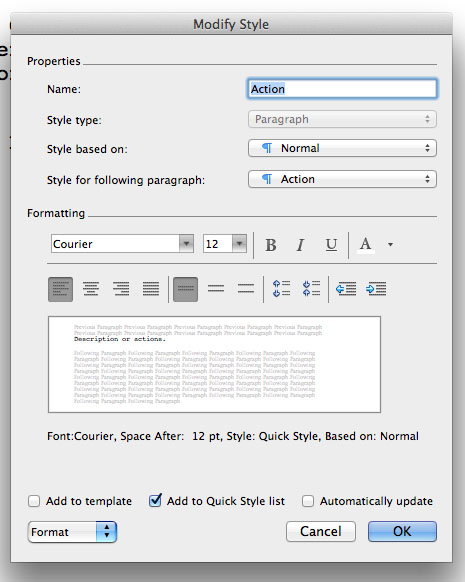
Name the style as ‘Action’. Click OK. Word will automatically assign the ‘Style for following paragraph’ to ‘Action’. To create a shortcut, click on the ‘Format’ drop down on the lower left:

Select Shortcut key…. You’ll get this box:

Alt is assigned to the menu and Shift is assigned to upper case letters. I recommend using CTRL+SHIFT+Number. E.g., for Action you could have CTRL+SHIFT+2. Click on Assign and then OK.
Slug
Highlight ‘Slug’ and repeat the above steps. In the New Style popup, name it ‘Slug’ and assign the ‘Style for following paragraph’ to ‘Action’. Click OK.
Set the shortcut as CTRL+SHIFT+1.
Transition
Same as above. In the New Style popup, name it ‘Transition’ and assign the ‘Style for following paragraph’ to ‘Slug’. Click OK.
Set the shortcut as CTRL+SHIFT+6.
Character name
Same as above. In the New Style popup, name it ‘CharacterName’. Click OK.
Set the shortcut as CTRL+SHIFT+3.
Dialogue
Same as above. In the New Style popup, name it ‘Dialogue’ and assign the ‘Style for following paragraph’ to ‘CharacterName’. Click OK.
Go back to the CharacterName style and assign the ‘Style for following paragraph’ to ‘Dialogue’. Click OK.
Set the shortcut as CTRL+SHIFT+5.
Parenthetical action
Same as above. In the New Style popup, name it ‘Paranthetical’ and assign the ‘Style for following paragraph’ to ‘Dialogue’. Click OK.
Set the shortcut as CTRL+SHIFT+4.
Title
Same as above. In the New Style popup, name it ‘TitleOver’ and assign the ‘Style for following paragraph’ to ‘Dialogue’. Click OK.
Set the shortcut as CTRL+SHIFT+7.
Now we have our styles. Page break has the exact same style as CharacterName so you can use that instead. Try playing around with the styles. It works!
Don’t forget to save your template!
If you’re having trouble with my shortcuts, feel free to choose your own. Keep it simple and repeatable so you only have to learn one set of movements and you’ll be doing it fast in no time.
Microsoft Word tells you whether your preferred shortcut is already in use for an important function or not. You can also save your shortcuts and styles to apply to all documents created in Word (but that isn’t a good idea if you’re using Word for other stuff as well).
There you have it, how to set up Microsoft Word to write a screenplay. Happy writing!