This guide covers the S-Log2 workflow as it pertains to the a7S and a7S II, shot in S-Gamut color mode. We will learn:
- How to expose for S-Log2
- How to monitor exposure in S-Log2 using nothing but the camera
- How to match shots and grade in S-Log2
- Two ‘correct’ ways to expose, and which I prefer and why
Important Note:
For a7S II users, there are two main differences from the a7S:
- The minimum ISO for S-Log2 is now 1600
- You have customizable Zebras for more precise control.
Nothing else changes.
With a camera like the a7S II and a7S, the exposure window is pretty narrow (that’s what separates it from a higher-end camera), so nailing exposure takes lots of practice and discipline.
But it’s not hard if you’re willing to put the time and effort into it. Secondly, you also need to either find time to get better at grading, or hire a colorist. If neither of these are possibilities, your results will suffer, and you’re better off shooting in another picture profile.
If you’re committed to getting the best dynamic range and cinematic image quality from the a7R II, then you might want to watch the following videos in the order they are presented. Please take notes and revisit videos if you have to. Give yourself time and be patient. Even if you don’t end up shooting S-Log2, the knowledge is beneficial.
Finally, practice and see how it turns out for you.
Start by watching these videos on how to use a waveform monitor, if you haven’t already:
https://youtu.be/G84SYddGPQs
What is S-Log2?
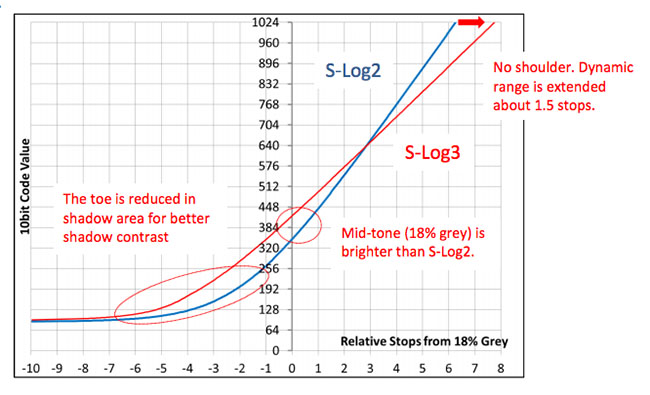
S-Log2 is a gamma curve that keeps the image flat for grading. Sony claims it has 1300% more dynamic range (15.3 stops of DR).
What the heck does that mean? You’ve probably heard of people using 18% middle grey to expose cameras. In S-Log2, the middle grey is at 32% (32 IRE). The ‘usual’ 90% white level is at 59% (59 IRE). So, guess where 100% white should fall? 1300%. In other words, Sony claims that the A7s can record about 13 times more data than Rec. 709.
The key word is ‘can’. Theoretically. However, practically, the dynamic range is limited by the gamut and noise characteristics of the sensor. Here’s a graph showing S-Log2 compared to S-Log3 (newer gamma found in the Sony a7S II/FS7/F5/F55/F65):
List of articles you need to read before watching the video
Before you watch the guide, or read about the wolfcrow system, please make sure we’re on the same page about the terminologies used. Otherwise it’s going to be tough viewing. Here are articles that will help you understand the terms as I define them:
- Full swing vs studio swing
- What is gamma?
- What is color space?
- What is color bit depth and a color model?
- What is middle grey?
- What is IRE?
- Driving Miss Digital – noise and signals
- What is a LUT?
- What is the zone system?
How to expose, monitor and grade S-Log2
Watch the entire thing if you can. It’s an hour long, but there was no faster way to explain how I arrived at the wolfcrow system. Here are some highlights, in case you feel like jumping ahead:
- 1:10 Two ways to expose for S-Log2! The ETTR system and the wolfcrow system
- 6:40 Problems with the ETTR system and why I don’t prefer it
- 8:00 Understanding the difference between RAW and S-Log2
- 11:00 Understanding S-Log2
- 13:50 How the Zebras in the Sony A7s works (a7S II users have more options here)
- 17:40 How to use the Zone system to test for the usable Dynamic Range
- 26:30 What is the real “middle grey” for the Sony A7s/a7S II?
- 29:18 How to expose for the best skin tones
- 32:12 The wolfcrow system of getting the right exposure with the Sony A7s/a7S II
- 36:00 How to use nothing but the in-camera Zebra and meter for your exposures
- 42:42 When and how to use LUTs
- 49:40 wolfcrow system condensed
- 52:50 How to grade S-Log2 footage from the Sony A7s/a7S II
Here’s the guide. Enjoy:
Errors and omissions for the above video:
In my article on full swing vs studio swing, I define full swing correctly, as between 0-1024; yet in the video, I use the term ‘full swing’ to mean full swing+super whites, which is incorrect. Please be aware of the difference, and it doesn’t mean anything in practical terms. In the video, when I say full swing, I’m always referring to full swing+super whites. This is the entire range from -7 to 109 IRE.
I mention in the article that 2+ stops is the least noisy, though evidently that is incorrect. It was a slip up. The least noisy is ETTR, and the wolfcrow system is the next best thing.
During the chart after the 11:00 mark, I show how a one stop overhead makes the dynamic range 12 stops. That is incorrect, and was a mistake I made while speeding up post. The 12 stops of usable dynamic range includes the overhead, all the way to 109 IRE.
Clarifications
2 stops over is the middle point. Following the Zone system analogy, it would be Zone V. Middle grey, then, will be at Zone III.
References
I did make some bold statements during the video, and here are the references for the same:
I say that Kodak film has a usable dynamic range of 12 stops. It is from a Kodakwhitepaper (motion.kodak.com): Exposing Film. Some gems from it:
Generally speaking, the latitude of KODAK Color Negative Film is about 10-12 stops.
To obtain the best exposure, err on the side of over-exposure to create a “bullet-proof” negative. It’s better to provide too much information on the negative than too little.
The entire analog image chain is designed to accommodate a normal exposure, normal processing, and normal printing. In fact, the system is nearly foolproof and endlessly forgiving when everything operates under normal parameters.
Cinematographers usually operate very close to that line of normalcy. Small adjustments … can produce interesting outcomes that provide precise and repeatable control over a great number of image parameters.
This is the foundation of the wolfcrow system.
Always attempt to get the best latitude, grain, color and sharpness from the stock you’re using. A properly exposed negative will optimize all these characteristics. Once you understand the film’s limits and capabilities, you can be more confident while making tough, on-the-spot shooting decisions. Occasionally, you will deviate from the normal exposure.
Consistent exposure minimizes dependence on the laboratory’s ability to compensate; as exposure correction always results in a trade-off in some area of image quality.
About S-Log2, I mentioned it was designed for DI workflows. This is from S-Log: A new LUT for digital production mastering and interchange applications, by Hugo Gaggioni, Patel Dhanendra, Jin Yamashita, N. Kawada, K. Endo and Curtis Clark:
S-Log is a gamma function applied to Sony’s electronic cinematography cameras, in a manner that digitally originated images can be post-processed with similar techniques as those employed for film originated materials.
Shooting in S-Log will enable the cinematographer to decide the exposure value by using a light meter.
CMOS imagers respond to incoming light in a far more linear fashion than film, thus there are no “toes” or “shoulders”.
When shooting in S-Log, as distinct from ITU-R BT.709 (Rec. 709) video gamma, a color grading process (‘look management’) is mandatory…
About the relation of S-Log2 to white balance, and why it affects grading and the creation of LUTs, refer to the Technical Summary for S-Gamut3.Cine/S-Log3 and S-Gamut/S-Log3, by Sony:
It [S-Log3] is more like a pure log encoding than S-Log2 to provide better log based grading.
S-Gamut needs color temperature setting to select color conversion matrix. S-Gamut3…does not depend on color temperature any more.
White point of S-Gamut is D65
S-Gamut is the color space when shooting S-Log2.
Mid exposure point or Zone V for the Sony a7S and a7S II in S-Log2 mode
As mentioned in the video, the mid exposure point, or Zone V, for S-Log2 is 2 stops over. In other words, what should be middle grey should be overexposed by 2 stops:
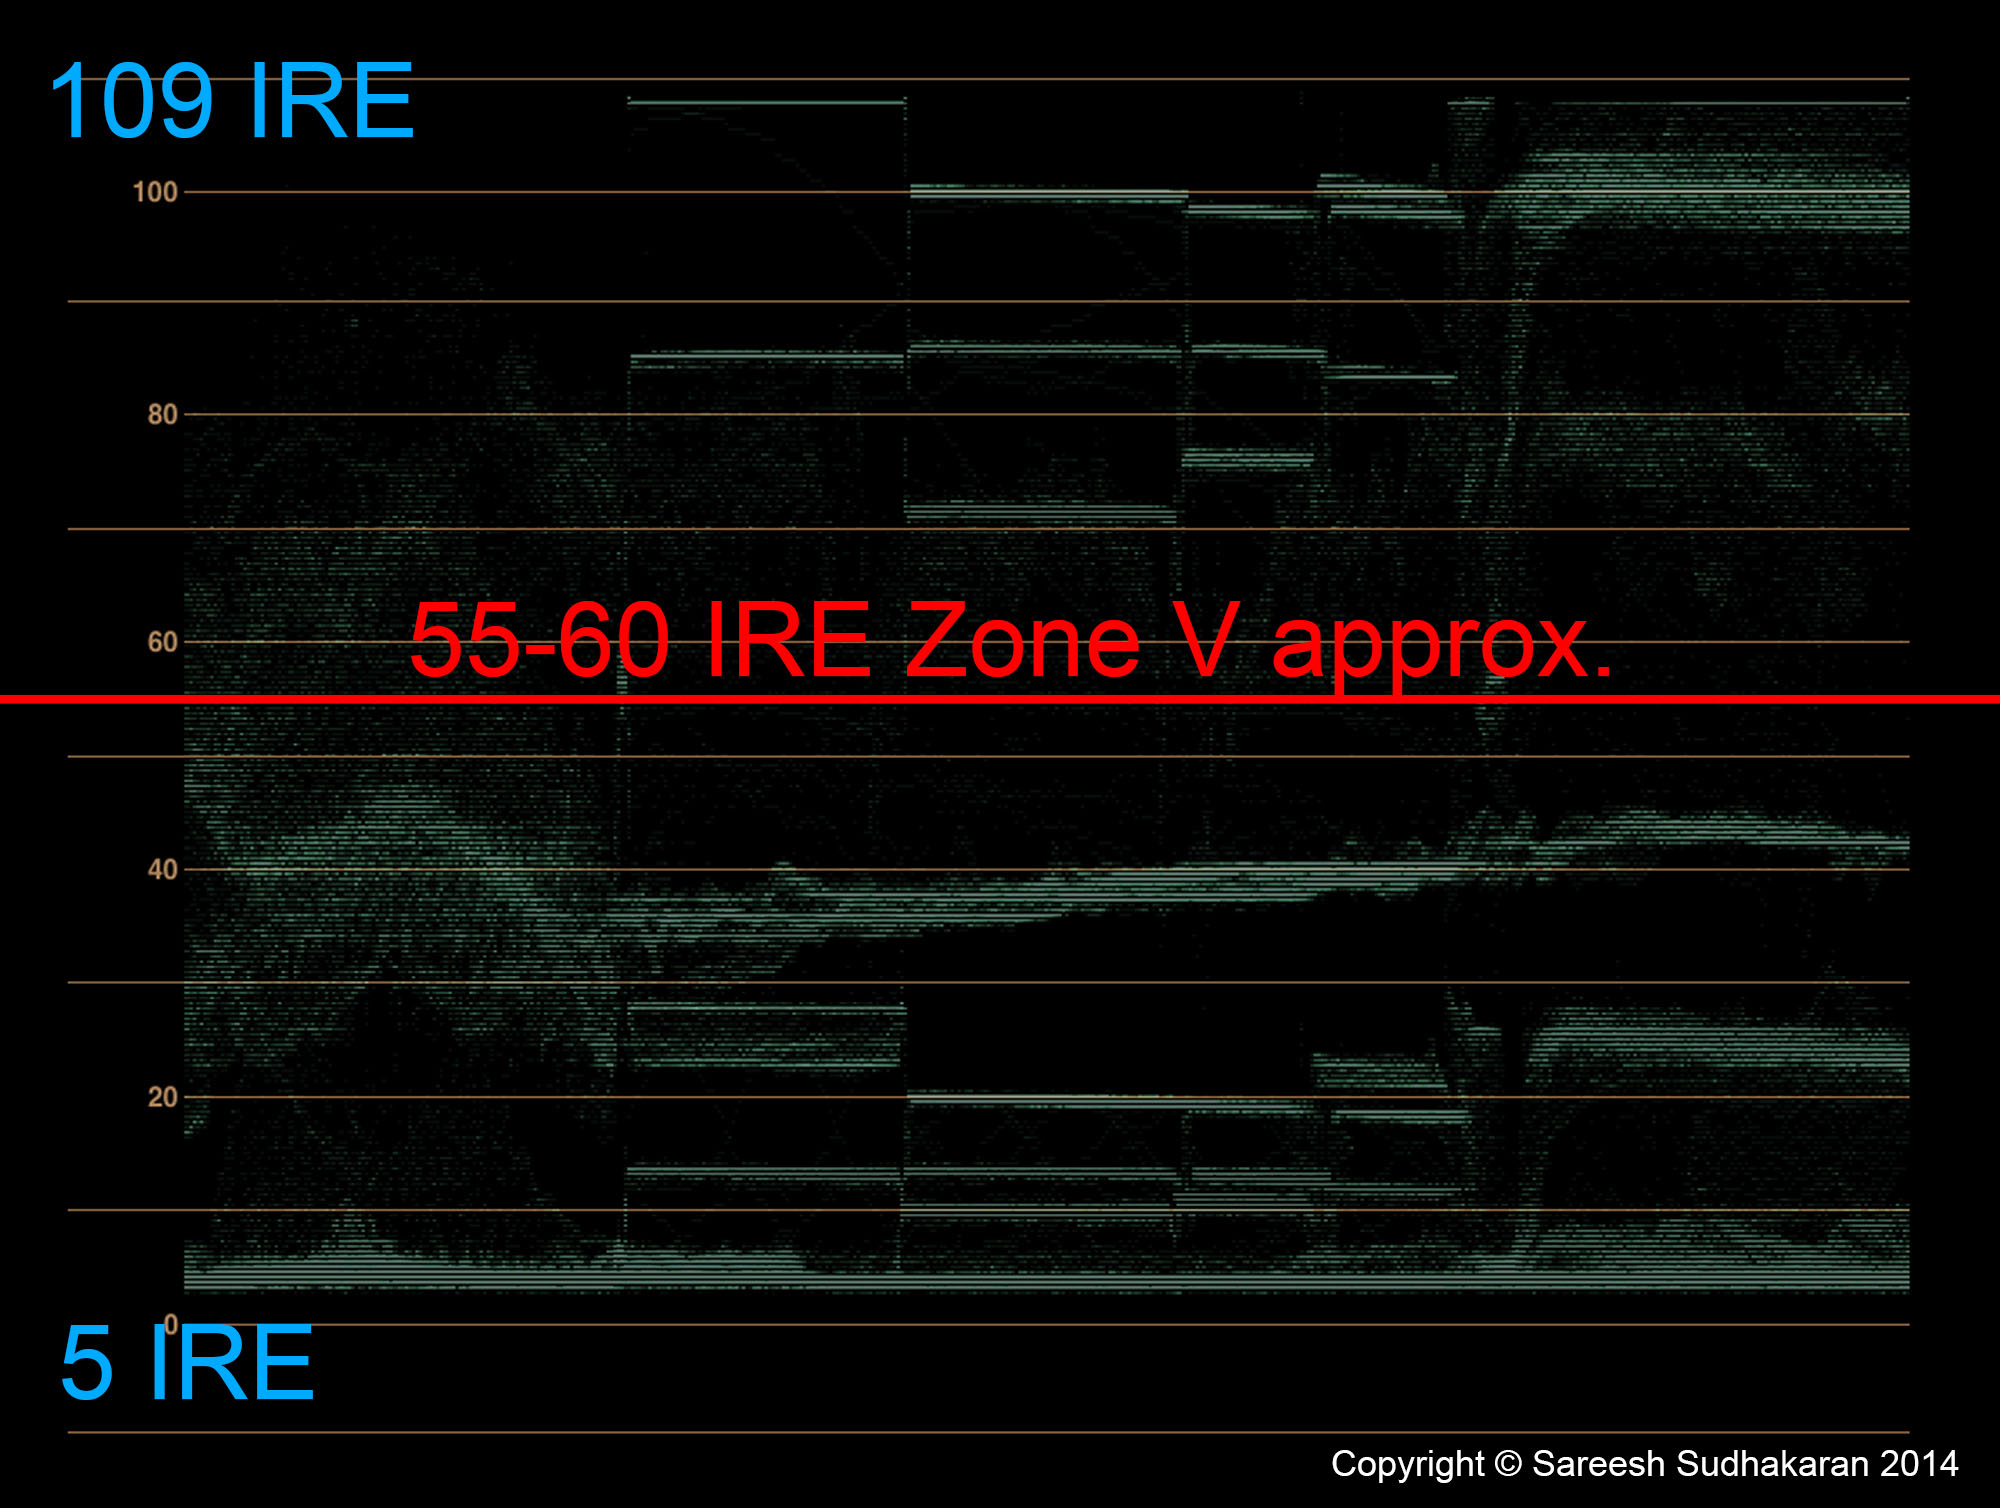
How to expose for best quality
Unfortunately, areas at the ‘defined’ middle-grey (32% IRE) still suffer from color noise (click to enlarge):

The lowest level that eliminates color noise is IRE 40. For this reason, it is suggested to expose at 3 to 3 and 1/3rd stops over middle grey. This is the wolfcrow system.
A practical example of using the wolfcrow system
Here’s a quick and simple practical demonstration of using the wolfcrow system with lighting:
Important notes:
- At one point I say lighting/contrast ratio is 2 stops, but it’s only 1.5 stops. However, that’s with a light meter. In the actual scopes, the difference is a full 2 stops because you can isolate the darkest and brightest portions. You can’t do that with a light meter.
- Ignore the color tint for this video. I shot with the a7S, though the newer cameras have gotten rid of the green color cast in S-Log2. I’ve tested each camera separately, and I have additional videos in my guide for each of them. There is no difference between them as far as exposure for S-Log2 is concerned.
- Shot at 3840×2160 Prores LT on an Atomos Shogun at 25 fps. White balanced to 2900K
If you’re not seeing any difference between 2 stops over and 3 stops over, here’s an image for you to study (red channel only, graded with raised levels in PS, click to enlarge):

Two points:
- 3 stops over is definitely cleaner in the shadow side (look at the ear). It might seem like we’re splitting hairs, but –
- Study the background. The background upper portion is 1 stop under key, and the lower portion is 2 stops under key. The noise is clearly and visibly greater at 2 stops over. This is the problem – you get okay results on the main subject, but if you have anything darker it will suffer. That’s why 3 stops over is better.
The wolfcrow system, in a nutshell
- The lower demarcation line for the a7S II, the point beyond which important objects, areas or details shouldn’t go below, is IRE 40. Unfortunately, without a waveform this is impossible to find.
- As long as you follow the above rule strictly you are free to expose your scene the way you want it.
- Custom white balance using the Movie Mode.
- The color mode for S-Log2 is ALWAYS S-Gamut. You can set the detail to -7 (the lowest, by default I believe). Nothing else needs to be changed.
- Due to the nature of light levels for video work you will most likely adopt an exposure of between 2 to 3 stops. There are certain simple scenarios where even 1 stop will do, but generally, you’re better off between 2 to 3 stops.
- Which one do you pick? 2 or 3 or 2.5 or what? Just go back to the first point again: IRE 40. As long as you can keep important stuff above that, and you’re happy with how the highlights roll off, you’re good to go. The key is, for the exact same scene, keep this value constant.
- To expose for 2.5-3 stops, let the Zebra appear with your IRE set at 70 (the lowest possible, which is basically anything from 60 to 70 IRE).
- To expose for 2-2.5 stops, let the Zebra appear with your IRE set at 70 (the lowest possible, which is basically anything from 60 to 70 IRE), and then reduce your exposure until the Zebra disappears. Don’t overdo it, a third of a stop or at most two thirds of a stop.
- If you don’t understand how to use the camera meter for exposure, watch this lesson.
Can it be any simpler? No it cannot. Here’s a quick infographic from the video that shows all this in a nutshell:

The wolfcrow system vs ETTR
Finally, here’s a quick comparison chart between the two exposure methods. Both ETTR and the wolfcrow system are valid methods, though I prefer the wolfcrow system:
| Advantages | Disadvantages | |
| Exposing to the Right (ETTR) | Least amount of noise possible | Can’t really expose using Zebras or the histogram, need a waveform monitor. 100+ zebra isn’t really ETTR.Color grading is extremely hard, and ETTR for RAW does not work the same way as ETTR for S-Log2. |
| The Wolfcrow System | Combines the advantage of ETTR (zero color noise) while maintaining maximum tonality and texture – the fundamental concepts of the zone system. Provides a consistent Zone V point for easy color grading in post production – something that is mandatory with S-Log2. One can use the in-camera meter and/or zebra to expose, without needing any external tools. DPs can calibrate their light meters to a consistent level. You can light by eye! | Due to inaccuracies in testing, zebras, meters, etc., individual operators must start experimenting with the Wolfcrow system and find their optimal exposure point. This is exactly how a DP would learn to use film. There is still a lot of subjectivity in exposure, which no system can cure.One must always have an eye on clipping highlights, though that is the case for any exposure! |
FAQs
These are important topics raised by subscribers that shed more light on this lesson.
Q. How do you use zebras under the wolfcrow system?
A. I keep my zebras at 70 IRE (For a7S II users, you can customize the Zebra to 65 +/- 5) so I can see if my main subject is at the right exposure. Then, if I have time, I also go to 100+ IRE (For a7S II users, you can customize the second Zebra to 105+) Zebra to see which parts are at risk of blowing out. This is a little tricky, because the camera shows everything above 100 IRE under zebra stripes, and we might freak out. But let’s not forget there’s a stop or more of latitude between 100 IRE and 109 IRE, which is the maximum the A7s is capable of in S-Log2 mode.
Note to a7S II users: You can use the customizable Zebras for a more precise calibration, but the general rules apply.
Q. Is it a good idea to tweak the S-Log2 profile?
A. I don’t think so. Sony has given us a very small window with S-Log2 (which is not similar to the S-Log2 on the F5/F55) and S-Gamut (the a7s and a7S II sensor is truly special, and has its own gamut). I believe Sony engineers have come up with a gamma curve that takes best advantage of the sensors abilities.
It would take a large amount of study to find any flaws or improvements, and there would be no point eventually. I use the S-Log2 profile in its default state. Zero tweaking.
Q. How do you expose 3 stops over? The camera meter only goes up to 2 stops!
A. Overexpose until the camera meter reads 2 stops (+2.0). Then turn the ISO or aperture dials to one stop over. E.g., if your ISO is at 3200 and you’re 2 stops over, turn the ISO to 6400, and the meter will start blinking, but it’s 3 stops over now.
If you don’t want to change the ISO, and let’s say it’s at 12800 and you don’t want to increase it, but your aperture is at f/2.8 when the meter is at +2.0. Then open up the aperture to f/2 and it’s 3 stops over now.
Or just use the Zebra, as I’ve explained!
Q. Can we use the “official’ Sony S-Log2 LUT for the A7s and a7S II?
A. S-Log2/S-Gamut on the A7s/a7S II is not the same as S-Log2/S-gamut on Sony’s other cameras. Sony states this quite clearly:
http://helpguide.sony.net/ilc/1420/v1/en/contents/TP0000435736.html?search=knee
This means the official S-Log2 LUT must not be used with A7s/a7S II S-Log2 footage. There is no official LUT for the A7s/a7S II.
Q. Can you explain how you go about using the wolfcrow system, the actual steps?
A. I’ll break this down into two sections:
What I do before the shot
I always start by locking my f-stop. Interiors, it’s at f/2.8 most of the time, sometimes f/4. The shutter is also locked to 1/50, only to be touched if my career is at stake.
This means, I’m left with the ISO dial. I try to stay between 3200 and 12800. If I have to go about 12800, then I know I have a lighting problem.
When shooting video, my Mode dial is on Movie. I don’t grab stills, as the motion blur really ruins it for me. When outputting 4K, it has to be in Movie mode. If I want to shoot stills, I have that set to my Memory bank, just a turn of the dial and back, and I’m done.
My S-Log2 is at its default setting (PP7). That’s how I like it.
What I do on set
I custom white balance first – it’s not possible in Manual Exposure mode so we have to jump through Sony’s hoops. Here’s how I WB.
One should not auto white balance in S-Log2 mode. I’ve got picture profiles on my Fn button so I dial it off first. Then move to M, take a still of either a white or grey card – there’s no need to zoom in because only the center circle (spot meter circle, because I’m always on spot meter) is read and needs to be within the card. Once that’s saved I go back to Movie mode and choose the preset if not done automatically.
I look at the scene on the LCD and/or Shogun. I turn on the Zebras (it’s also on my Fn for easy access) and set it to 70 as per the wolfcrow system. On the Shogun I turn on the 105 zebras so I don’t have to waste time cycling between them.
If I’m shooting a face, that’s where I’m looking for zebras. Now this is not easy to do when starting out, because a face or object is rarely flatly lit like a chart. That’s where the wolfcrow system video-section about skin tones and 40 IRE come into play. Also, different DPs expose for skin differently. Some like to underexpose. I like to overexpose skin by a stop, and if my lighting ratio is 2:1 (two stops difference) then in my head I go through these calculations:
- The skin needs to be overexposed by a stop
- The wolfcrow system places middle grey at 70 IRE, so this means, the skin should be at 76.6 or 80 IRE
- I turn the Zebra to 80 IRE. Is the lit side plastered with zebras? Then I’m good. Otherwise, I need to either turn my ISO dial or add light.
- The dark side of the face is two stops lower, so it will be at 50 IRE, which is perfect. If it falls below 40 IRE, I must bounce fill.
My face is exactly where it needs to be.
Now, I look at the 105 IRE on the Shogun (or just dial it on the A7s)/a7S II. This is an anxious moment. If I have windows or clothes blowing out, then I let out a huge sigh. Time to make a decision.
Something must give. What? I turn off the zebras and study the image as-is. Are the highlights blowing out gracefully? Am I getting the mood and feel I want? If yes, then I shoot.
If no (the more likely scenario), then I ask myself:
- Can I use a graduated ND to bring down those areas (this works a lot of the time)?
- Can I flag those portions (doesn’t work for windows)?
- Can I throw light on the face and use an ND over the lens, or gel the windows, or any of the hundreds of things a cinematographer can do?
If no to all of the above, which is what we all find ourselves in shooting run-and-gun stuff, then I must lower my levels. I lower my ISO until the blown out region falls under the 105 IRE zone. If I’m shooting S-Log2, then the ISO won’t go below 3200, so I’ll have to use an ND filter (I won’t touch my aperture, it’s sacrosanct). If there’s no time to grab an ND filter, then I use the shutter.
Either way, now I know by how much I have to reduce the overall exposure. By now the skin might be at 50 IRE or 40 IRE or worse. Either I throw some light on it, or ‘expose normally’ and live with the color noise.
Which is more important? The window or the subject? In my mind the subject is always the most important.
All this hardly takes me a minute, most of the time just a few seconds. Now with the waveform on the Shogun, I really don’t need the 105 IRE setting anymore. I still keep the 70 IRE on the A7s/a7S II just to have a clearer idea of what I’m doing. I don’t like looking at zebras because it distracts me from the shot, but without an external monitor, there’s no other tool on the A7s/a7S II that tells you the right exposure.
Also, the LCD on the A7s/a7S II cannot be trusted for video. An external monitor is better, though if you’re shooting S-Log2 they are also useless where superwhites are concerned. The color space is S-Gamut, and no Rec. 709 monitor can show that. The only tool that will allow you to be sure about highlights is the waveform monitor.
The A7s/a7S II blows out gracefully, and that’s all that matters to me. Once you conduct a few tests of your own you’ll learn to understand the way it works in the highlights. It will inspire more confidence in the camera’s ability to handle highlights gracefully in S-Log2. That’s how DPs learnt to light film and understand its limits, except we can do it much faster with a monitor and waveform. In fact, it’ll just take a few hours.
As explained in the video, ETTR is murder for color grading due to varying exposure and noise levels, and the histogram should not be used for video. The levels on the histogram don’t correspond to video levels.
The wolfcrow system allows a DP to keep exposure constant (a big deal in cinematography) and noise levels constant (a big deal for grading, VFX, chroma keying, and compression) from shot to shot. It allows a DP to shoot as in the film days, by understanding exposure and being able to dictate it. You can’t light for ETTR without wasting loads of time. You can’t use ETTR when you have specular highlights and superbright regions. If one is always worrying about the highlights one’s subject will be inconsistently exposed.
The wolfcrow system also allows a DIT to create a 3D LUT for a scene that will look consistent on set from shot to shot. This LUT can be used by a colorist across the entire scene in one go as reference. An ETTR setup would require a separate 3D LUT for every shot, as documented by Sony in their S-Log2 whitepaper.
Finally, it allows the colorist to match shots faster with more accuracy in post processing, even using the shot matching feature found on the Avid. In conclusion, the only way to keep a workflow fast with quick turnaround times is to be consistent with exposure and white balance. That’s all the wolfcrow system does – it asks for exposing at 3+ to keep the noise levels down, while giving you enough latitude to reign in those highlights and still give you all the advantages of ETTR without the post processing hassles.
There are some situations where +3 is unworkable, so a DP can choose to be at +2 or +1 even, as long as that number is consistent from shot to shot. Of course, it introduces color noise, but that’s the limitation of the Sony A7s/a7S II and its specific S-Log2/S-Gamut system. Every camera has such limitations.
There’s a reason why the Alexa or Epic doesn’t offer ETTR, nor do you see many real cinematographers asking for it, nor is it a big part of ACES; and neither is it recommended by any of the EBU documents on exposure.
Q. Can you explain how to use the wolfcrow system for moonlight or dark night scenes?
A. Are there going to be any highlights (moon, torches, fire, etc.) in the shot? If no, then you can actually go much higher than +3 as long as you don’t clip, and you remain consistent across all shots. This is important so you have the least noise in the shadows.
It is critical to maintain exposure across shots so you can cut them together and grade them easily. This will also help you match noise levels from shot to shot.
First, find the most important thing in the shot. If it’s the actor’s face, then that needs to be at the wolfcrow spot (+3, +3.5, +4 whatever, the higher the better, but it must stay consistent or the noise levels won’t match later).
Then, figure out if you want the background to be entirely visible with sufficient detail. If you’re stopping down, there will be fine detail, if not, there will just be texture. Is this texture important to you? If yes, then this ‘darkest region that is still important to you’ must be above 40 IRE.
Or above +0.5 stops on the spot meter. How do you translate this? As a starting point, real moonlight is about 1 lux, or about f/1.4 at ISO 20,000. That’s pretty dark. To be at +0.5 you’ll need about ISO 32,000 at f/1.4. Assuming shutter is at 1/50. The correct mathematical number is ISO 30,000 but we’re erring on the side of caution.
Your actor should then be lit for +3 or 70 IRE. On a meter the lit side will read f/2.8 to f/3.5, but under f/4.
Next up, turn the zebra to 80, 90, 100 and 105 IRE. Pay attention at 100 and especially at 105. If nothing blows out at those levels you still have a couple of stops of headroom on top, and you could push the wolfcrow system to +4 or even +5 if the scene allows.
So, you ‘lock’ two things:
- The lower level (above 40 IRE)
- The skin exposure (+3 or whatever, but it stays locked for all shots)
However, if you have a large expanses of darkness, with little texture. E.g., dark clear skies or snow, where noise will be very apparent, then lock on the 40 IRE point and let the skin vary a bit. It’s okay, it will look natural as the subject turns this way and that. The dark expanse will not distract the viewer from shot to shot when noise levels change. If you lock it to 40 IRE, the noise levels will remain constant from shot to shot. If you don’t have this, but have forests, then it doesn’t matter, and you should lock the face.
If you do this right, you’ll be blessed with two things:
- When you bring everything down in grading, you’ll have beautiful tonal detail and texture throughout the image. It will look rich.
- The noise levels will be way low (we’re shooting at ISO 30K so there will be noise, and overexposing allows us to crush noise later), but whatever noise remains will look organic.
Please use my numbers only as a starting point. There could be tons of variations. I can only advise you to not wait till the day of the shoot, and test the scene immediately.
If you have lights in the scene, here’s what I would do (using the spot meter on the A7s/a7S II or a dedicated light meter):
- Somewhere outdoors, meter the background (doesn’t matter what it is) and the actors’ skin, and note down the exposures.
- If you have fire, light it up and meter that. Also meter the ground near the fire.
- Then, switch on the lights and meter its effect on the background and actors. Note everything down.
Now you have a lighting ratio map of each of these elements in relation to the other. This relation does not change whether you’re shooting film or Rec. 709 or S-Log2.
Then try to figure out if the lights are powerful enough to get the background to your desired level. Don’t just peg it at 40 IRE. It is entirely possible that the ground looks great two stops below the main subject, so it would be at 50 IRE in that case. Don’t start looking at IRE until you’ve understood your lighting ratios first!
Test the lighting fixtures at the distance you plan to have it and you’ll know. E.g., my Yonguo YN900 panel meters at f/18 at ISO 3200 at 10 feet. The further the light, the more even the illumination across the scene and it will look natural, but LEDs are not powerful enough for that kind of distance. If you bring it too close, the fall off will be too rapid, and the scene will look ‘lit’. Try to get this right before shoot day.
Does anything blow out the background when pointed at it? If yes, then tape/scrim it or use a smaller fixture. Even if you have to reduce exposure to keep anything from blowing out, try not to get the background below 30 IRE.